
- Introduction to SureContact Dashboard
- How to Install and Connect the SureContact WordPress Plugin
- What Do Contact Fields Mean in the SureContact WordPress Plugin
- How to Invite Members to a Workspace in SureContact
- How to Switch Organizations in SureContact
- Workspace-Level Contact Allocation in SureContact
- Workspace-Level Timezone Settings in SureContact
- How to Add a Custom Tracking Domain in a Workspace in SureContact
- SureContact MCP Server
- Creating Forms in SureContact
- Setup SMTP in SureContact
- Email Campaigns in SureContact
- How to Add a Preferences URL in Your Emails
- How to Share Email Templates in SureContact
- Spintax Feature in SureContact
- Deleting Sent Campaigns in SureContact
- A/B Testing Integration Guide
- Unsubscription Guide
- SureContact SMTP Setup Guide
- SMTP Routing User Flow
- FluentCRM Integration with SureContact
- SureContact Third-Party Integration — Step-by-Step Guide
- Fluent Forms Integration with SureContact
- SureForms Integration with SureContact
- WPForms Integration with SureContact
- Bulk Sync WordPress Users to SureContact
- Contact Form 7 Integration with SureContact
- Sync WooCommerce Customers with SureContact
- FluentCart & FluentCommunity Integration With SureContact
SureContact Automation Management Guide
SureContact Automations allow you to build powerful, trigger-based workflows that automatically enroll contacts, send emails, and run actions. This guide explains how to pause, resume, and delete automations, both at the automation level and for individual contact executions.
Understanding Automation Statuses
Every automation has one of three statuses:
| Status | Meaning | New Triggers? |
| Draft | Created but never activated – not live | No |
| Active | Running – accepting triggers and enrolling contacts | Yes |
| Inactive | Paused – not accepting new triggers or enrollments | No |
Automations Overview
Navigate to Automations in the left sidebar, then select Workflows to view all your automations.
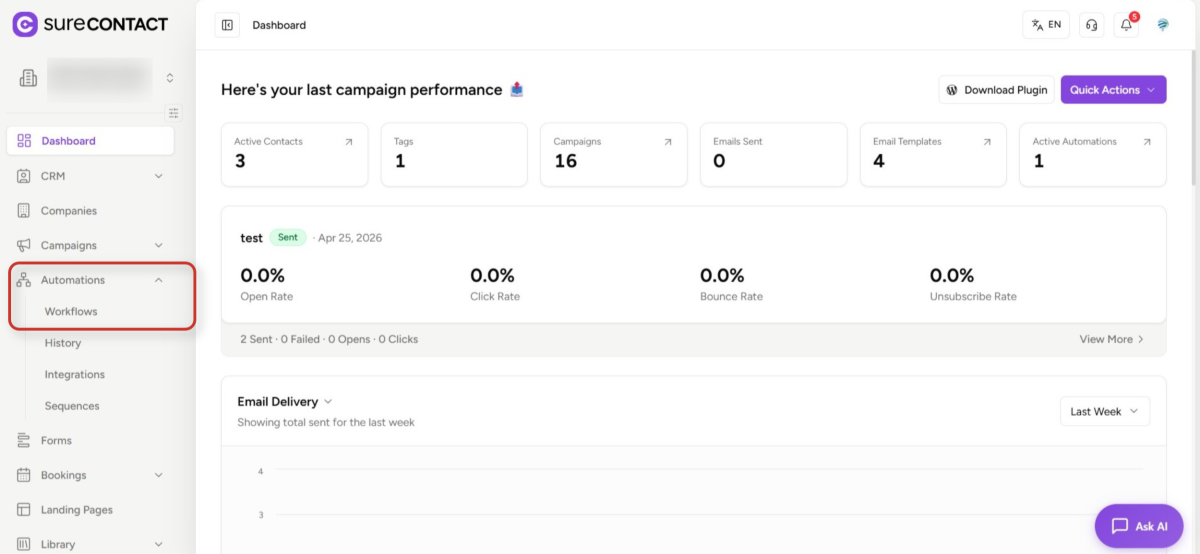
The list shows the name, current status toggle, execution count, and action buttons.
Pausing an Automation
What Pausing Does
Pausing an automation sets it to Inactive. Once paused:
- No new contacts will be triggered into the automation
- No new enrollments happen
- Contacts already in progress continue – their active steps are not interrupted
- The automation can be resumed at any time
Note: Pausing affects the automation as a whole, not individual contacts already inside it.
Steps to Pause an Automation
1. Go to Automations from the left sidebar
- Click Automations in the left navigation, then select Workflows
2. Find the automation you want to pause
- Locate the active automation in your list – it will show a purple (on) toggle in the Status column
3. Click the Status toggle
- Click the purple toggle next to the automation name to switch it to Inactive
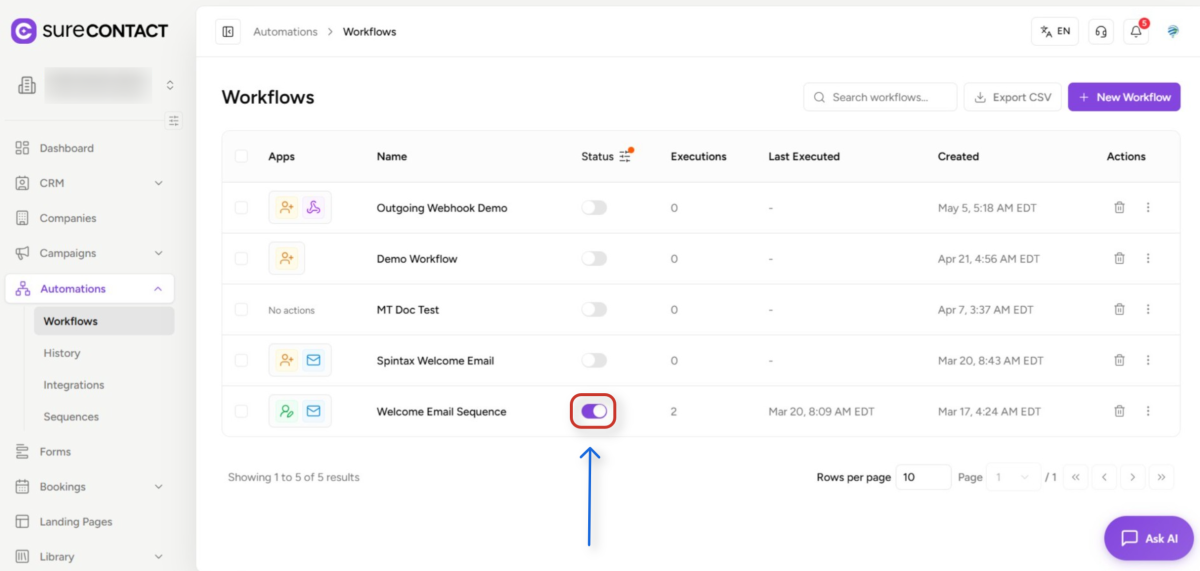
- The toggle will turn grey, indicating the automation is now paused
Note: You cannot pause a Draft automation – it was never active to begin with.
Resuming (Activating) an Automation
What Resuming Does
Resuming sets the automation back to Active. Once resumed:
- New triggers start firing again
- New contacts can be enrolled
- For Sequences: contacts who were cancelled due to the automation being paused are automatically re-enrolled
- Any newly added steps become active for eligible contacts
Steps to Resume an Automation
1. Go to Automations from the left sidebar
- Navigate to Automations > Workflows
2. Locate the paused (Inactive) automation
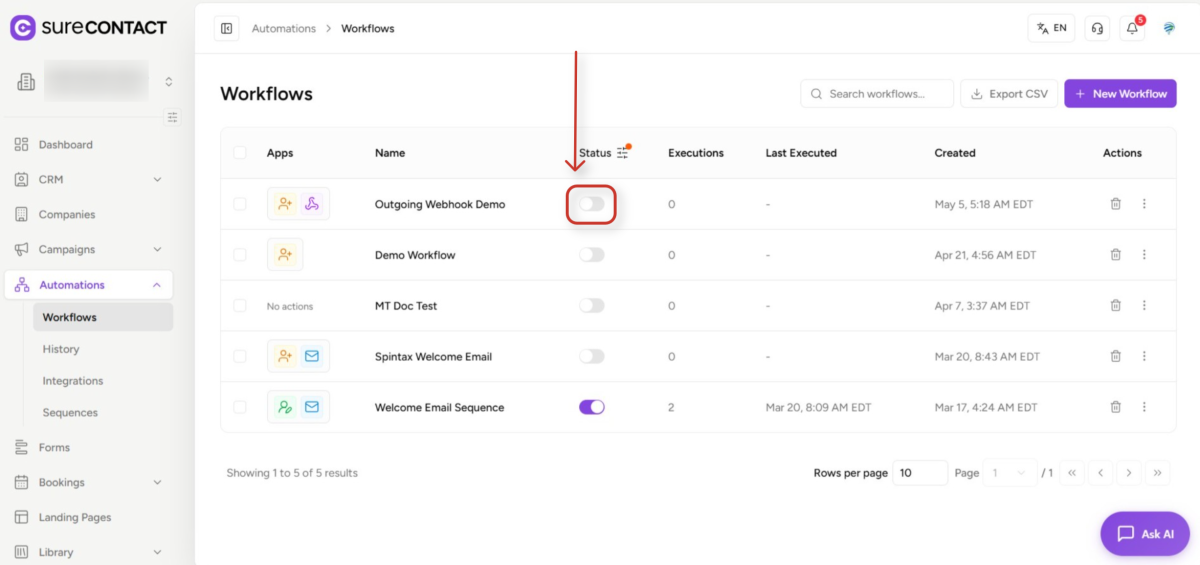
- Paused automations show a grey toggle in the Status column
3. Click the Status toggle
- Click the grey toggle to switch it back to Active (purple)
Requirements Before You Can Activate
The automation must have:
- At least one trigger configured
- At least one action configured
- For email sequences: valid email steps set up
If any of these are missing, activation will be blocked with a validation message.
Additional Actions via the Three-Dot Menu
Each automation row has a three-dot menu (vertical ellipsis) in the Actions column. Click it to access the following options:
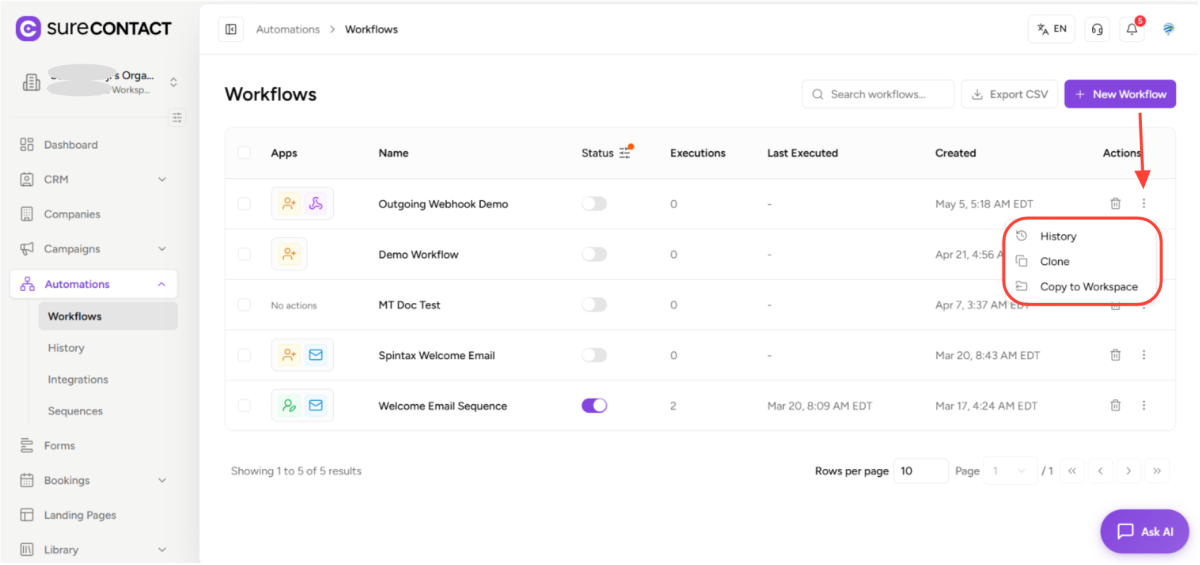
- History – view the execution history for that specific automation
- Clone – create a duplicate of the automation
- Copy to Workspace – copy the automation to another workspace
Deleting an Automation
What Deleting Does
Deleting an automation removes it from your active list. Key points:
- It is a soft delete – the automation and its history are preserved in the background for auditing
- No new triggers will fire after deletion
- Execution history is kept – past contact data and logs remain accessible
- The delete cannot be undone from the UI
Contacts who were actively progressing through the automation at the time of deletion are not automatically stopped; their records are preserved, but no further steps will execute.
Steps to Delete a Single Automation
1. Go to Automations > Workflows
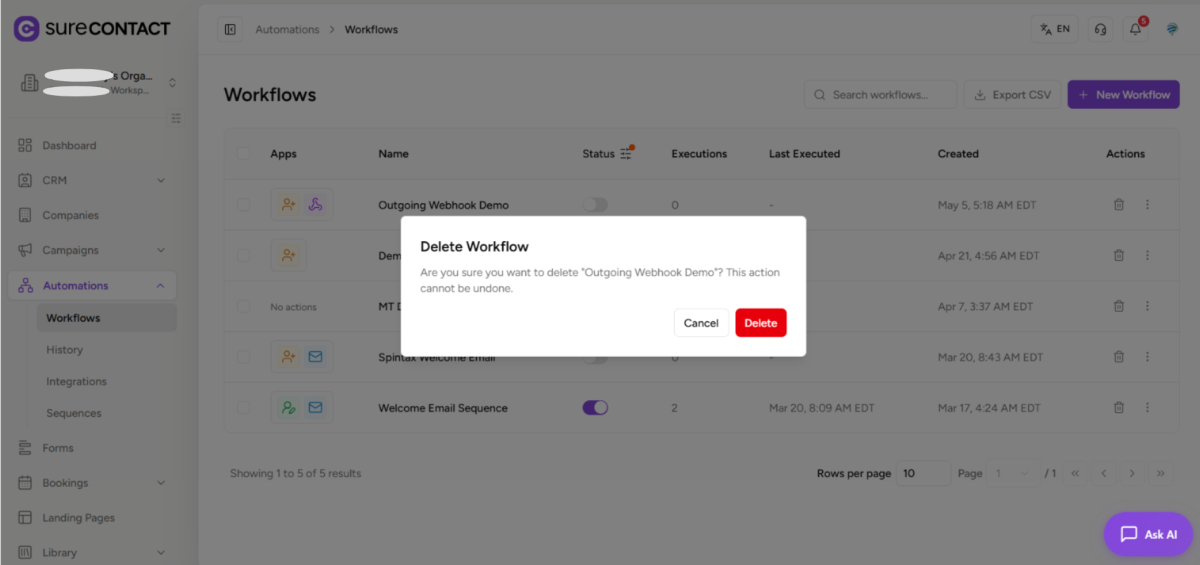
2. Click the trash icon next to the automation
- The trash icon appears in the Actions column on the right side of each row
3. Confirm the deletion
- A confirmation dialog will appear asking you to confirm
- Click Delete to permanently remove the automation, or Cancel to go back
Bulk Deleting Automations
You can delete multiple automations at once using the bulk select feature.
Steps to Bulk Delete Automations
1. Go to Automations > Workflows
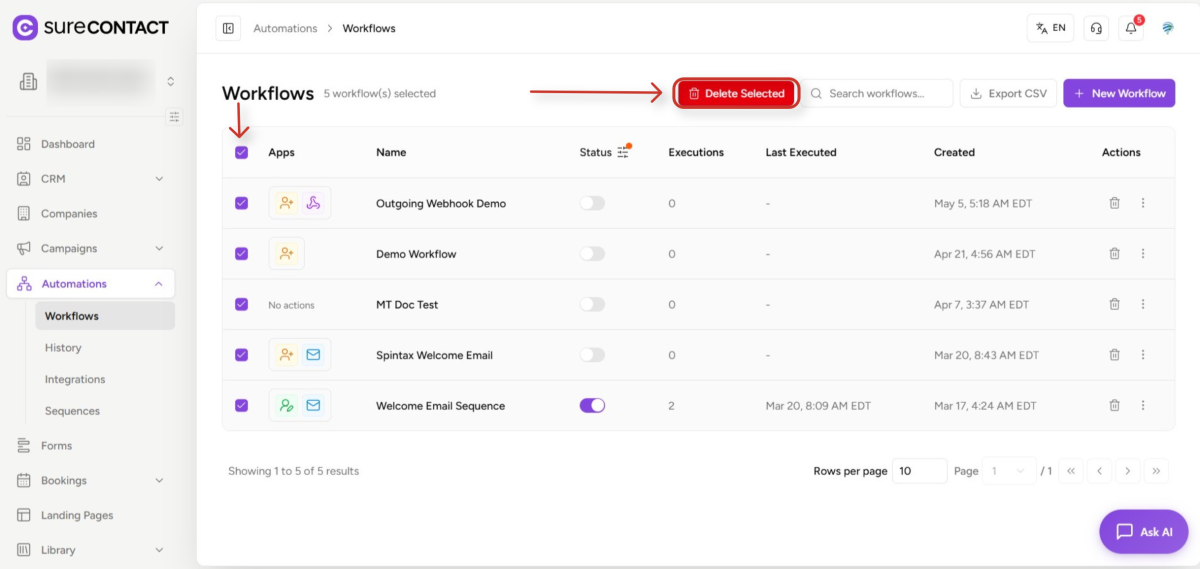
2. Select automations using the checkboxes
- Click the checkbox on the left side of each automation row you want to delete
- To select all automations at once, click the checkbox in the header row
3. Click the Delete Selected button
- Once one or more automations are selected, a red Delete Selected button appears in the header area
- Click Delete Selected to delete all selected automations
4. Confirm the bulk deletion
- Confirm the action in the dialog that appears
- All selected automations are deleted in a single batch operation
Pausing an Individual Contact’s Execution
Beyond pausing the whole automation, you can pause a specific contact’s progression individually from the Execution History.
What This Does
- Pauses that contact’s progression at their current step
- Other contacts in the same automation are completely unaffected
- The automation itself stays Active – it continues enrolling new contacts
Resuming a Single Contact’s Execution
To resume a paused individual execution:
- In the History page, find the paused execution
- Click Resume in the Actions column
- The contact continues from the exact step they were paused at, they do not restart from the beginning
Quick Reference
| Action | Effect on New Triggers | Effect on In-Progress Contacts | Reversible? |
| Pause (Inactive) | Stopped | Continue as-is | Yes – Resume anytime |
| Resume (Active) | Restart | New contacts enroll; sequences re-enroll cancelled contacts | Yes – Pause anytime |
| Pause single execution | No change | That contact pauses at current step | Yes – Resume that execution |
| Resume single execution | No change | Continues from exact paused step | – |
| Delete | Stopped permanently | Preserved in history, no further steps | No (soft delete, UI restore unavailable) |
Key Differences: Sequences vs. Workflows
| Feature | Sequences | Workflows |
| Contact tracking | Step-by-step subscriber records | Node-based execution path |
| On resume after pause | Cancelled subscribers are re-enrolled automatically | Executions continue from last completed node |
| Re-enrollment | Configurable (Allow Re-enrollment setting) | Can trigger multiple times by nature |
Need Help?
If you need any assistance, please email [email protected], and our support team will be happy to help you.
We don't respond to the article feedback, we use it to improve our support content.