
- Introduction to SureContact Dashboard
- How to Install and Connect the SureContact WordPress Plugin
- What Do Contact Fields Mean in the SureContact WordPress Plugin
- How to Invite Members to a Workspace in SureContact
- How to Switch Organizations in SureContact
- Workspace-Level Contact Allocation in SureContact
- Workspace-Level Timezone Settings in SureContact
- How to Add a Custom Tracking Domain in a Workspace in SureContact
- SureContact MCP Server
- Creating Forms in SureContact
- Setup SMTP in SureContact
- Email Campaigns in SureContact
- How to Add a Preferences URL in Your Emails
- How to Share Email Templates in SureContact
- Spintax Feature in SureContact
- Deleting Sent Campaigns in SureContact
- A/B Testing Integration Guide
- Unsubscription Guide
- SureContact SMTP Setup Guide
- SMTP Routing User Flow
- Gradual Send Feature Guide
- Reusable Email Templates Guide
- Conditional Blocks Guide
- Scheduling vs. Sending Immediately Emails in SureContact
- Campaign Analytics Guide
- Email Tracking Opens Clicks SureContact
- SureContact Email Template Library Guide
- Sending Domains Subdomain vs Root Domain Guide
- DMARC Setup Guide
- Warming Up a New Sending Domain
- How to Add an Unsubscribe Link in Your Emails
- Analyzing a Campaign with AI (Spam & Ethics Check)
- FluentCRM Integration with SureContact
- SureContact Third-Party Integration — Step-by-Step Guide
- Fluent Forms Integration with SureContact
- SureForms Integration with SureContact
- WPForms Integration with SureContact
- Bulk Sync WordPress Users to SureContact
- Contact Form 7 Integration with SureContact
- Sync WooCommerce Customers with SureContact
Reusable Email Templates Guide
SureContact Email Templates are pre-built email designs you can save and reuse across campaigns, automations, sequences, and direct emails, without rebuilding from scratch each time. They support personalization via merge tags, conditional logic, and all four creation methods: Drag & Drop, Rich Text, Explore Library, and Import HTML.
This guide walks through the complete workflow for creating, designing, personalizing, previewing, saving, and managing Email Templates in SureContact.
Prerequisites
Before creating Email Templates, please ensure the following:
1. You Have a SureContact Account with Workspace Access
Log in at surecontact.com with an account that has access to the Campaigns section. Email Templates are stored per workspace.
2. Your Workspace Has an Active Email Sender (SMTP) Configured
To use templates in live campaigns or automations, your workspace needs a connected SMTP or sending domain. Go to Campaigns → SMTP to configure this before sending.
How to Create and Use Email Templates
1. Navigate to Email Templates
- From the left sidebar, click Campaigns to expand it.
- Click Email Templates under the Campaigns section.
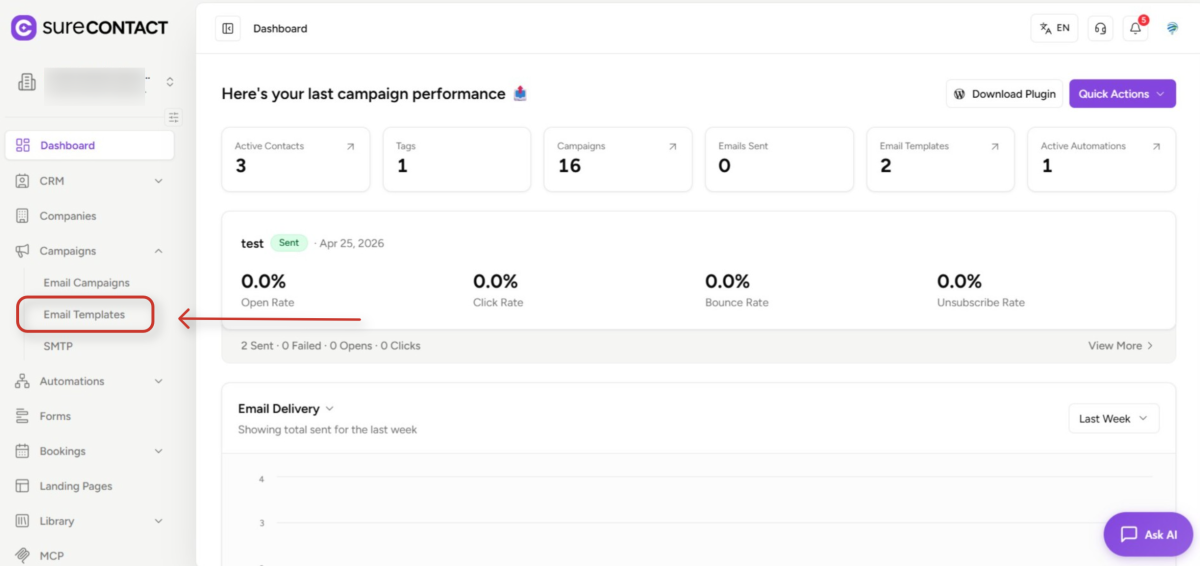
- You will see a list of all saved templates with search and filter options.
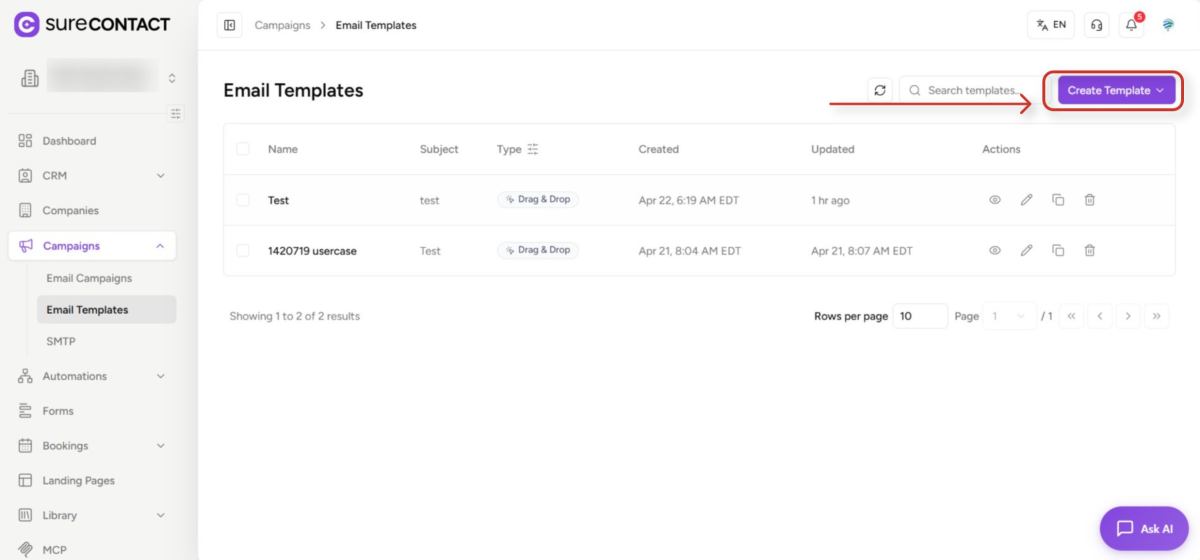
2. Create a New Template
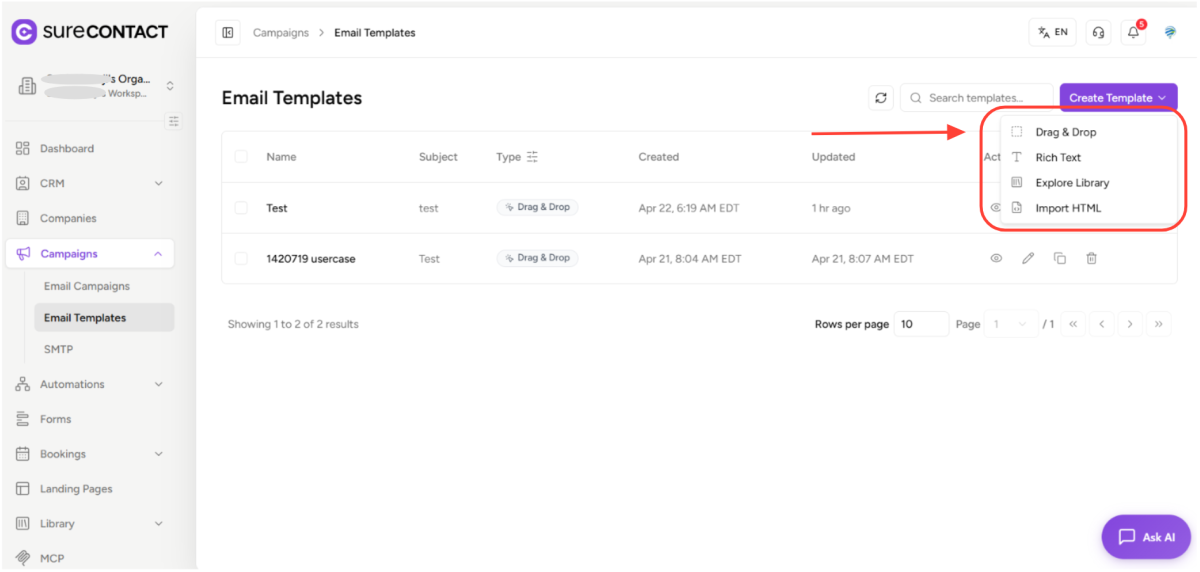
Click the Create Template button in the top-right corner. A dropdown menu appears with four creation methods:
- Drag & Drop – Visual design with blocks, columns, images, buttons, and more. The builder saves your layout as a re-editable design structure.
- Rich Text – A simple text editor for plain, formatted emails.
- Explore Library – Browse professionally designed templates to use as a starting point.
- Import HTML – Paste or upload a custom .html file. SureContact extracts the subject from the <title> tag automatically.
3. Fill in Template Details
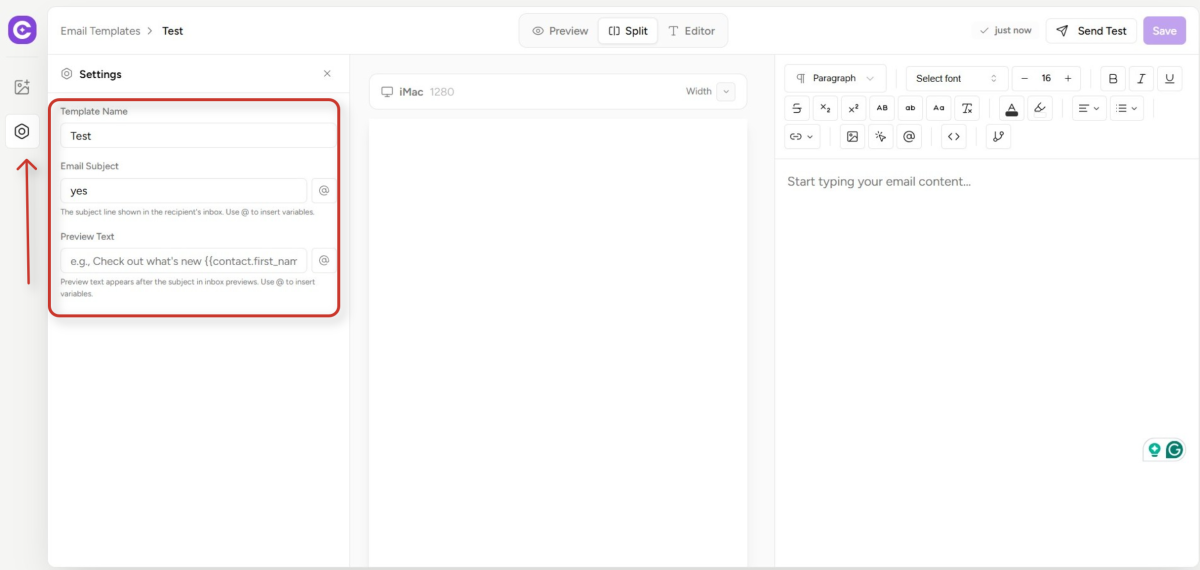
After the editor opens, click the Settings icon (hexagon) in the left icon bar, then click Go to Settings to open the Name & Subject panel. Every template requires these three core fields:
- Template Name – Internal label visible only to your team (not to contacts).
- Email Subject – The subject line shown in the recipient’s inbox. Supports merge tags and conditionals. Use @ to insert variables.
- Preview Text – The short snippet shown beneath the subject in inbox previews. Use @ to insert variables.
4. Design the Email Body
The Drag & Drop editor is the most feature-rich option. Use the Elements & Layouts panel on the left to build your email:
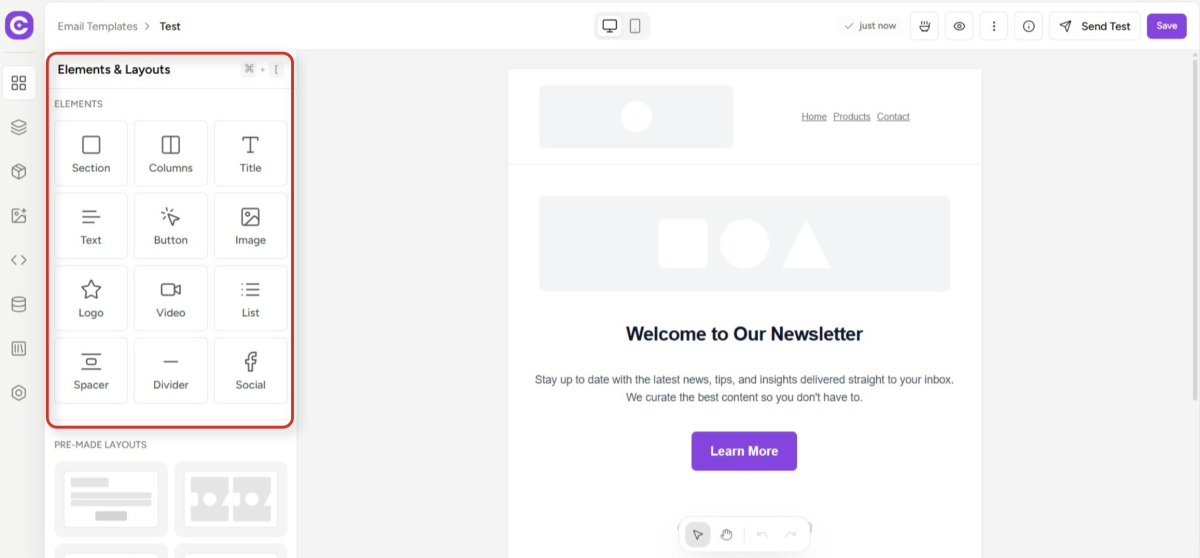
- Section – Adds a full-width structural row.
- Columns – Creates a multi-column layout (up to 4 columns).
- Text / Title – Add formatted text or headings.
- Image / Logo – Insert images or your workspace logo.
- Button – Add clickable CTA buttons with custom links.
- Video, List, Spacer, Divider, Social – Additional content blocks.
Pre-made Layouts at the bottom of the panel let you insert common email structures instantly. The canvas auto-saves your work as you edit.
5. Add Personalization with Merge Tags
Use {{variable}} syntax anywhere in the subject, preview text, or body to personalize emails per contact. Click the Database icon in the left editor sidebar to browse all available variables.
5.1 Common Merge Tags
- {{contact.first_name}} – Contact’s first name
- {{contact.last_name}} – Contact’s last name
- {{contact.email}} – Contact’s email address
- {{contact.company}} – Contact’s company
- {{workspace.name}} – Your workspace name
- {{unsubscribe_url}} – Unsubscribe link (required by law)
- {{view_in_browser_url}} – View in browser link
- {{preferences_url}} – Subscription preferences link
5.2 Fallback Values
Use a fallback to avoid blank personalization if the field is empty:
{{contact.first_name || “Friend”}}
5.3 Custom Fields
Reference any custom field using:
{{contact.custom.your_field_name}}
6. Add Conditional Content (Advanced)
Show or hide content blocks based on contact data using Liquid-style conditionals. This is entered directly in the HTML view or rich text editor:
{% if contact.tags contains “vip” %}
Here is your exclusive discount.
{% else %}
Join our VIP program.
{% endif %}
Supported operators: == , != , contains , and , or , not , is empty , is not empty.
7. Preview the Template
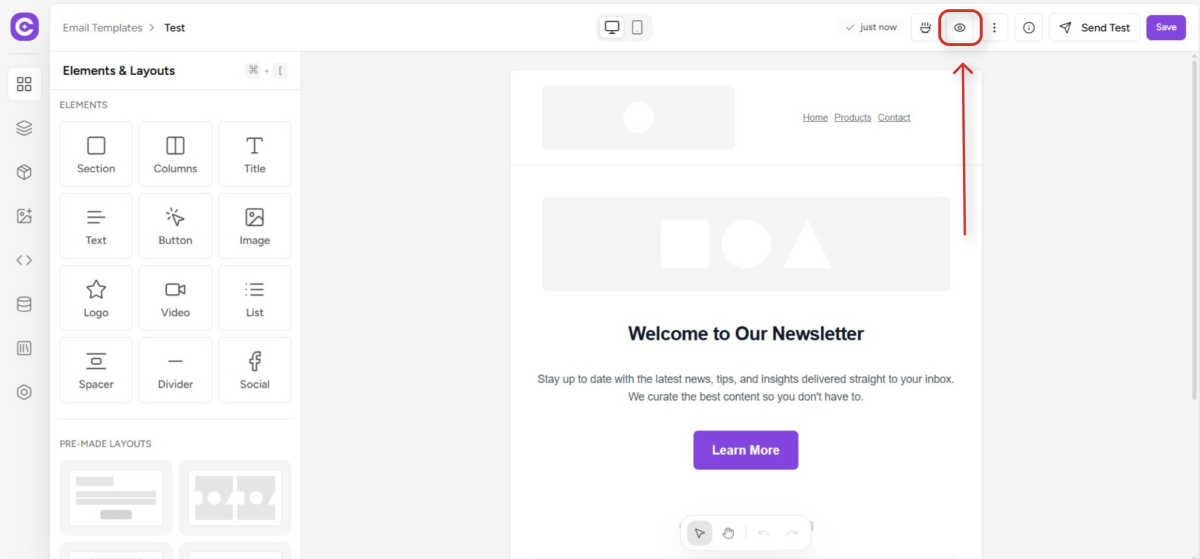
Click the Eye (Preview) icon in the top-right toolbar to open preview mode. You can:
- Select a specific contact to test personalization and verify merge tags resolve correctly.
- Toggle between Desktop and Mobile views to check responsive rendering.
- Review conditional content to confirm the right blocks show for the selected contact.
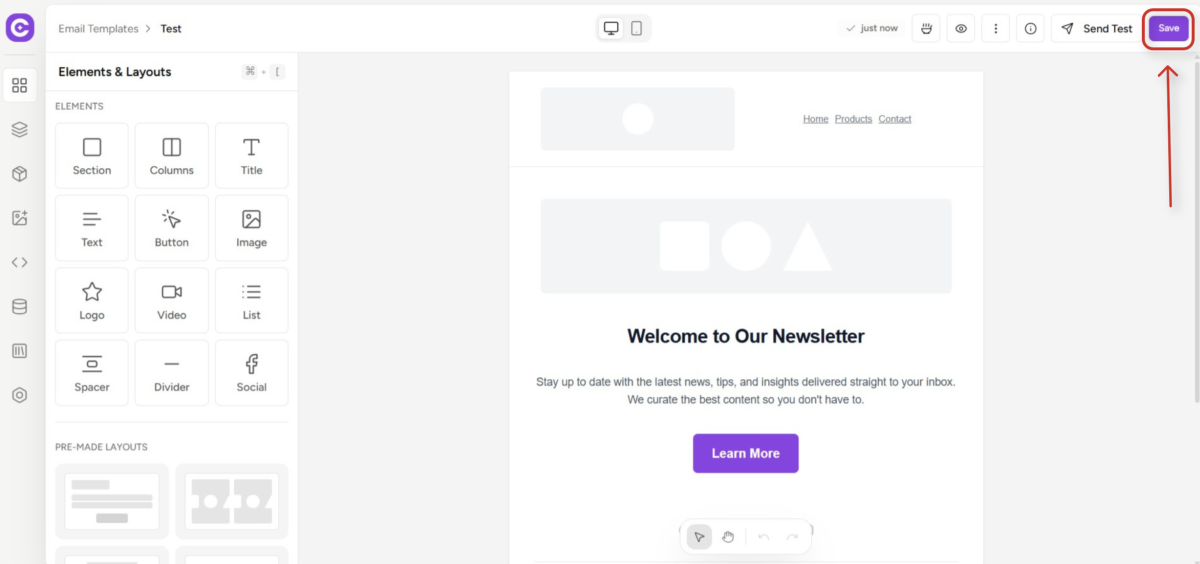
8. Save the Template
Click the Save button in the top-right corner of the editor. The template is now available to use in:
- Campaigns – Select the template when creating a campaign; its content is copied in at that point.
- Automations / Workflows – Choose a template for any Send Email action step.
- Sequences – Assign a template to a sequence step.
- Direct Emails – Send one-off emails to a contact using the template.
Note: Editing a template after it has been used in a campaign does not change the campaign – content is copied at creation time. Changes to templates do affect future automation and sequence steps.
Managing Templates
1. Duplicate
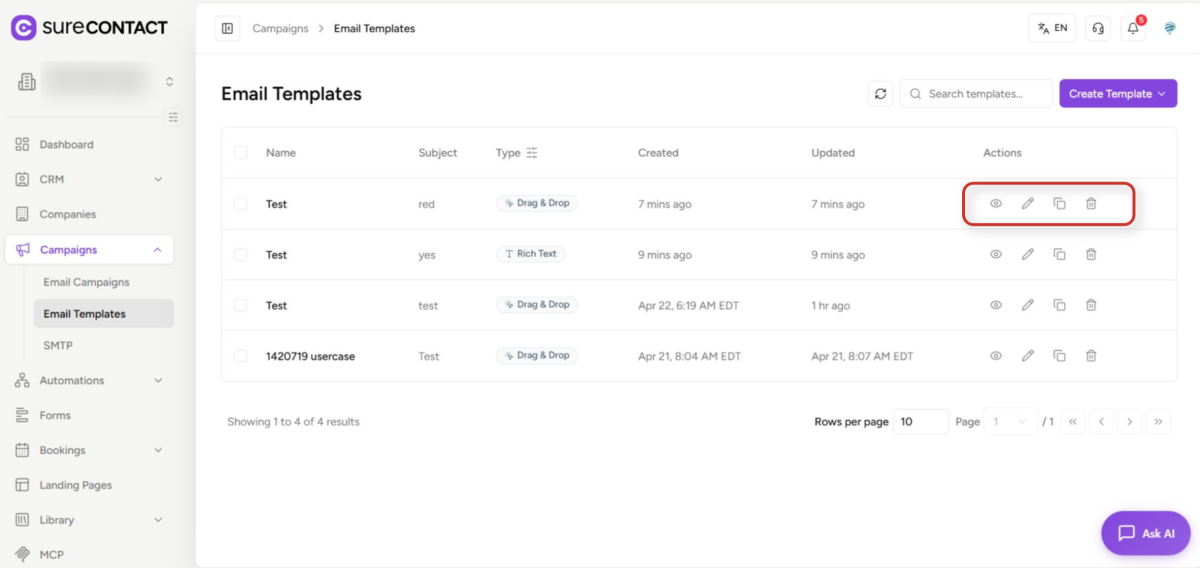
- Click the Duplicate (copy) icon in the Actions column to create a copy of any template.
- Useful for creating variations without starting from scratch. The copy is private by default.
2. Edit
- Click the Pencil (edit) icon to re-open the template in the same editor used to create it.
- Drag & Drop templates retain their full design structure and are fully re-editable.
3. Delete
- Click the Trash icon to delete a template.
- Existing campaigns that used this template are unaffected since their content was already copied in.
4. Bulk Delete
- Select multiple templates using the checkboxes in the Name column.
- A bulk delete option appears once one or more templates are selected.
Tips for Reusability
- Give templates descriptive names (e.g., Welcome Email – New Subscribers, not Template 1).
- Always include {{unsubscribe_url}} in the footer – it is legally required in most regions.
- Use a fallback for first name: {{contact.first_name || “there”}} to avoid blank personalization.
- Duplicate a proven template as a starting point for new campaigns rather than rebuilding.
- Use the Explore Library to start from a professionally designed layout and customize it.
Need Help?
If you need any assistance, please email [email protected], and our support team will be happy to help you.
We don't respond to the article feedback, we use it to improve our support content.