
- Introduction to SureContact Dashboard
- How to Install and Connect the SureContact WordPress Plugin
- What Do Contact Fields Mean in the SureContact WordPress Plugin
- How to Invite Members to a Workspace in SureContact
- How to Switch Organizations in SureContact
- Workspace-Level Contact Allocation in SureContact
- Workspace-Level Timezone Settings in SureContact
- How to Add a Custom Tracking Domain in a Workspace in SureContact
- SureContact MCP Server
- Creating Forms in SureContact
- Create Forms & assign lists & tags
- Multi Language Support(WordPress)
- Page Visit Tracking Guide (WordPress)
- Forms Custom Fields Sync Guide
- Landing Pages User Flow Guide
- SureContact Organization Workspace Setup Guide
- Companies User Flow Guide
- FAQs
- Bulk Operations SureContact
- SureContact Double Opt-In Guide
- SureContact API Keys Guide
- SureContact 2FA User Guide
- SureContact Bookings User Flow Guide
- SureContact MultiStep Forms Guide
- Zoom Integration with SureContact
- Group Booking User Flow Documentation
- Global Search – User Flow Documentation
- Folders in SureContact
- SureContact Email Tracking Pixel Regulations
- Email Open Tracking Consent SureContact
- Forms Custom Success Message Redirect Guide
- Partial Form Submission Guide
- Shopify Integration with SureContact Guide
- Migrate to Unified Preference Page
- Setup SMTP in SureContact
- Email Campaigns in SureContact
- How to Add a Preferences URL in Your Emails
- How to Share Email Templates in SureContact
- Spintax Feature in SureContact
- Deleting Sent Campaigns in SureContact
- A/B Testing Integration Guide
- Unsubscription Guide
- SureContact SMTP Setup Guide
- SMTP Routing User Flow
- FluentCRM Integration with SureContact
- SureContact Third-Party Integration — Step-by-Step Guide
- Fluent Forms Integration with SureContact
- SureForms Integration with SureContact
- WPForms Integration with SureContact
- Bulk Sync WordPress Users to SureContact
- Contact Form 7 Integration with SureContact
- Sync WooCommerce Customers with SureContact
- FluentCart & FluentCommunity Integration With SureContact
SureContact Double Opt-In Guide
SureContact’s Double Opt-In (DOI) feature adds a mandatory email confirmation step to your contact subscription flow. When enabled, contacts are placed in Pending status and only become Active and eligible to receive campaigns after clicking a confirmation link in a verification email.
This guide covers how to enable and configure Double Opt-In, how the confirmation flow works end-to-end, how to use automation triggers and reminder actions, and how to manage contacts who have not yet confirmed.
Prerequisites
Before enabling Double Opt-In, please ensure the following:
1. SMTP Must Be Configured
The Double Opt-In toggle requires a working SMTP connection before it can be enabled. Set up your SMTP provider under Settings → Email before proceeding.
2. A Confirmation Email Template Must Exist
You need at least one email template that includes the {{email_optin_url}} variable. Only templates containing this variable will appear in the Confirmation Email Template dropdown. Create the template first under Library → Templates.
How to Enable Double Opt-In
Follow these steps to configure Double Opt-In for your workspace.
1. Navigate to Settings
- From the left sidebar, click Settings.
- Scroll down the Settings page until you reach the Double Opt-In section.
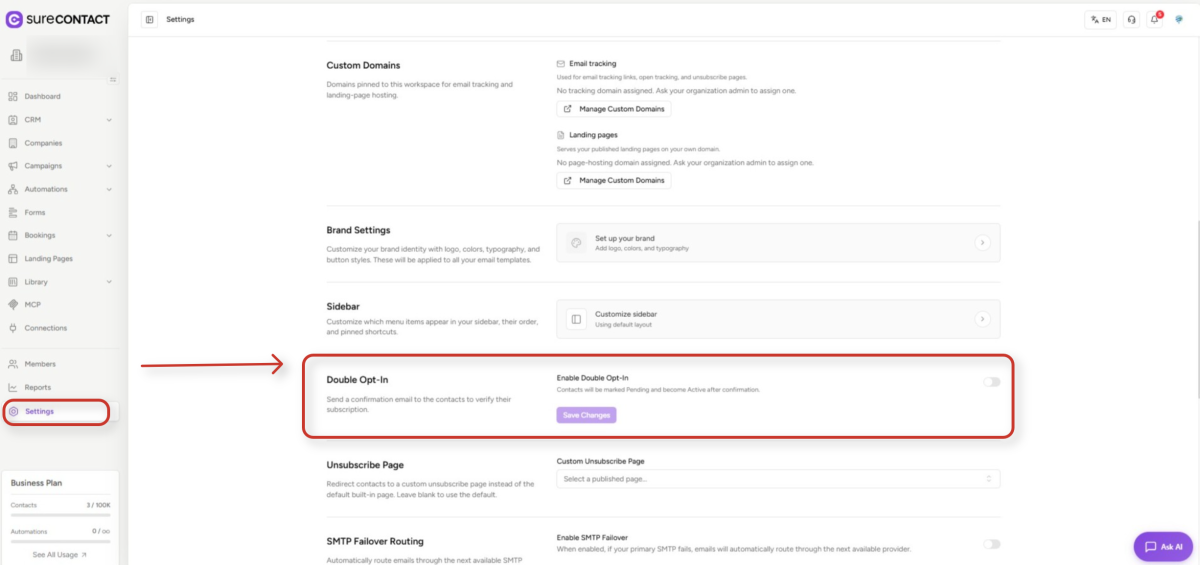
2. Enable the Double Opt-In Toggle
- Click the toggle next to Enable Double Opt-In to turn it on.
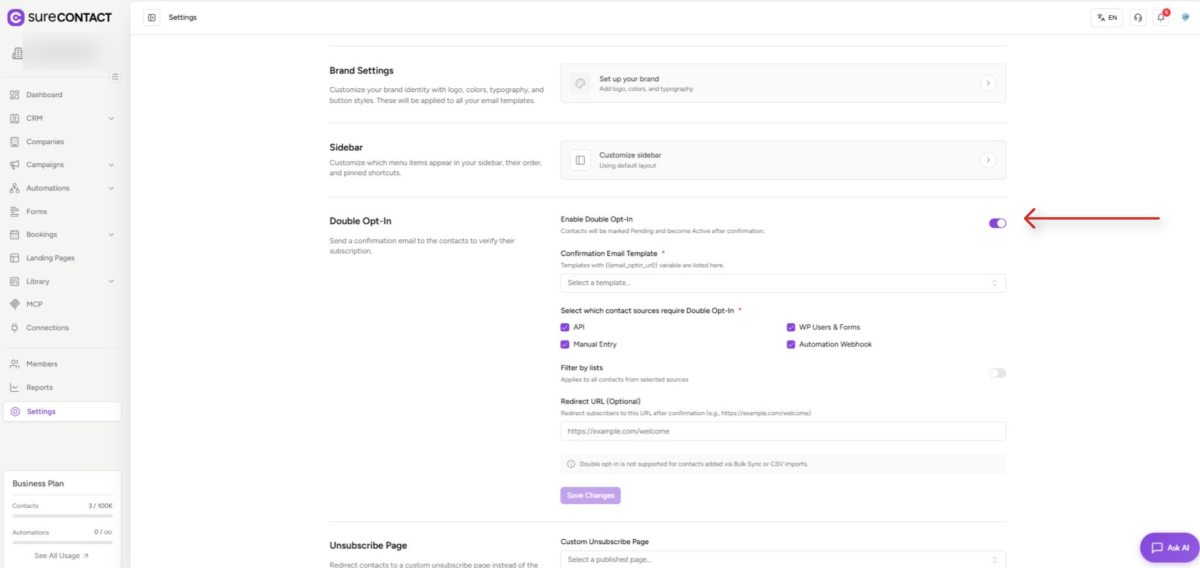
- Once enabled, all new contacts from the configured sources will be placed in Pending status until they confirm.
3. Select a Confirmation Email Template
- Under Confirmation Email Template, choose the template that contains {{email_optin_url}}.
- Only templates containing that variable are listed. If the dropdown is empty, create a template first.
- The template is sent automatically whenever a contact triggers the DOI flow.
4. Configure Contact Sources
Choose which contact sources require Double Opt-In confirmation:
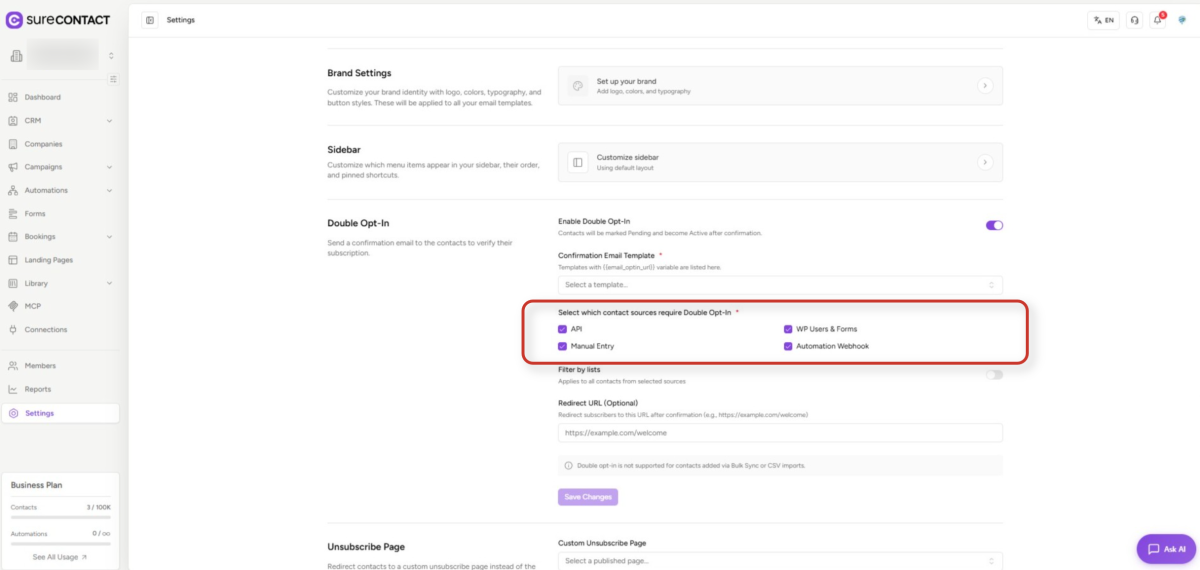
- API – Contacts created via the SureContact REST API.
- WP Users & Forms – Contacts from WordPress user sync or WPForms submissions.
- Automation Webhook – Contacts created through webhook-triggered automations.
- Manual Entry – Contacts added manually in the workspace.
5. (Optional) Filter by Lists
- Toggle on Filter by lists to restrict DOI to specific contact lists.
- Include mode: Only contacts added to the selected lists trigger DOI.
- Exclude mode: Contacts added to the selected lists skip DOI; all others trigger it.
6. (Optional) Set a Redirect URL
- Enter a URL in the Redirect URL field to send contacts to a custom page after confirming.
- Leave blank to show the default SureContact confirmation page.
7. Save Changes
- Click Save Changes. Double Opt-In is now active for all configured sources.
The Double Opt-In Flow
When DOI is enabled, every new contact from a configured source goes through the following steps:
Step 1 – Contact is Created
- SureContact checks: Is DOI enabled? Is the contact’s source configured? Does it pass the list filter?
- If all checks pass, the contact’s status is set to Pending and the confirmation email is sent immediately.
Step 2 – Confirmation Email is Sent
- The email uses your chosen template. The {{email_optin_url}} variable is replaced with the contact’s unique confirmation link.
- The link is valid for the configured Token Expiry period (default: 72 hours).
Step 3 – Contact Clicks the Link
- The contact is taken to a branded confirmation page reflecting your workspace colors, logo, and fonts.
- The page is publicly accessible – no login required.
Step 4 – Contact Confirms
SureContact validates the token: it must exist, not be expired, not already be used, and the contact must still be Pending. On success:
- Contact status changes to Active.
- The opted_in_at timestamp is recorded on the contact record.
- Any automations using the Opt-In Confirmed trigger are fired.
- The contact is redirected to your configured Redirect URL (if set).
Token Expiry & Resending
Token Expiry
The default confirmation link expiry is 72 hours. You can change this in Settings → Double Opt-In.
If a contact clicks an expired link:
- They see an Expired message on the confirmation page.
- Resend the confirmation email to generate a fresh token.
If a contact clicks an already-confirmed link:
- They see an Already Confirmed message. No further action is needed.
Resending the Confirmation Email
There are two ways to resend the confirmation email:
1. Manually from the Contact Profile
- Navigate to the contact’s profile page.
- The Resend Confirmation Email option appears only if the contact is in Pending status.
- Resending generates a fresh token and resets the expiry timer.
2. Via Automation – Send Opt-In Reminder Action
- Add a Send Opt-In Reminder action to an automation workflow.
- The action only executes if the contact is still in Pending status; it is safe to use in timed sequences.
- Common use: send a reminder 24 hours after the original email if the contact has not confirmed.
Automation Integration
SureContact provides a dedicated trigger and action for building DOI-aware automations.
Trigger: Opt-In Confirmed
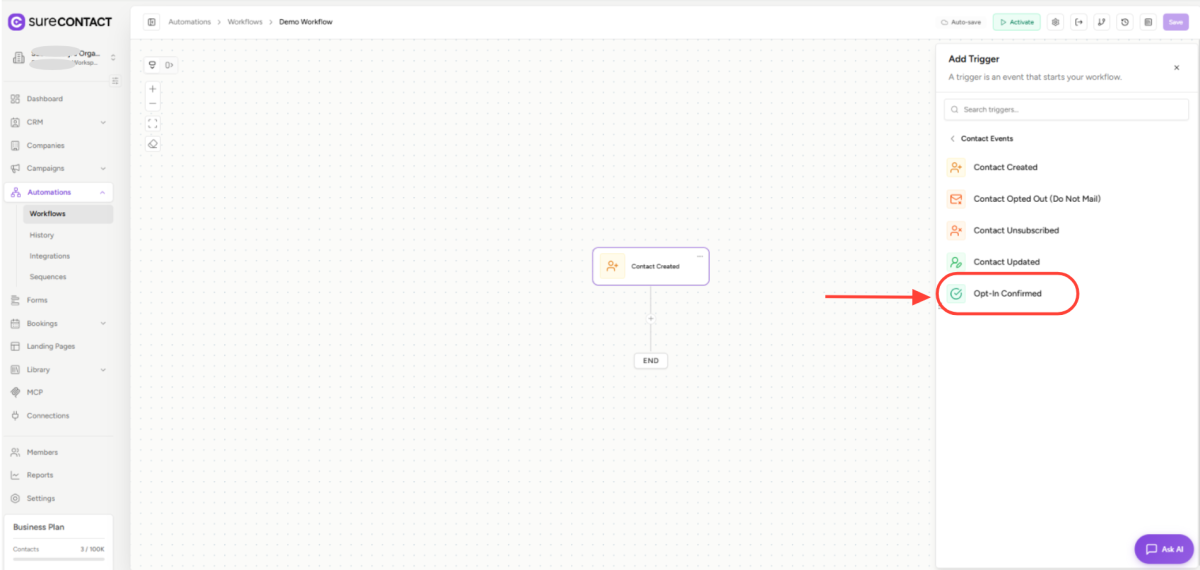
The Opt-In Confirmed trigger fires whenever a contact successfully completes the double opt-in confirmation. You can optionally filter by contact source (API, Form, Webhook, or any).
Available trigger variables:
- trigger.source – The source that originally created the contact.
- trigger.confirmed_at – Timestamp when the contact clicked Confirm.
- trigger.opted_in_at – Alias for confirmed_at; recorded on the contact profile.
Common Use Cases for Opt-In Confirmed Trigger:
- Start a welcome email sequence immediately after confirmation.
- Add the contact to a specific list based on their source.
- Apply tags to segment confirmed vs. unconfirmed contacts.
Action: Send Opt-In Reminder
The Send Opt-In Reminder action resends the confirmation email. It silently skips contacts who are no longer in Pending status, making it safe to include in any automation sequence.
Recommended Pattern – 24-Hour Reminder:
- Trigger: Contact Created (any source).
- Wait: 24 hours.
- Action: Send Opt-In Reminder (executes only if still Pending).
- Wait: 48 hours.
- Condition: If contact is still Pending → apply “Unconfirmed” tag or remove from list.
Email Template Variables
Use these variables when building your confirmation email template:
Required
- {{email_optin_url}} – The confirmation link. Must be present or the template will not be selectable.
Optional – Contact Data
- {{contact.first_name}} – Contact’s first name.
- {{contact.full_name}} – Contact’s full name.
- {{contact.email}} – Contact’s email address.
Optional – Workspace & Expiry
- {{workspace.name}} – Your workspace name.
- {{expires_in}} – Human-readable expiry, e.g. “72 hours”.
- {{expiry_hours}} – Expiry as a number, e.g. “72”.
Contact Sources – DOI Behaviour Reference
Sources that trigger DOI (when configured):
- Form submission – triggers DOI if enabled globally or at form level.
- API-created contact – triggers DOI if API is a selected source.
- Automation Webhook – triggers DOI if webhook is a selected source.
- WordPress users/sync – triggers DOI if WP Users & Forms is a selected source.
Sources that always bypass DOI:
- Manual entry – hand-entered contacts bypass DOI regardless of settings.
- CSV / bulk import – always bypasses DOI. This is by design and cannot be overridden.
Form-Level DOI Override:
Individual forms can have their own DOI setting, independent of the global workspace setting. If a form has DOI enabled, it applies to all submissions from that form, even if the global setting is off. Configure this under Forms → [Form Name] → Settings → Double Opt-In.
Need Help?
If you need any assistance, please email [email protected], and our support team will be happy to help you.
We don't respond to the article feedback, we use it to improve our support content.