
- Introduction to SureContact Dashboard
- How to Install and Connect the SureContact WordPress Plugin
- What Do Contact Fields Mean in the SureContact WordPress Plugin
- How to Invite Members to a Workspace in SureContact
- How to Switch Organizations in SureContact
- Workspace-Level Contact Allocation in SureContact
- Workspace-Level Timezone Settings in SureContact
- How to Add a Custom Tracking Domain in a Workspace in SureContact
- SureContact MCP Server
- Creating Forms in SureContact
- Create Forms & assign lists & tags
- Multi Language Support(WordPress)
- Page Visit Tracking Guide (WordPress)
- Forms Custom Fields Sync Guide
- Landing Pages User Flow Guide
- SureContact Organization Workspace Setup Guide
- Companies User Flow Guide
- FAQs
- Bulk Operations SureContact
- SureContact Double Opt-In Guide
- SureContact API Keys Guide
- SureContact 2FA User Guide
- SureContact Bookings User Flow Guide
- SureContact MultiStep Forms Guide
- Zoom Integration with SureContact
- Group Booking User Flow Documentation
- Global Search – User Flow Documentation
- Folders in SureContact
- SureContact Email Tracking Pixel Regulations
- Email Open Tracking Consent SureContact
- Forms Custom Success Message Redirect Guide
- Partial Form Submission Guide
- Shopify Integration with SureContact Guide
- Setup SMTP in SureContact
- Email Campaigns in SureContact
- How to Add a Preferences URL in Your Emails
- How to Share Email Templates in SureContact
- Spintax Feature in SureContact
- Deleting Sent Campaigns in SureContact
- A/B Testing Integration Guide
- Unsubscription Guide
- SureContact SMTP Setup Guide
- SMTP Routing User Flow
- FluentCRM Integration with SureContact
- SureContact Third-Party Integration — Step-by-Step Guide
- Fluent Forms Integration with SureContact
- SureForms Integration with SureContact
- WPForms Integration with SureContact
- Bulk Sync WordPress Users to SureContact
- Contact Form 7 Integration with SureContact
- Sync WooCommerce Customers with SureContact
- FluentCart & FluentCommunity Integration With SureContact
Shopify Integration with SureContact Guide
Connect your Shopify store directly from SureContact using your own Shopify custom app credentials (Client ID and Client Secret), no app review or shared OAuth app required. The connect dialog walks you through creating a custom app in your Shopify Developer Dashboard, adding the required API scopes and redirect URL, and pasting in your Client ID and Client Secret. Once connected, you can configure which contacts sync, map Shopify fields to SureContact fields, and control tag syncing, all from the Integrations page.
This guide explains the complete setup process for connecting your Shopify store with SureContact.
Overview
With the Shopify integration, you can:
- Connect your Shopify store using your own app credentials, right from the Integrations page.
- Follow step-by-step setup instructions with copyable scopes and redirect URL.
- Configure field mappings and tag sync before the initial backfill runs.
- Track sync progress and see created/updated contact counts live.
This makes setting up Shopify a short, self-contained flow instead of a round trip between two apps.
How to Connect Your Shopify Store
1. Open the Integrations Page
- Log in to your SureContact account.
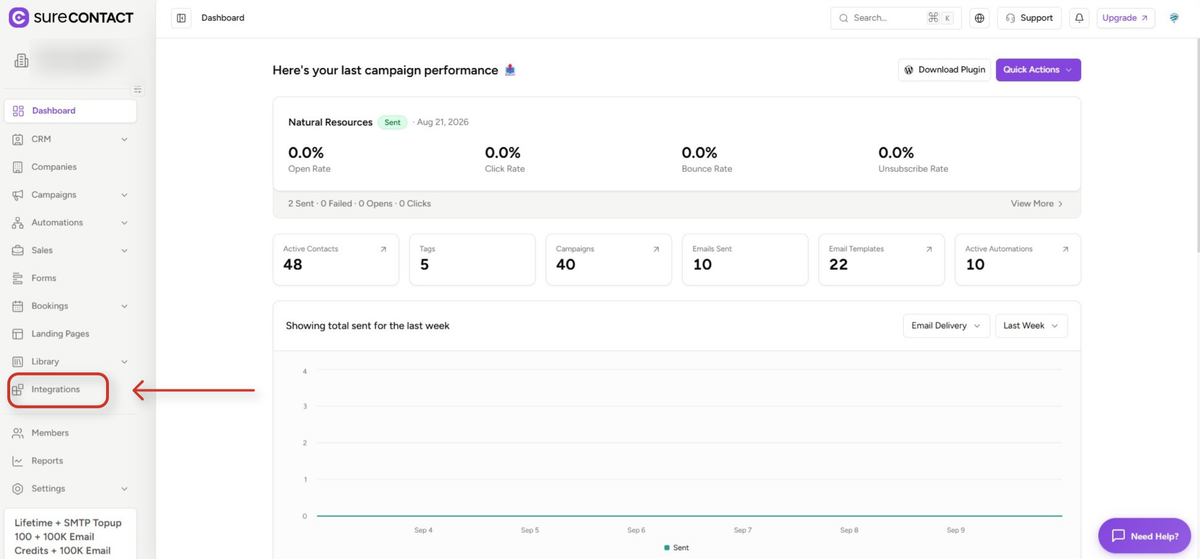
- On the left sidebar, scroll down and click Integrations.
2. Open Shopify and Start the Connection
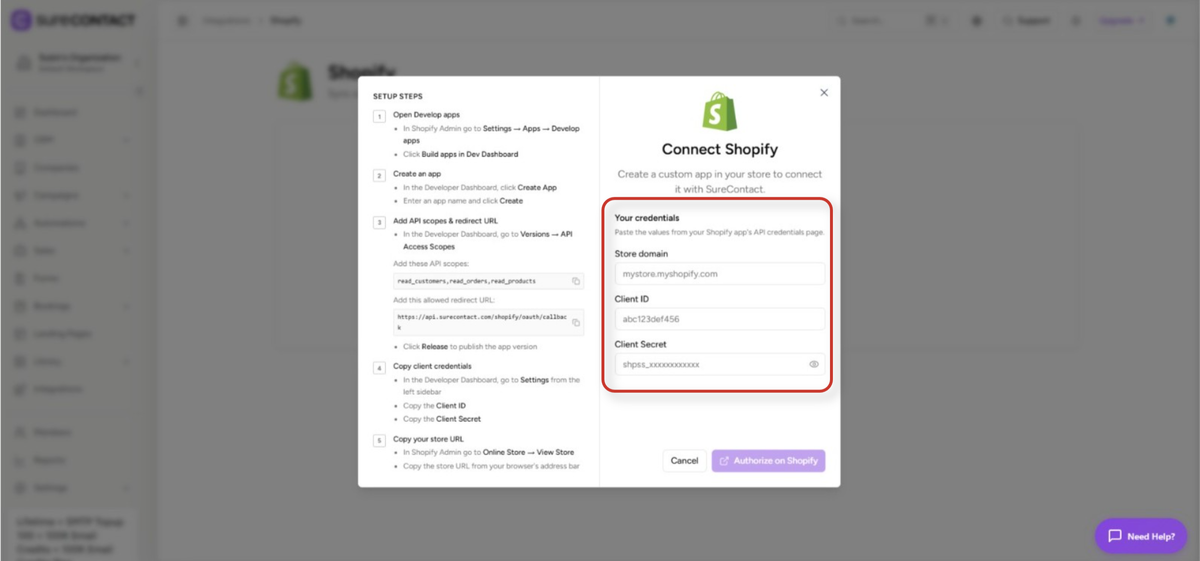
- Under Integrations, click Shopify.
- Click Connect Store.
- A popup will appear asking for your Store Domain, Client ID, and Client Secret.
3. Copy Your Store Domain from Shopify
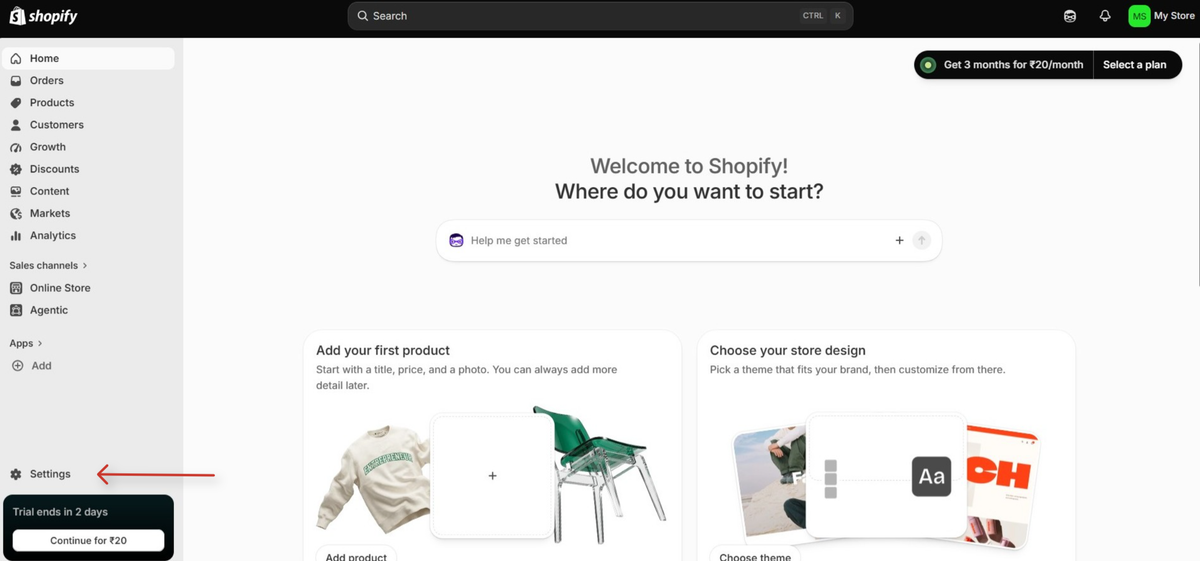
- Go to your Shopify store admin.
- Click Settings, shown at the bottom left of the Shopify sidebar.
- Copy the store domain shown there.
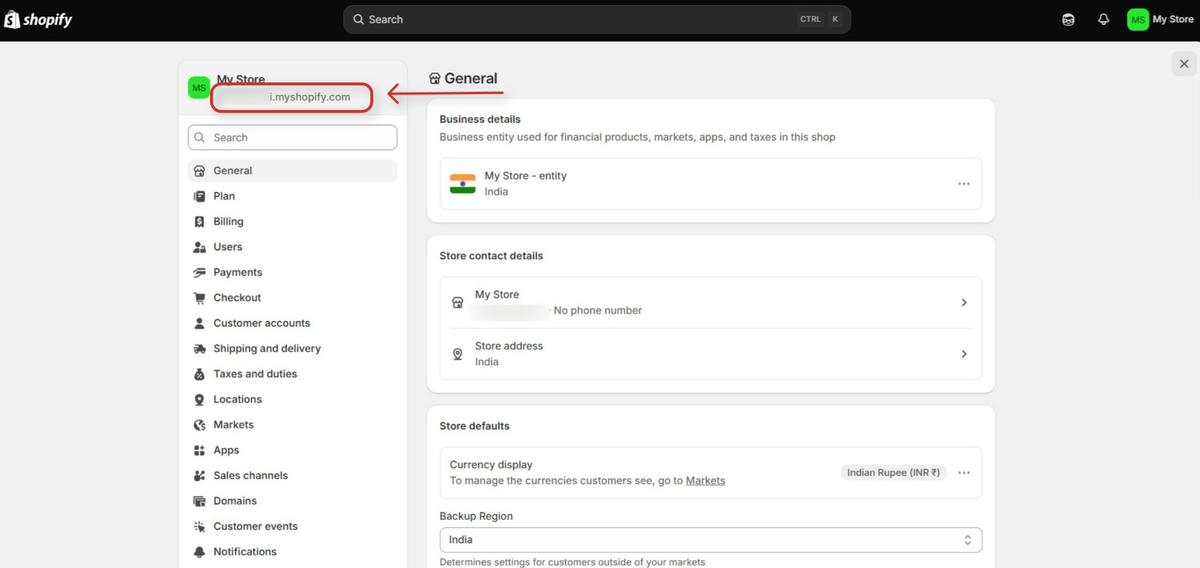
- Paste it into the Store Domain field under SureContact.
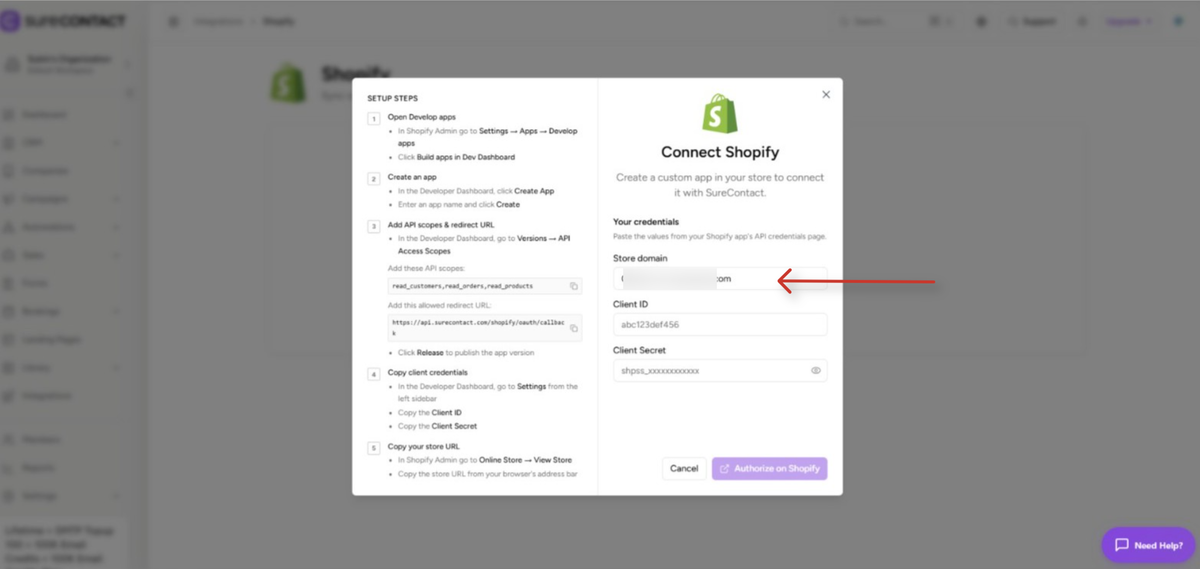
4. Create a Custom App in Shopify
- In Shopify, go to Apps.
- Click Develop apps.
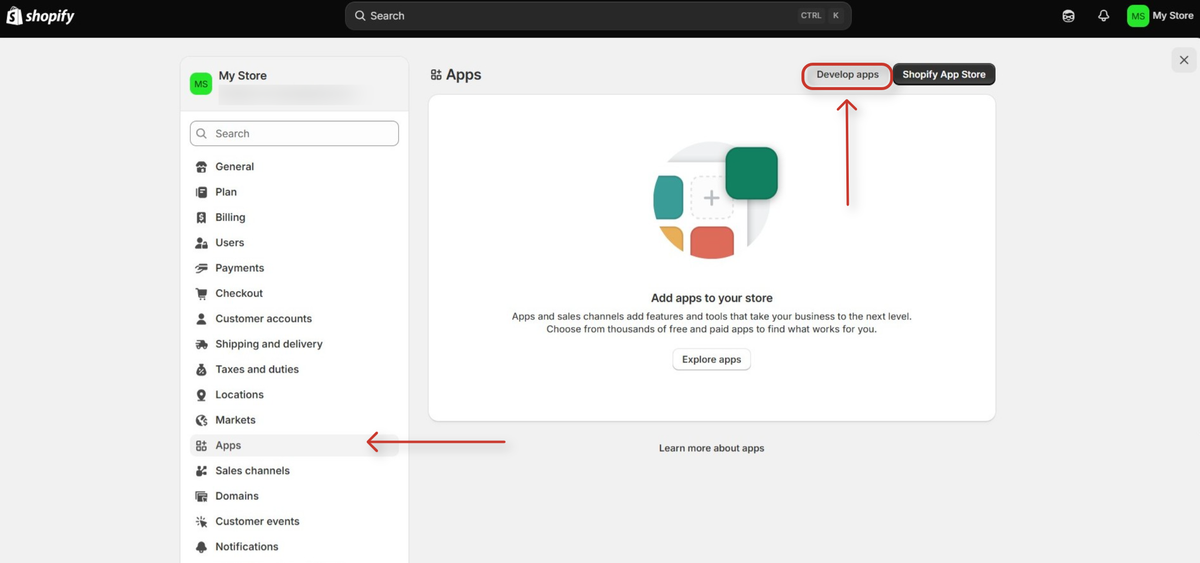
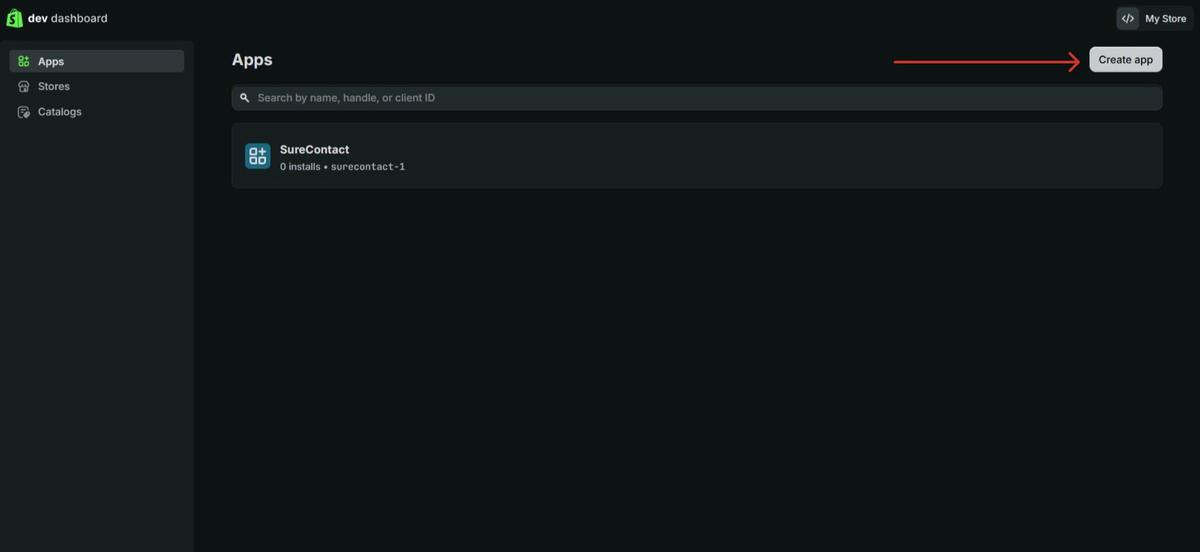
- Click Build apps in Dev Dashboard.
- Click Create app.
- Give the app a name (App Name) and click Create.
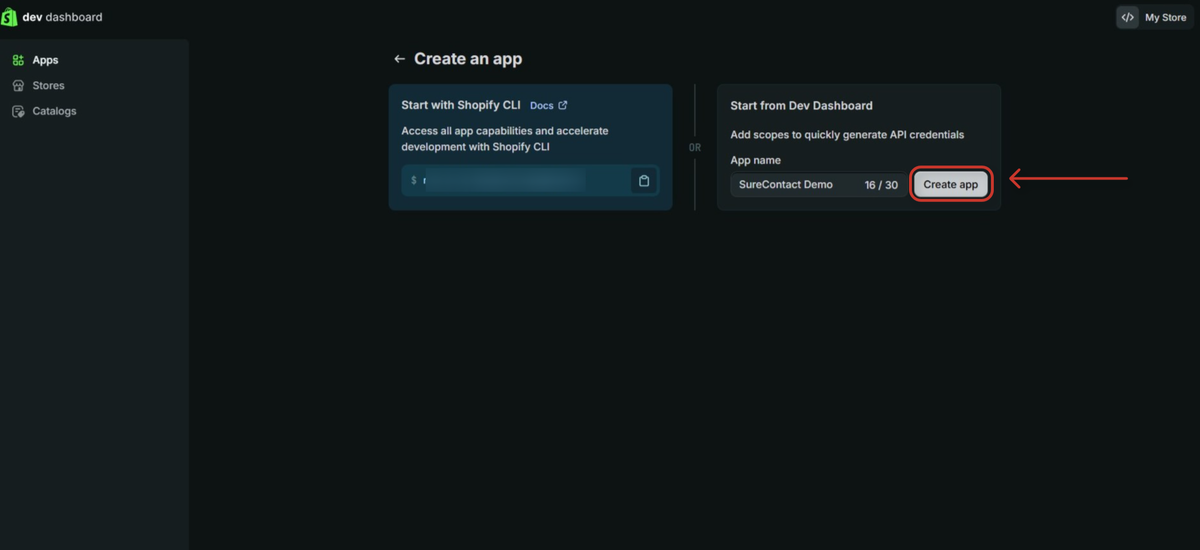
5. Add the Required API Scopes
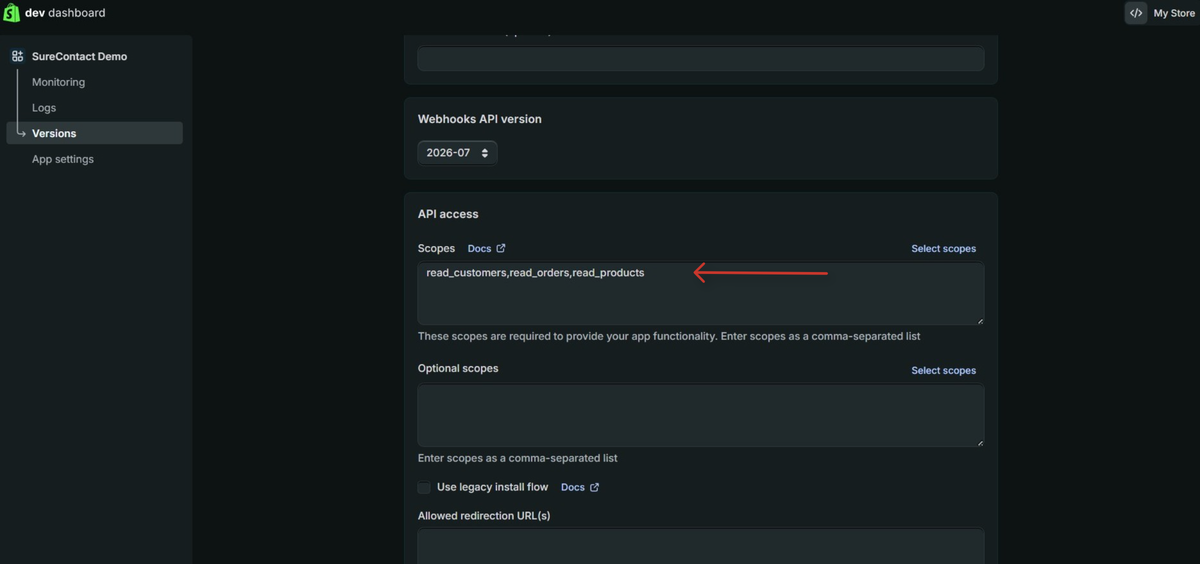
- In your new app, go to API Access – this is where the required scopes are added.
- Go back to SureContact and copy the scopes shown there.
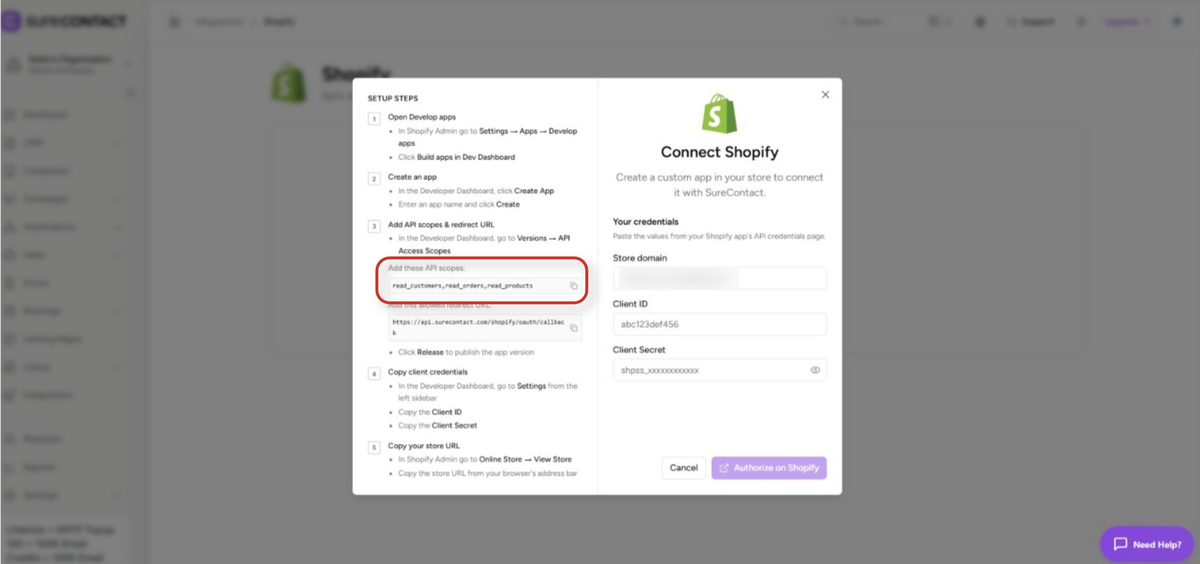
- Add the copied scopes under the Scopes field inside Shopify.
6. Add the Redirect URL
- Go back to SureContact and copy the redirect URL shown there.
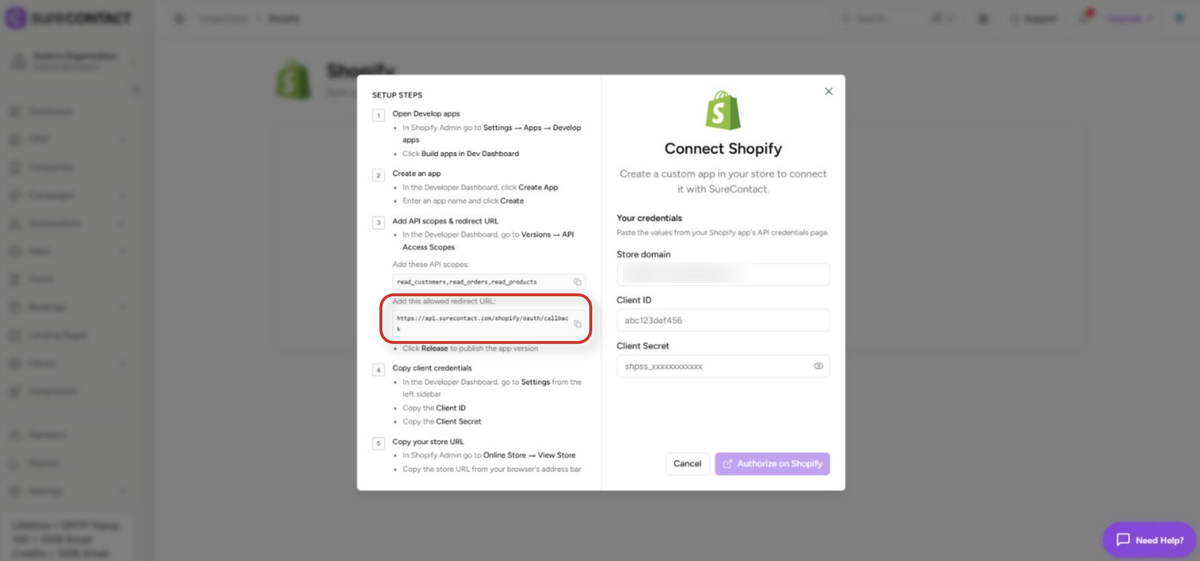
- Paste it under Allowed redirection URL(s) in Shopify.
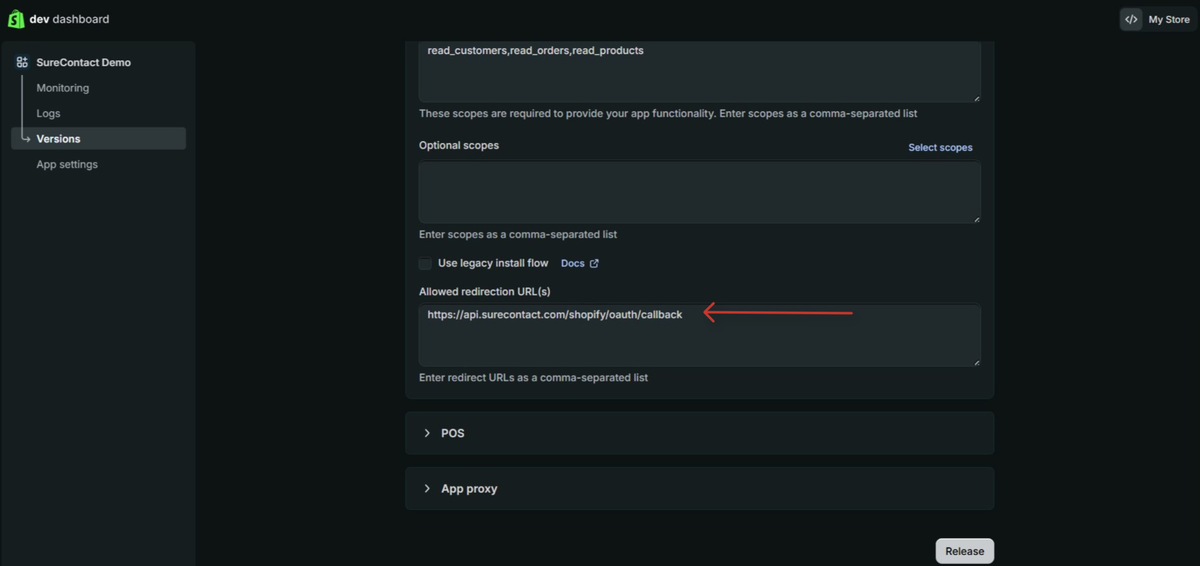
7. Release the App
- Click Release.
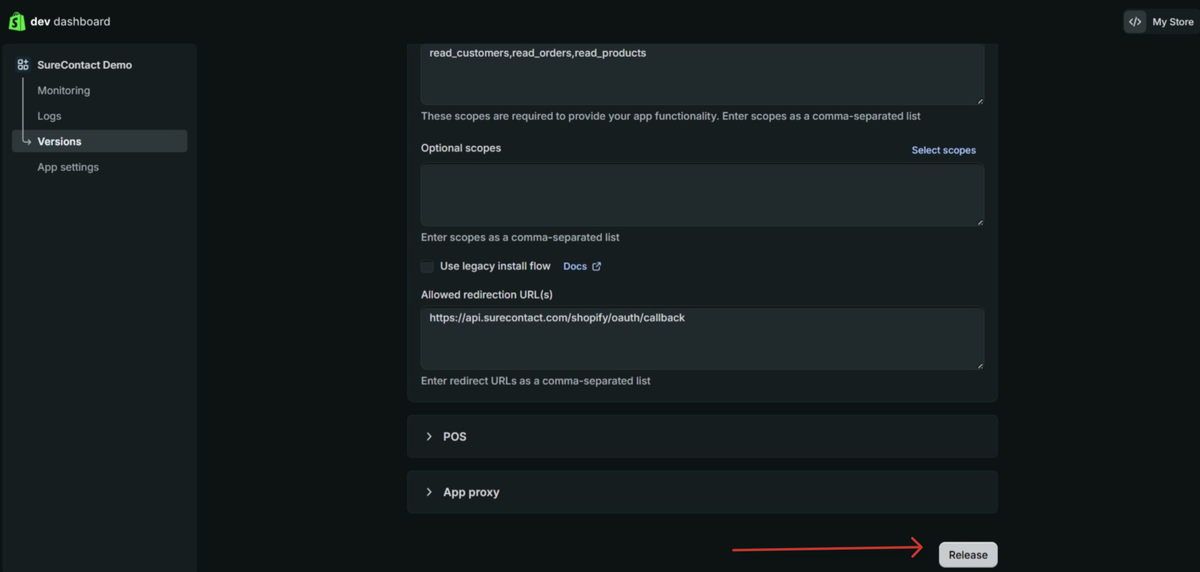
- Click Release again to confirm.
- A new version of the app will be created.
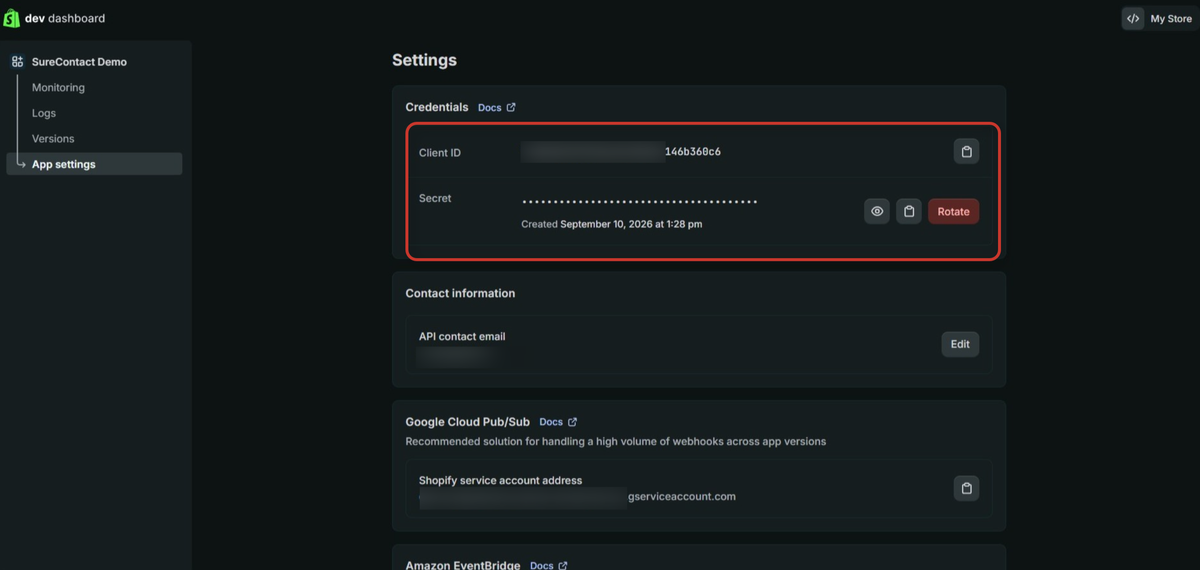
8. Copy the Client ID and Client Secret
- Click App Settings (shown in the app dashboard).
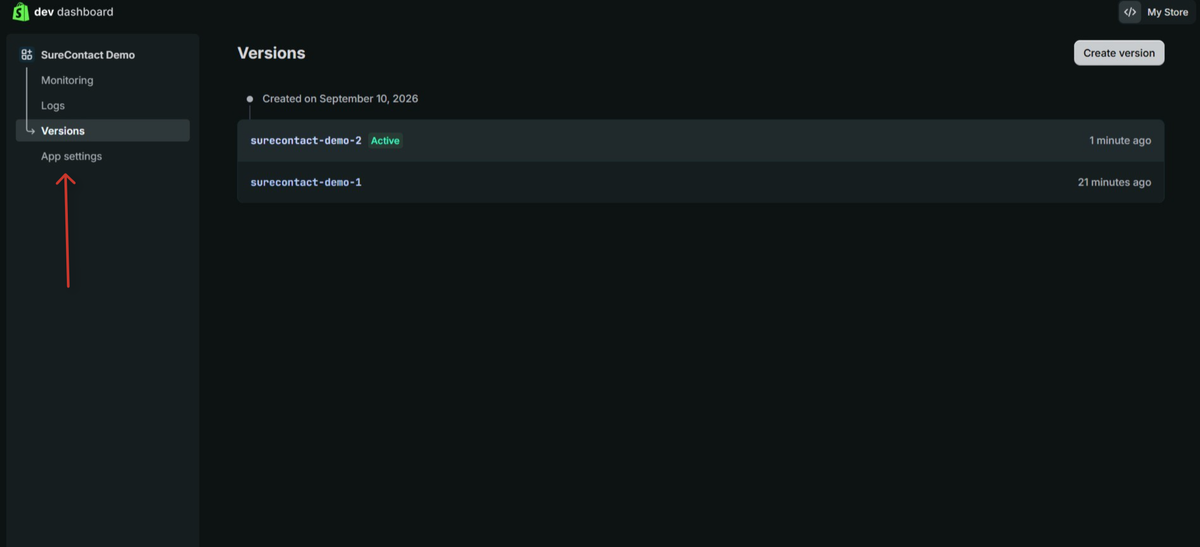
- Copy the Client ID & Client Secret and paste it under SureContact.
9. Authorize and Install the App
- Back in SureContact, click Authorize on Shopify.
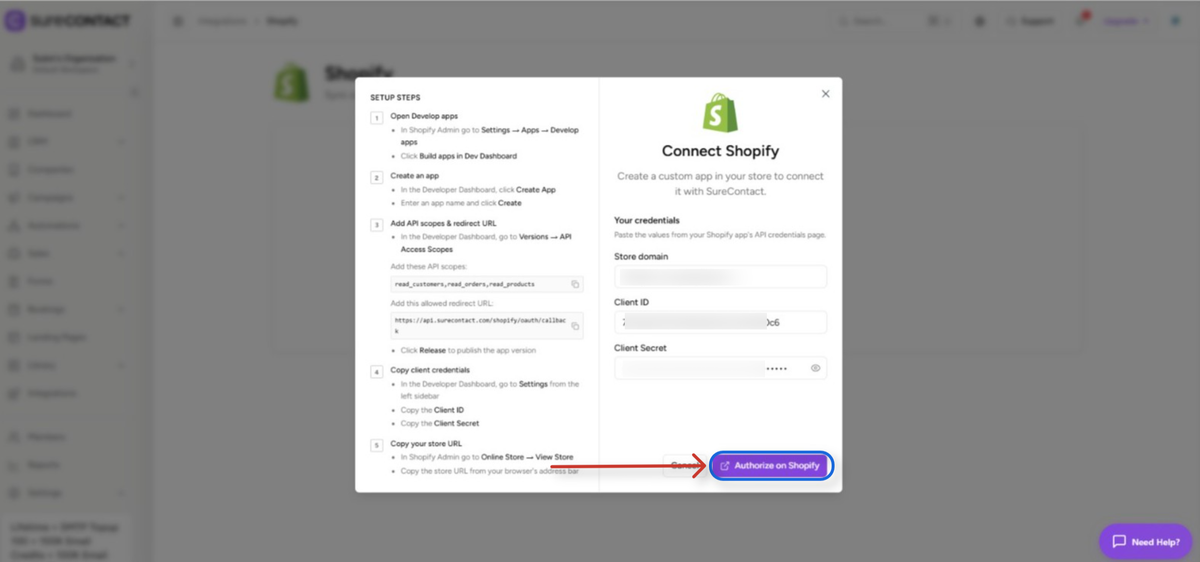
- Click Install under Shopify.
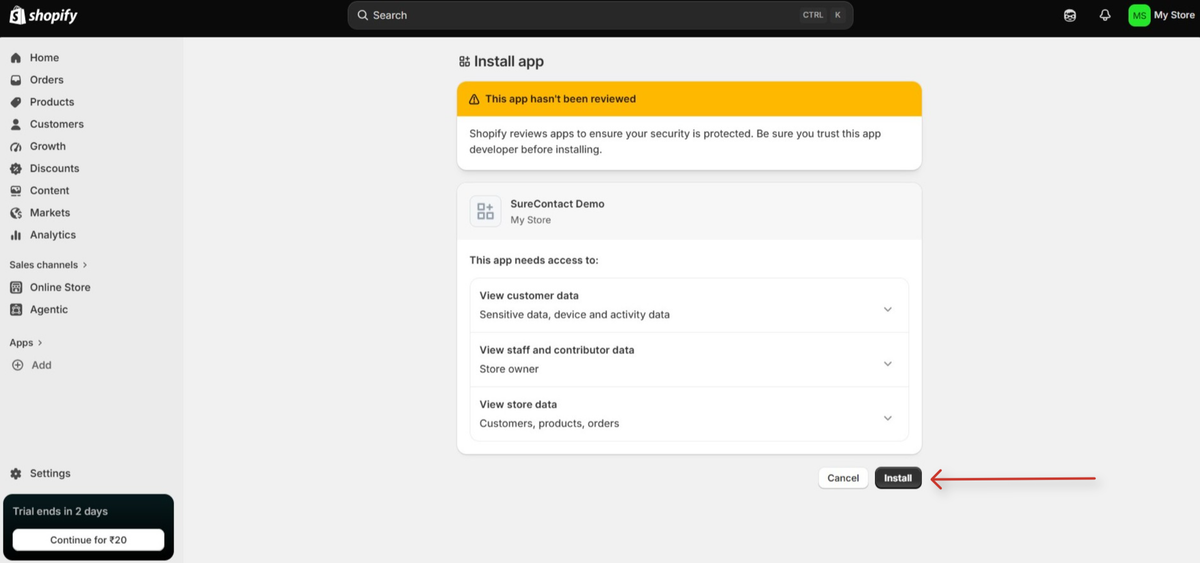
- The connection will be set up successfully.
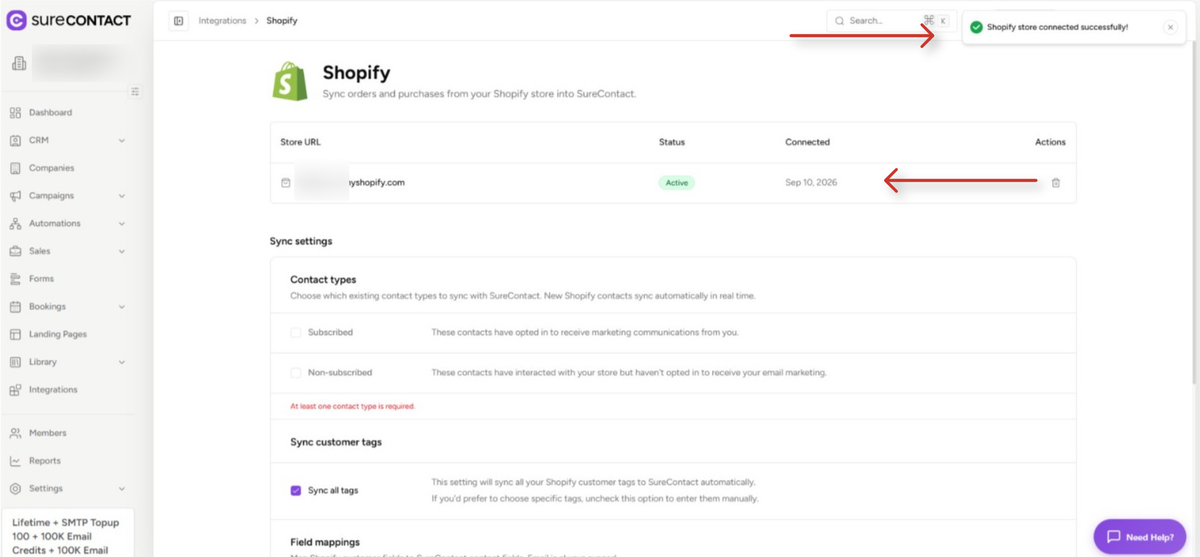
Configure Sync Settings
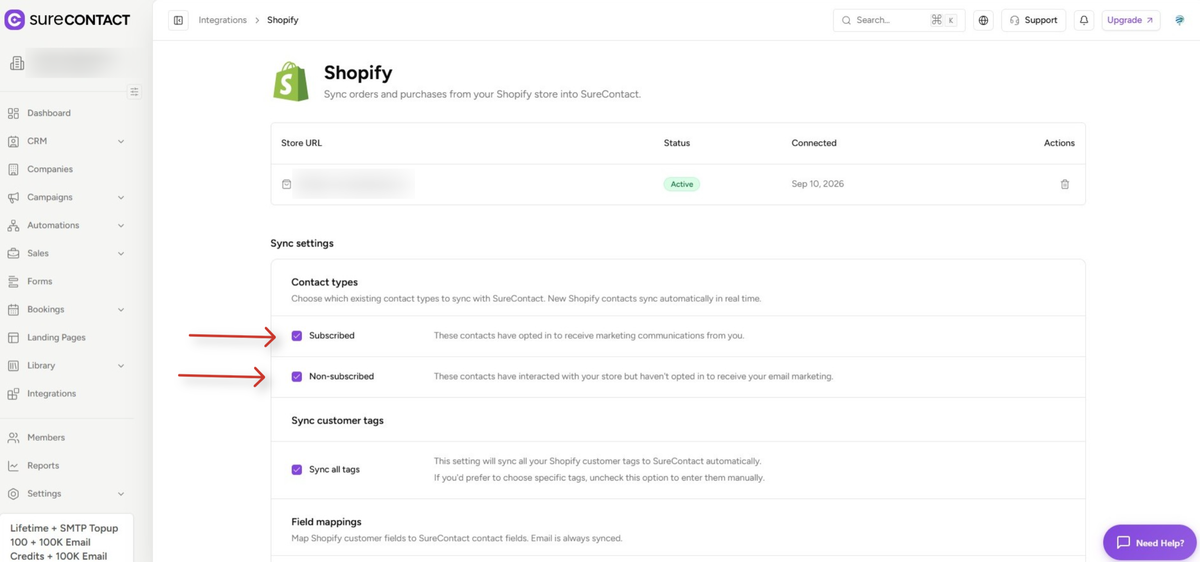
10. Choose Which Contacts to Sync
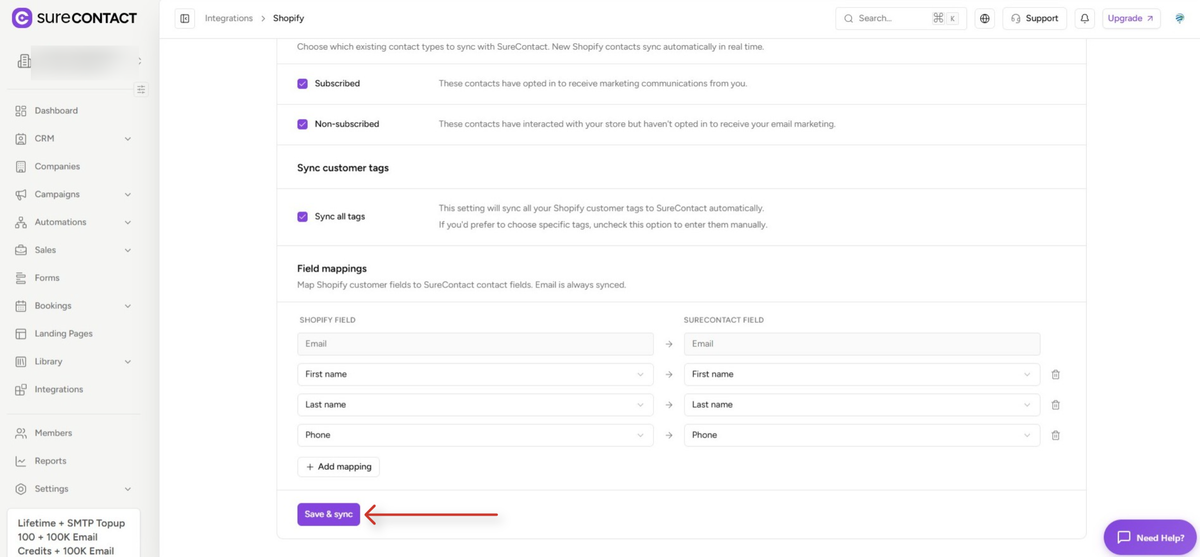
- Click Subscribed, Non-subscribed to choose which contacts should sync.
11. Map Fields and Sync Tags
- Map the Shopify fields with the corresponding SureContact fields.
- If a mapping isn’t available under SureContact fields, click Create New Field to add one.
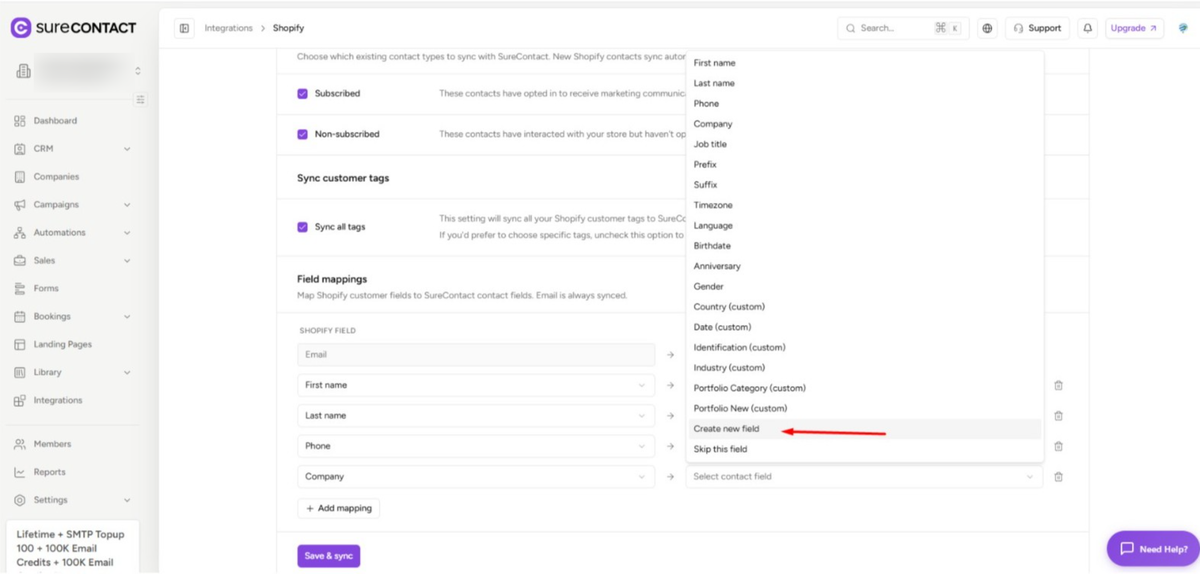
- Click Save & Sync.
- This starts syncing your contacts and details from Shopify to SureContact.
12. Test the Connection
- Once the sync is complete, go to your store and make a test purchase.
- After the test order is submitted, go to SureContact and open Contacts – you should see a new contact added.
That’s it! Your Shopify store is now connected with SureContact.
Need Help?
If you need any assistance, please email [email protected], and our support team will be happy to help you.
We don't respond to the article feedback, we use it to improve our support content.