
- Introduction to SureContact Dashboard
- How to Install and Connect the SureContact WordPress Plugin
- What Do Contact Fields Mean in the SureContact WordPress Plugin
- How to Invite Members to a Workspace in SureContact
- How to Switch Organizations in SureContact
- Workspace-Level Contact Allocation in SureContact
- Workspace-Level Timezone Settings in SureContact
- How to Add a Custom Tracking Domain in a Workspace in SureContact
- SureContact MCP Server
- Creating Forms in SureContact
- Create Forms & assign lists & tags
- Multi Language Support(WordPress)
- Page Visit Tracking Guide (WordPress)
- Forms Custom Fields Sync Guide
- Landing Pages User Flow Guide
- SureContact Organization Workspace Setup Guide
- Companies User Flow Guide
- FAQs
- Bulk Operations SureContact
- SureContact Double Opt-In Guide
- SureContact API Keys Guide
- SureContact 2FA User Guide
- SureContact Bookings User Flow Guide
- SureContact MultiStep Forms Guide
- Zoom Integration with SureContact
- Group Booking User Flow Documentation
- Global Search – User Flow Documentation
- Folders in SureContact
- SureContact Email Tracking Pixel Regulations
- Email Open Tracking Consent SureContact
- Forms Custom Success Message Redirect Guide
- Partial Form Submission Guide
- Shopify Integration with SureContact Guide
- Migrate to Unified Preference Page
- Setup SMTP in SureContact
- Email Campaigns in SureContact
- How to Add a Preferences URL in Your Emails
- How to Share Email Templates in SureContact
- Spintax Feature in SureContact
- Deleting Sent Campaigns in SureContact
- A/B Testing Integration Guide
- Unsubscription Guide
- SureContact SMTP Setup Guide
- SMTP Routing User Flow
- FluentCRM Integration with SureContact
- SureContact Third-Party Integration — Step-by-Step Guide
- Fluent Forms Integration with SureContact
- SureForms Integration with SureContact
- WPForms Integration with SureContact
- Bulk Sync WordPress Users to SureContact
- Contact Form 7 Integration with SureContact
- Sync WooCommerce Customers with SureContact
- FluentCart & FluentCommunity Integration With SureContact
Migrate to Unified Preference Page
SureContact now gives your recipients one Manage Email Preferences page. It replaces the separate Unsubscribe and Email Preferences pages. From a single link, recipients can choose which email categories they receive, join or leave mailing lists, pause emails for a while, update their email tracking consent, or unsubscribe from everything.
This guide explains how to switch your emails from the old unsubscribe and preference links to the new {{manage_preferences_url}} link, and how to configure what recipients see on the page.
What Changes
Replace every old link variable in your emails with the single new variable:
| Old (legacy) | New (unified) | |
|---|---|---|
| Unsubscribe link | {{unsubscribe_url}} | {{manage_preferences_url}} |
| Preferences link | {{preferences_url}} | {{manage_preferences_url}} |
| Tracking preferences link | {{tracking_preferences_url}} | {{manage_preferences_url}} |
| Page the recipient lands on | …/unsubscribe/{token} or …/preferences/{token} | …/manage-preferences/{token} |
Do existing emails break?
No. Emails that still use the old variables keep working, and recipients can still unsubscribe through them. We recommend migrating anyway, so every recipient gets the full set of options on one page.
Prerequisites
Before you start the migration, please ensure the following:
1. Access to Your SureContact Workspace
You need permission to edit email templates, campaigns, automations, and sequences in the workspace.
2. A List of Emails That Use the Old Links
Note which templates, draft or scheduled campaigns, automation Send Email steps, and sequence emails contain an Unsubscribe or Preferences link. These are the emails you will update.
How to Migrate to the Unified Preference Page
1. Open the Email in the Email Builder
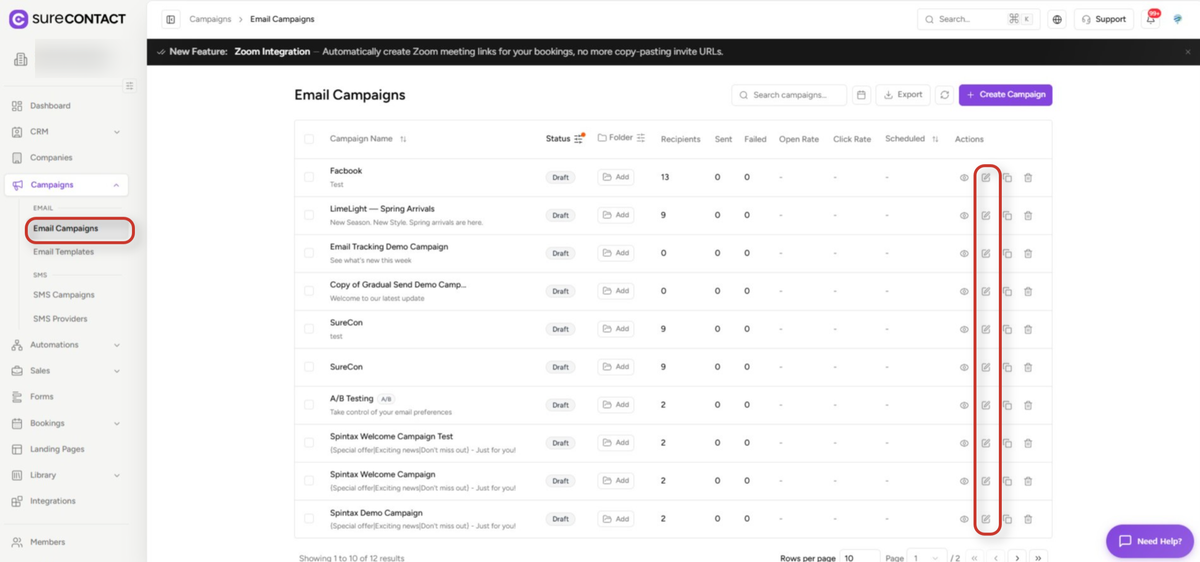
- Go to the email you want to update. It can be a template (Campaigns → Email Templates), a draft or scheduled campaign, an automation’s Send Email step, or a sequence email.
- Click the Edit (pencil) icon to open it in the email builder.
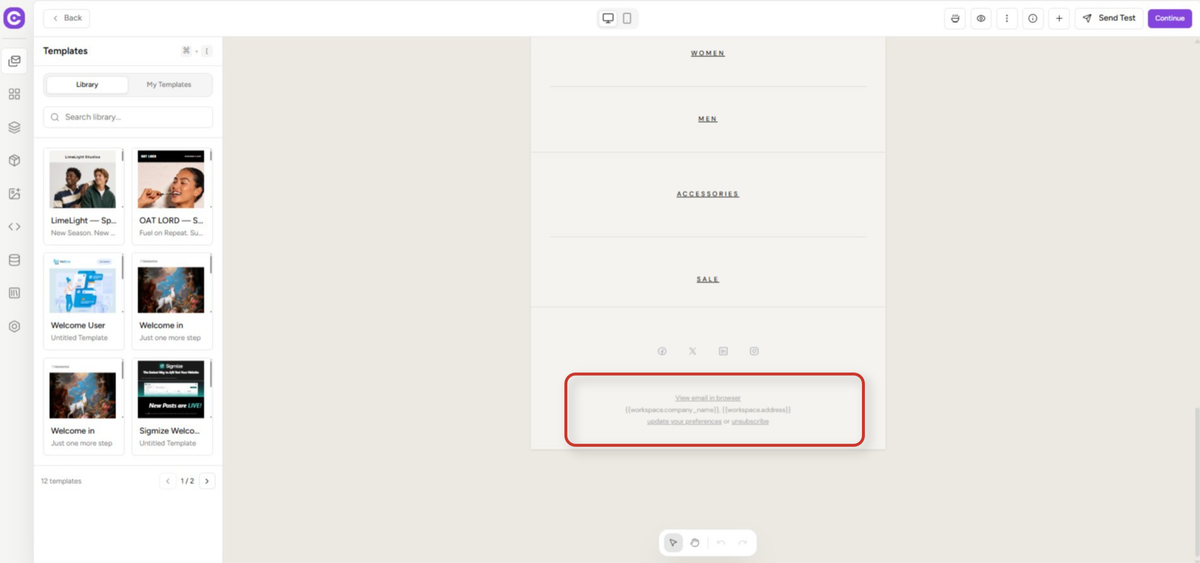
- Scroll to the footer, which is where the Unsubscribe or Preferences link usually sits.
2. Replace the Old Link with the Manage Preferences Link
- Click the footer text block, then double-click the old link text (for example, unsubscribe) to select it. A formatting toolbar appears at the bottom of the canvas.
- In the toolbar, click the Link icon. The Edit Link URL box opens and shows the current value, such as {{unsubscribe_url}}.
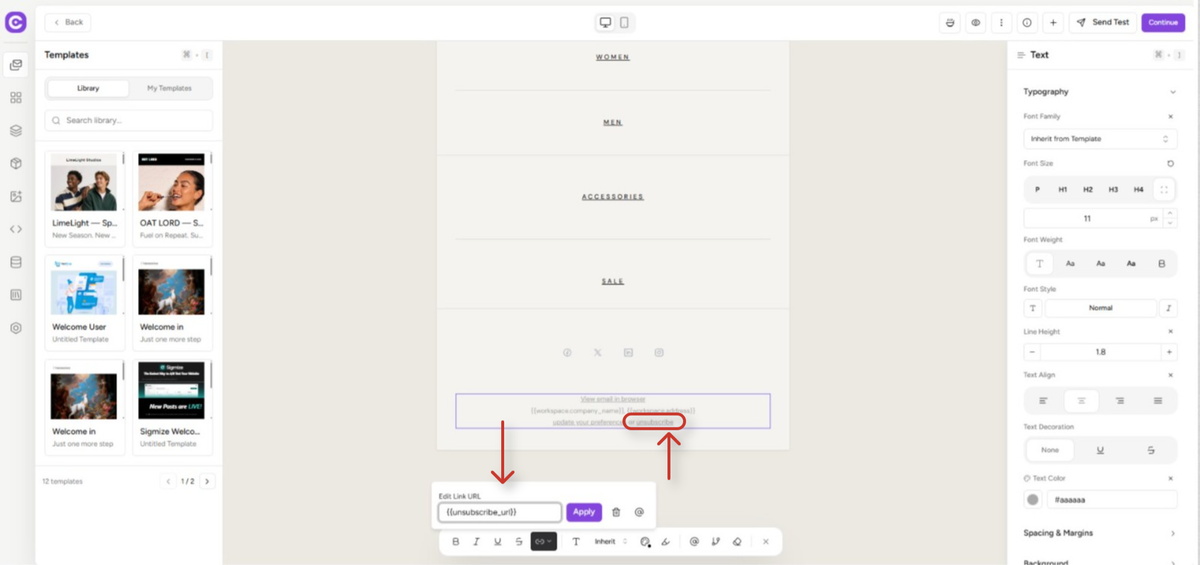
- Clear the existing value, then click the @ (insert variable) button next to the field.
- Type manage in the search box and choose Manage Preferences Url. SureContact inserts {{manage_preferences_url}} automatically.
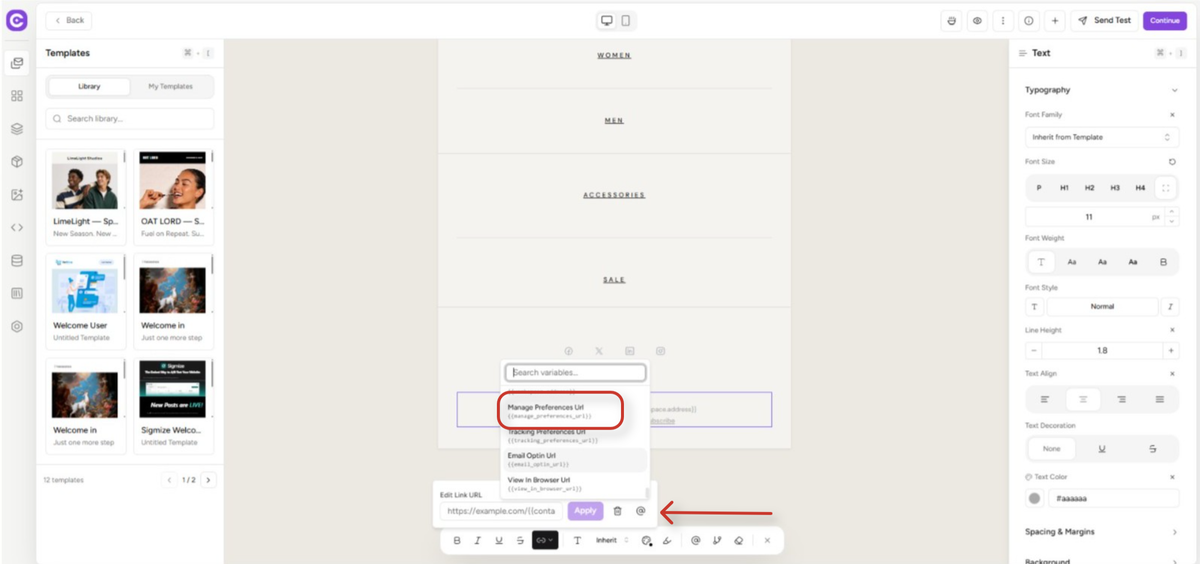
- Click Apply. Optionally, change the link text to something like Manage Preferences or Unsubscribe or manage preferences.
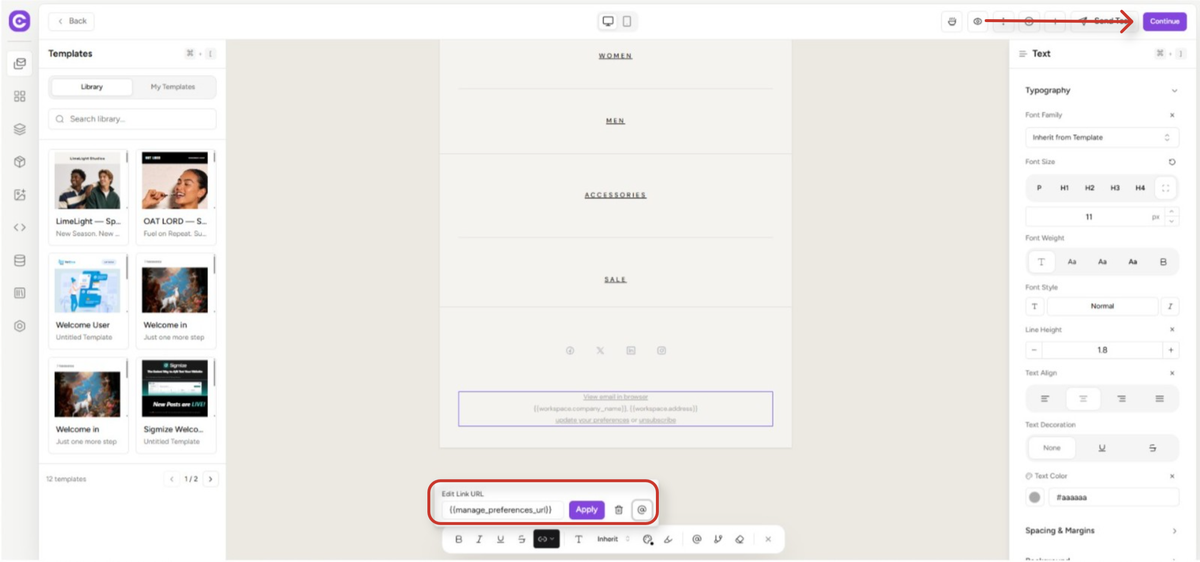
- Repeat for every old link in the footer. For example, if the footer shows both update your preferences and unsubscribe, update both links.
2.1 Links Added as a Custom Link or in HTML
- If the link was typed in as a custom URL, open it with the Link icon and change the URL from {{unsubscribe_url}} or {{preferences_url}} to {{manage_preferences_url}}.
- If your email uses custom HTML (for example, a section’s HTML Code panel or an HTML template), find and replace every {{unsubscribe_url}}, {{preferences_url}}, and {{tracking_preferences_url}} with {{manage_preferences_url}}, then click Apply Changes.
- Keep the double curly braces exactly as shown. Otherwise, the link will not work.
3. Save Your Changes
- Click Save in the top-right corner of the email builder (or Publish where available) to keep the update.
- Repeat steps 1–3 for every email on your list, including automation and sequence emails, since they keep sending in the background.
- Campaigns that have already been sent cannot be edited. Their links keep working through the old pages.
4. Choose What Recipients See on the Page (Optional)
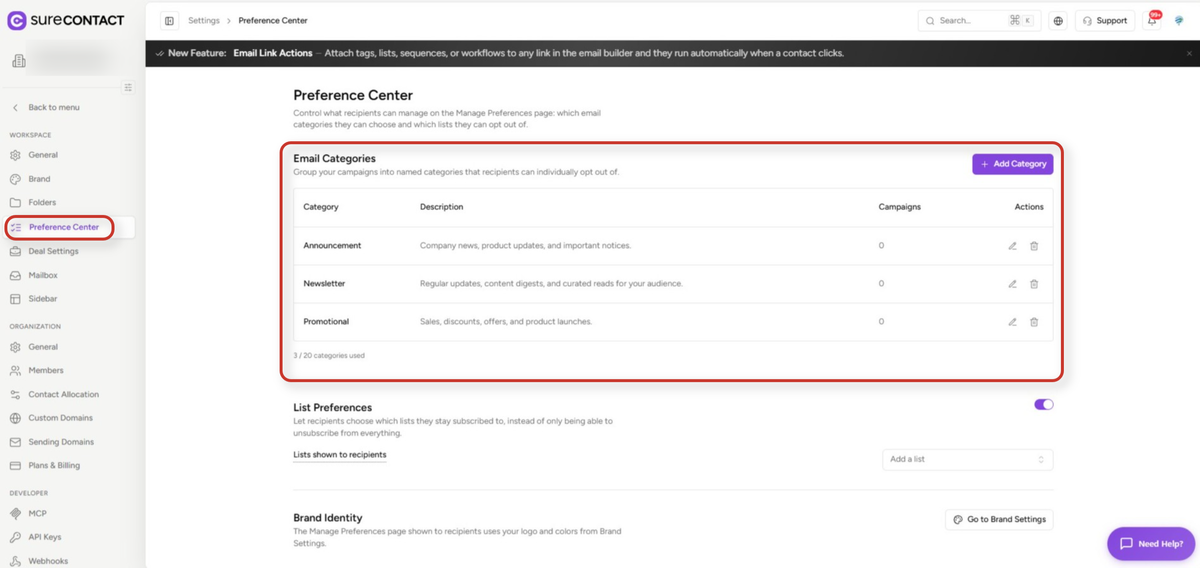
Go to Settings → Preference Center to control what recipients can manage on the Manage Preferences page.
4.1 Email Categories
- Recipients can untick categories such as Announcement, Newsletter, or Promotional to stop only those emails.
- Use Add Category to create more (up to 20), or the edit and delete icons to manage existing ones. This section appears on the page only when your workspace has categories.
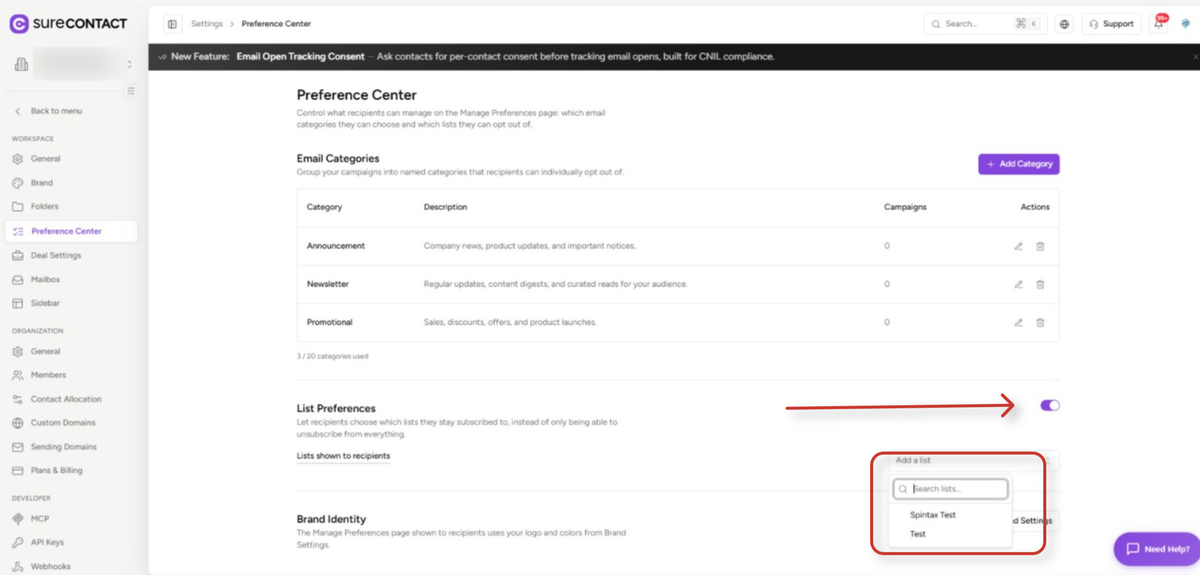
4.2 Mailing Lists
- Turn on the List Preferences toggle.
- Under Lists shown to recipients, open Add a list and choose each list you want recipients to be able to join or leave. Only static lists can be shown.
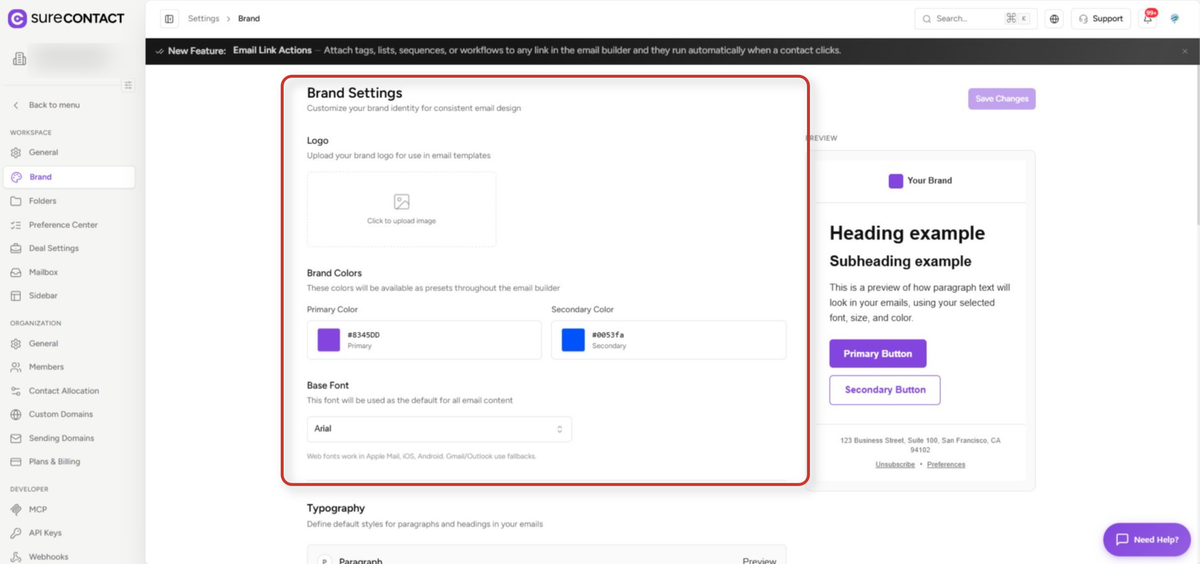
4.3 Branding
- The page uses the logo and primary colour from your Brand Settings. Click Go to Brand Settings from the Preference Center, or open Settings → Brand, to update them.
4.4 Tracking Consent and Custom Unsubscribe Page
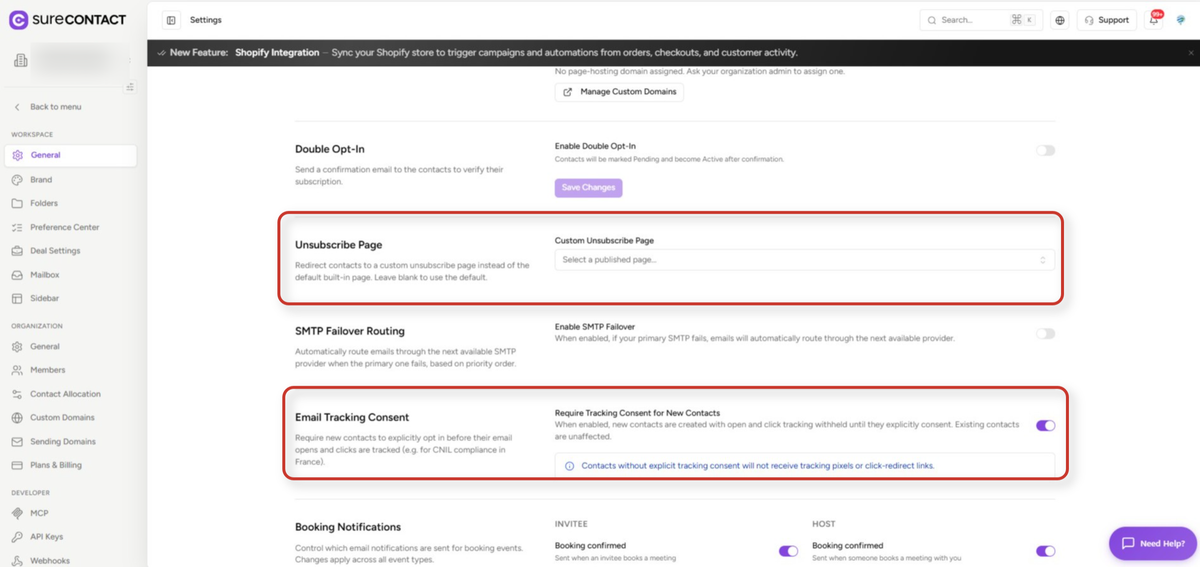
- The Allow Email Tracking option appears on the page only if Require Tracking Consent for New Contacts is turned on under Settings → General → Email Tracking Consent.
- If a published page is selected under Settings → General → Unsubscribe Page, recipients who click the new link are sent to that custom page instead.
5. Test the New Link
- Send a real campaign, or trigger the automation, to your own email address.
- Note: {{manage_preferences_url}} does not work in test emails sent with Send Test. It is only generated for real sends.
- Click the link in the email you receive. The page URL should contain /manage-preferences/ and show the title Manage Email Preferences.
Good to Know
- Unsubscribe from all on the new page takes effect immediately. The contact’s status changes to Unsubscribed.
- Unticking a category, leaving a list, or pausing emails keeps the contact Active. They simply receive fewer emails.
- If your workspace uses a custom unsubscribe page, recipients who click the new link are sent to that custom page instead.
- The one-click Unsubscribe button that Gmail and Yahoo show at the top of your emails is unaffected by this change.
Need Help?
If you need any assistance, please email [email protected], and our support team will be happy to help you.
We don't respond to the article feedback, we use it to improve our support content.