
- Introduction to SureContact Dashboard
- How to Install and Connect the SureContact WordPress Plugin
- What Do Contact Fields Mean in the SureContact WordPress Plugin
- How to Invite Members to a Workspace in SureContact
- How to Switch Organizations in SureContact
- Workspace-Level Contact Allocation in SureContact
- Workspace-Level Timezone Settings in SureContact
- How to Add a Custom Tracking Domain in a Workspace in SureContact
- SureContact MCP Server
- Creating Forms in SureContact
- Create Forms & assign lists & tags
- Multi Language Support(WordPress)
- Page Visit Tracking Guide (WordPress)
- Forms Custom Fields Sync Guide
- Landing Pages User Flow Guide
- SureContact Organization Workspace Setup Guide
- Companies User Flow Guide
- FAQs
- Bulk Operations SureContact
- SureContact Double Opt-In Guide
- SureContact API Keys Guide
- SureContact 2FA User Guide
- SureContact Bookings User Flow Guide
- SureContact MultiStep Forms Guide
- Zoom Integration with SureContact
- Group Booking User Flow Documentation
- Global Search – User Flow Documentation
- Folders in SureContact
- SureContact Email Tracking Pixel Regulations
- Email Open Tracking Consent SureContact
- Forms Custom Success Message Redirect Guide
- Partial Form Submission Guide
- Shopify Integration with SureContact Guide
- Migrate to Unified Preference Page
- Setup SMTP in SureContact
- Email Campaigns in SureContact
- How to Add a Preferences URL in Your Emails
- How to Share Email Templates in SureContact
- Spintax Feature in SureContact
- Deleting Sent Campaigns in SureContact
- A/B Testing Integration Guide
- Unsubscription Guide
- SureContact SMTP Setup Guide
- SMTP Routing User Flow
- FluentCRM Integration with SureContact
- SureContact Third-Party Integration — Step-by-Step Guide
- Fluent Forms Integration with SureContact
- SureForms Integration with SureContact
- WPForms Integration with SureContact
- Bulk Sync WordPress Users to SureContact
- Contact Form 7 Integration with SureContact
- Sync WooCommerce Customers with SureContact
- FluentCart & FluentCommunity Integration With SureContact
Forms Custom Success Message Redirect Guide
SureContact lets you control exactly what a visitor sees the moment after they submit a form: a custom on-page thank-you message, an automatic redirect to any URL, or a fully designed success page built with the drag-and-drop page builder.
This guide walks through the After Submission options available in the form builder’s Submission settings, with live screenshots from SureContact.
How to Set a Custom Success Message or Redirect
1. Open the Form in the Form Builder
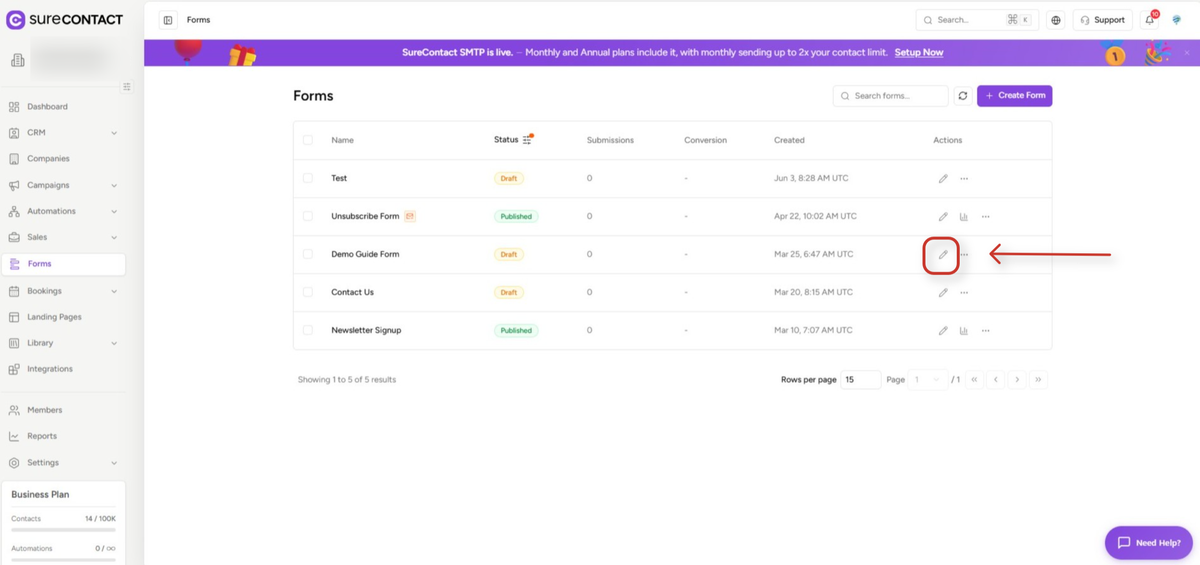
- Go to Forms in the left sidebar.
- Click the edit (pencil) icon next to the form you want to configure. This opens the Form Builder.
2. Open Form Settings
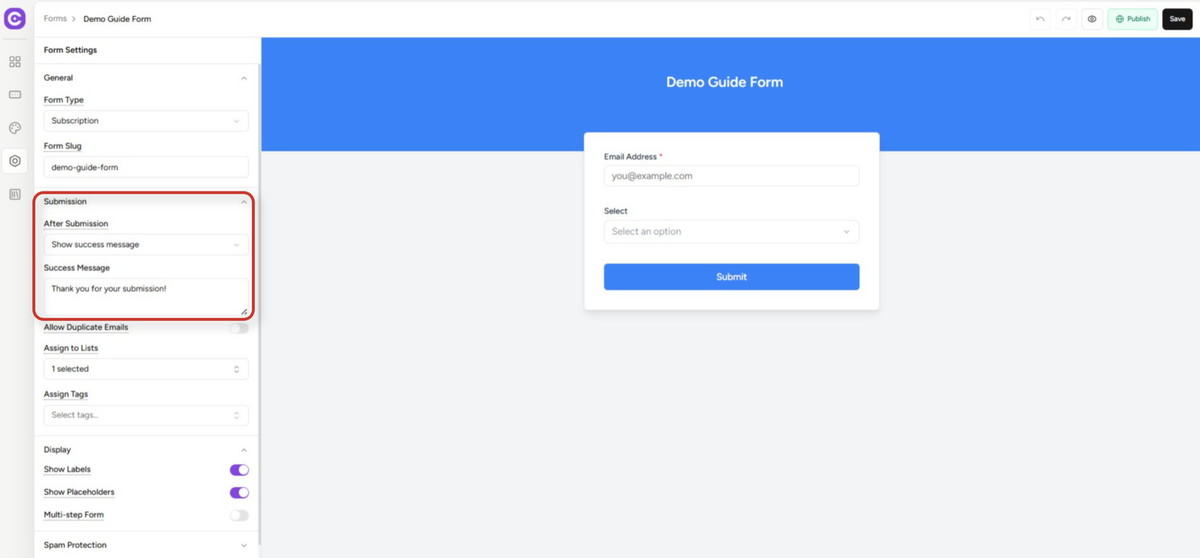
- In the form builder, click the gear (Settings) icon in the left icon rail to open the Form Settings panel.
- Expand the Submission section if it isn’t already open. You’ll see the After Submission dropdown, currently set to Show success message by default, with a Success Message field beneath it.
3. Choose an After Submission Option
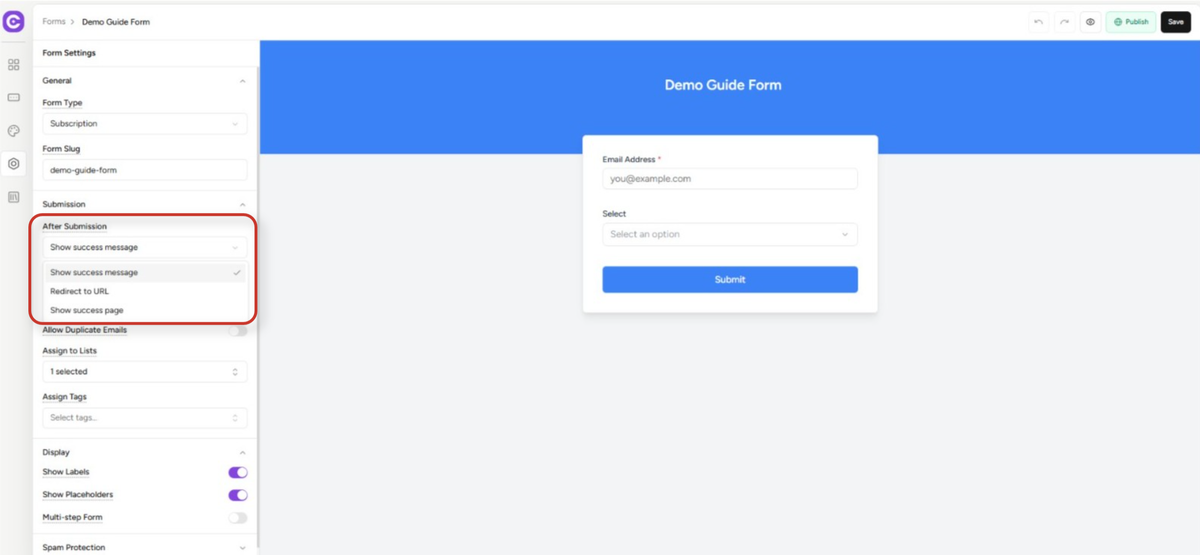
- Click the After Submission dropdown to reveal three options: Show success message, Redirect to URL, and Show success page.
3.1 Option A – Show a Success Message (No Redirect)
- Keep After Submission set to Show success message.
- Edit the Success Message field with your own text (e.g. “Thanks! We’ll be in touch within 24 hours.”). The default text is “Thank you for your submission!” if you leave it unchanged.
- Result: after submitting, the visitor stays on the same page and sees your message in place of the form.
3.2 Option B – Redirect to a Custom URL
- Select Redirect to URL from the dropdown. A Redirect URL field appears in place of the Success Message field.
- Enter the destination URL (e.g. a thank-you page, a resource download, or a checkout page). The field accepts any complete URL, including https://.
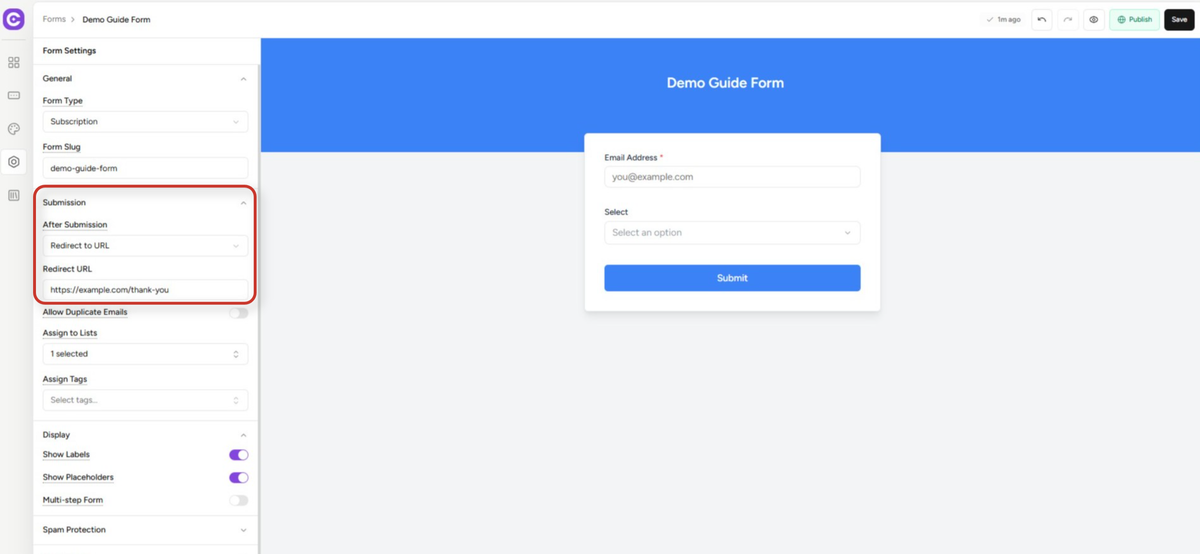
- Result: after submitting, the visitor is immediately redirected to that URL instead of seeing a message on the form.
3.3 Option C – Show a Custom Success Page
- Select Show success page from the dropdown to design a dedicated success page using SureContact’s drag-and-drop page builder, instead of a simple text message.
- Click Open Page Builder to build the page; add your own layout, images, and content, just like a Landing Page.
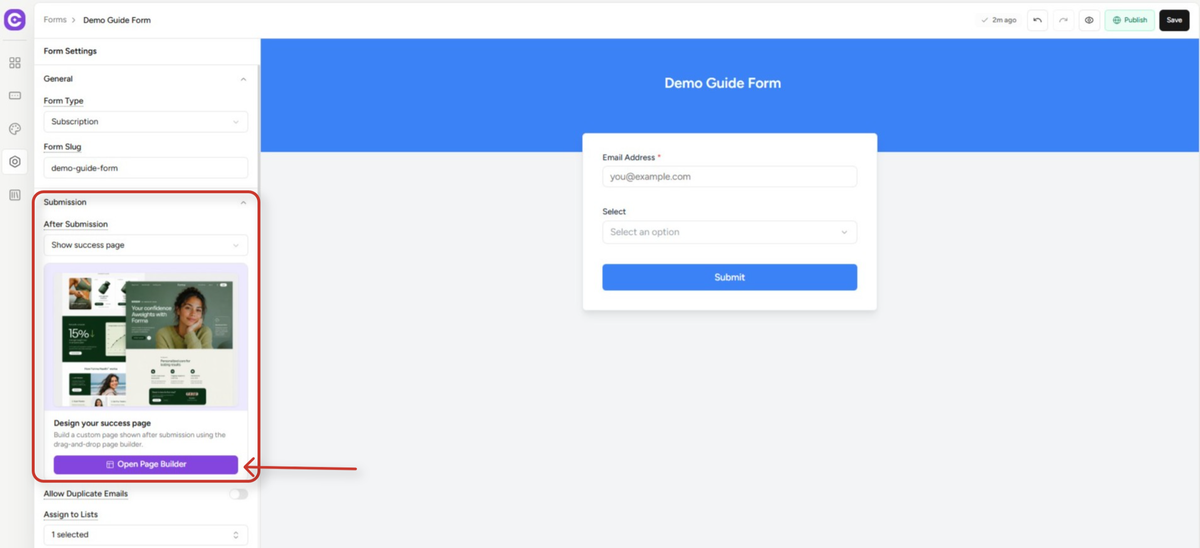
- Result: after submitting, the visitor sees the custom page you designed, rendered inline in place of the form.
4. Save or Publish Your Changes
- Click Save to store your changes to a Draft form, or Publish if you’re updating a form that is already live.
- Changes only take effect on the live form once it has been published; a Save on a Draft form does not affect visitors.
Important Notes / Behavior
Only one option applies at a time.
The After Submission dropdown is a single selection; choosing Redirect to URL or Show success page replaces whichever option was previously configured; you can’t combine a success message with a redirect.
Default message.
If the Success Message field is left at its default, SureContact shows “Thank you for your submission!” after submission.
Multi-step forms.
For multi-step forms, the selected after-submission behavior only triggers once the final step has been submitted.
Common Support Scenarios (FAQ)
“My redirect isn’t working.”
- Confirm the URL in the Redirect URL field is complete and valid (includes https://).
- Make sure After Submission is actually set to Redirect to URL, not Show success message or Show success page.
- Check that the form was Published (or re-Published) after the change; unpublished changes on a live form won’t apply to visitors.
“I want visitors to land on a page I designed, not just plain text.”
- Use the Show success page option instead of Show success message, then click Open Page Builder to design it visually.
“Can I redirect to a page within SureContact, like a Landing Page I built?”
- Yes, enter that Landing Page’s published URL in the Redirect URL field, the same as any external URL.
“Does this affect automations or email notifications tied to the form?”
- No, the After Submission setting only controls what the visitor sees. Automations, confirmation emails, and contact creation happen independently on the backend regardless of this setting.
Need Help?
If you need any assistance, please email [email protected], and our support team will be happy to help you.
We don't respond to the article feedback, we use it to improve our support content.