
- Introduction to SureContact Dashboard
- How to Install and Connect the SureContact WordPress Plugin
- What Do Contact Fields Mean in the SureContact WordPress Plugin
- How to Invite Members to a Workspace in SureContact
- How to Switch Organizations in SureContact
- Workspace-Level Contact Allocation in SureContact
- Workspace-Level Timezone Settings in SureContact
- How to Add a Custom Tracking Domain in a Workspace in SureContact
- SureContact MCP Server
- Creating Forms in SureContact
- Create Forms & assign lists & tags
- Multi Language Support(WordPress)
- Page Visit Tracking Guide (WordPress)
- Forms Custom Fields Sync Guide
- Landing Pages User Flow Guide
- SureContact Organization Workspace Setup Guide
- Companies User Flow Guide
- FAQs
- Bulk Operations SureContact
- SureContact Double Opt-In Guide
- SureContact API Keys Guide
- SureContact 2FA User Guide
- SureContact Bookings User Flow Guide
- SureContact MultiStep Forms Guide
- Zoom Integration with SureContact
- Group Booking User Flow Documentation
- Global Search – User Flow Documentation
- Folders in SureContact
- SureContact Email Tracking Pixel Regulations
- Email Open Tracking Consent SureContact
- Forms Custom Success Message Redirect Guide
- Partial Form Submission Guide
- Shopify Integration with SureContact Guide
- Migrate to Unified Preference Page
- Setup SMTP in SureContact
- Email Campaigns in SureContact
- How to Add a Preferences URL in Your Emails
- How to Share Email Templates in SureContact
- Spintax Feature in SureContact
- Deleting Sent Campaigns in SureContact
- A/B Testing Integration Guide
- Unsubscription Guide
- SureContact SMTP Setup Guide
- SMTP Routing User Flow
- FluentCRM Integration with SureContact
- SureContact Third-Party Integration — Step-by-Step Guide
- Fluent Forms Integration with SureContact
- SureForms Integration with SureContact
- WPForms Integration with SureContact
- Bulk Sync WordPress Users to SureContact
- Contact Form 7 Integration with SureContact
- Sync WooCommerce Customers with SureContact
- FluentCart & FluentCommunity Integration With SureContact
Folders in SureContact
SureContact includes two separate, independent folder systems that help you keep a growing workspace organized: Resource Folders for Campaigns, Email Templates, and Automations, and Media Folders for the images and assets stored in your Media Library.
This guide walks through how to create, use, and manage both folder types, and calls out the key differences between them so nothing gets accidentally lost.
Overview
The two systems look similar but work differently; here’s how they compare at a glance:
| Resource Folders | Media Folders | |
| Organizes | Email Templates, Campaigns, Automations | Uploaded images/assets in the Media Library |
| Nesting in UI | No, flat list only (backend supports nesting, UI doesn’t expose it) | Yes, full nested folder tree |
| Deleting a folder | Items inside become root-level (never deleted) | All contents (files + sub-folders) are permanently deleted |
| Where to manage | Settings → Folders, or inline while working with a Campaign/Template/Automation | Media Library panel / Assets tab in the editor |
Part 1 – Resource Folders (Campaigns / Email Templates / Automations)
Each of the three resource types, Campaigns, Email Templates, and Automations, has its own separate set of folders. A folder created for Campaigns is not shared with Templates or Automations, even if it has the same name.
Where to manage folders
- Central admin view: go to Settings → Folders. This shows every folder across all three resource types in a grid, with a type filter (All / Campaigns / Email Templates / Automations).
- Inline, while working: on the Campaigns, Email Templates, or Automations list page, use the folder filter dropdown in the toolbar to filter by folder, or create a new one on the fly.
- When creating/editing an item: the folder picker on the create/edit screen lets you assign the item to a folder (or leave it unassigned) directly.
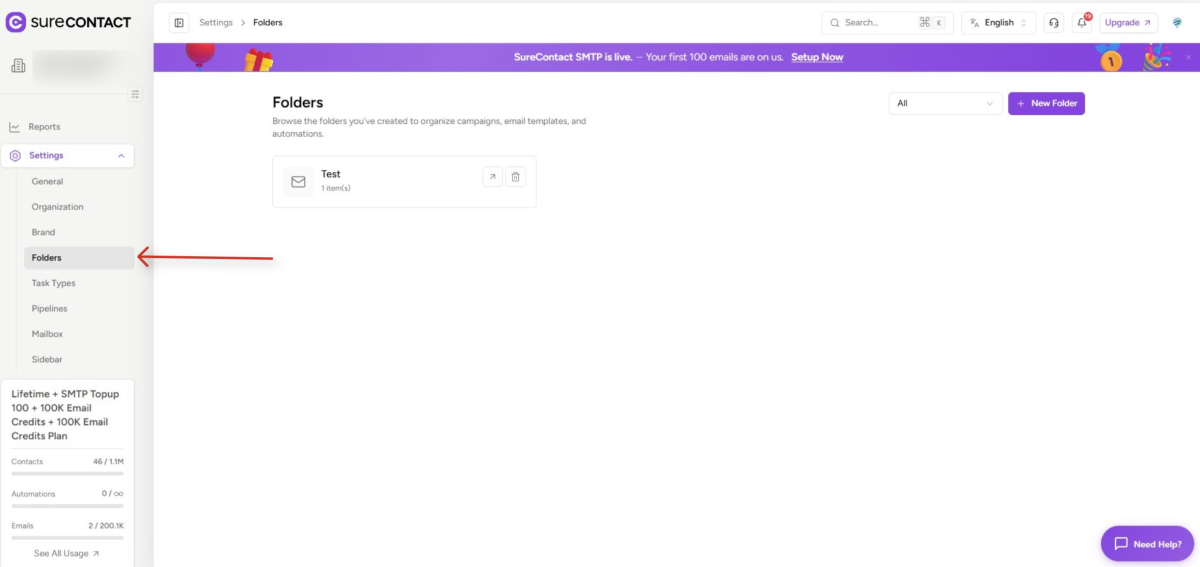
Step-by-step: Create a folder
1. Go to the list page for Campaigns, Email Templates, or Automations (or Settings → Folders).
2. Click New Folder.
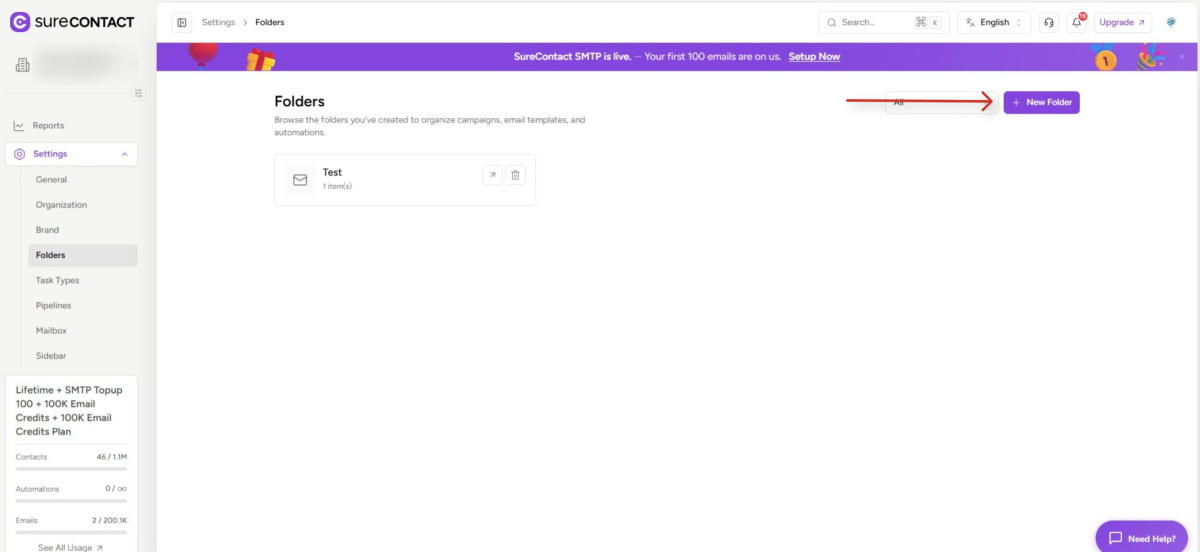
3. Enter a folder name (required) and choose a Type (Campaign, Email Template, or Automation).
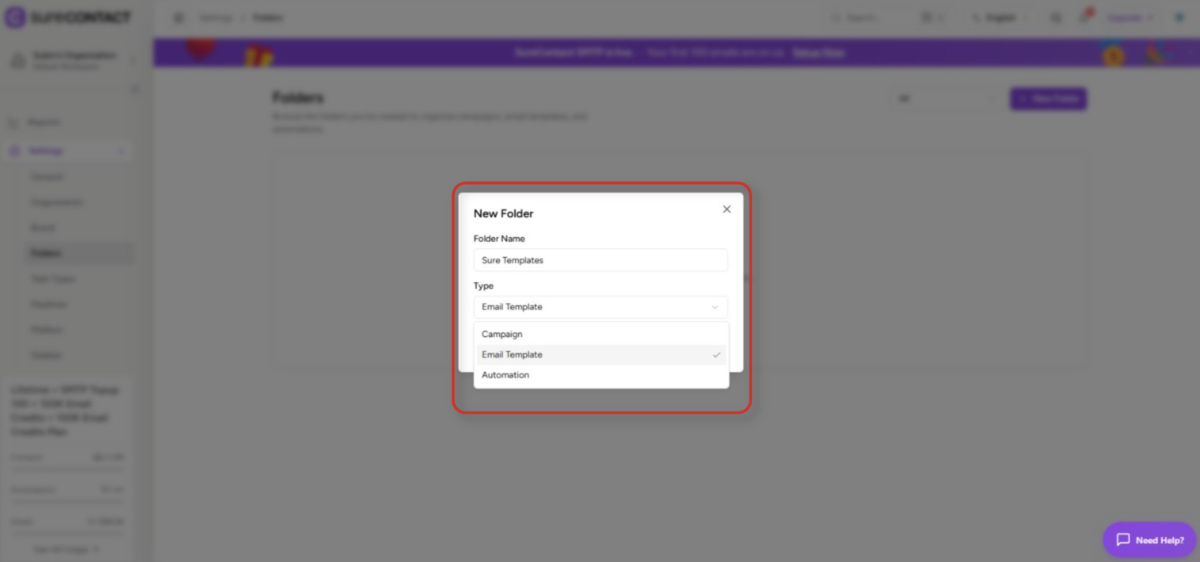
4. Save. The folder appears immediately in the folder filter dropdown and the Settings → Folders grid.
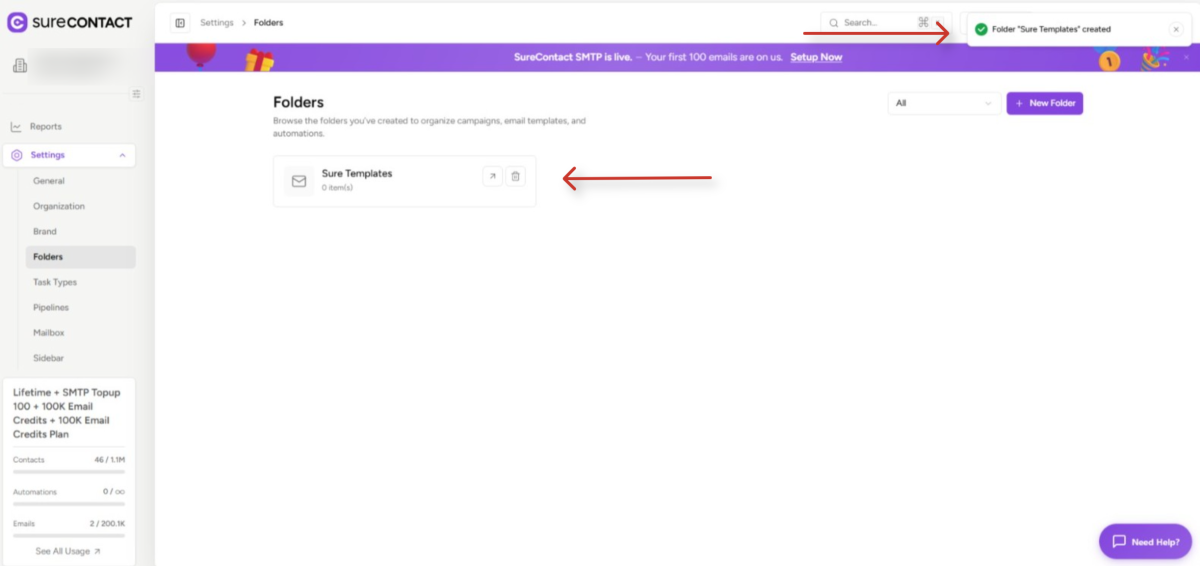
Step-by-step: Move items into a folder
Single item
1. Open the item (or use its row menu in the list view).
2. Use the folder picker (“Add” / “Select folder”) and choose the destination folder.
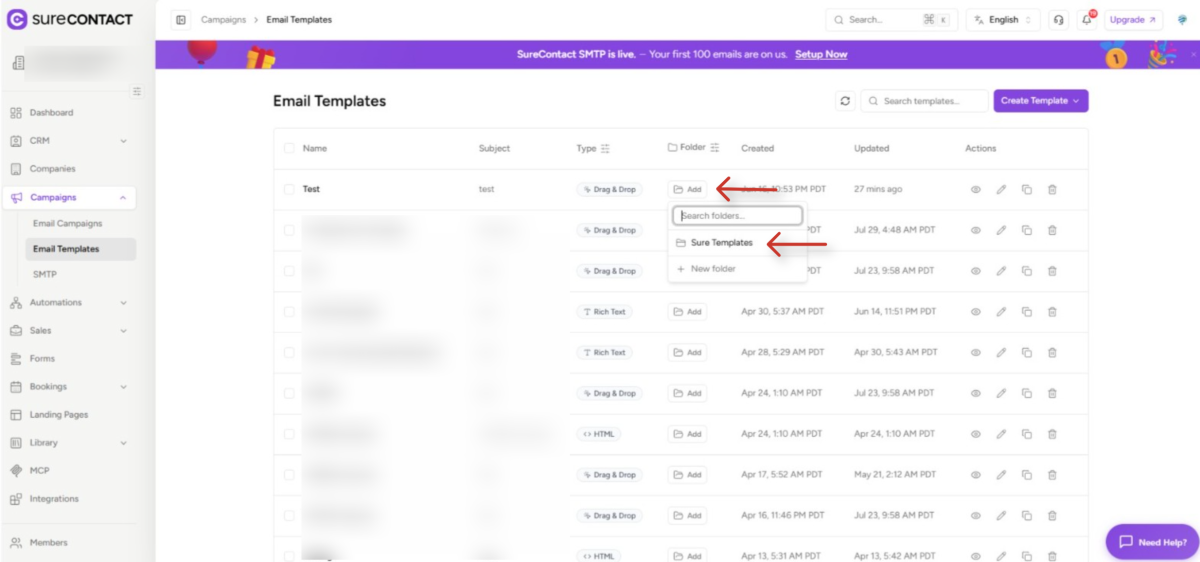
3. Save- the item now appears under that folder.
Multiple items at once
1. On the list page, select the checkboxes for the items to move.
2. Click Move to folder in the bulk actions bar.
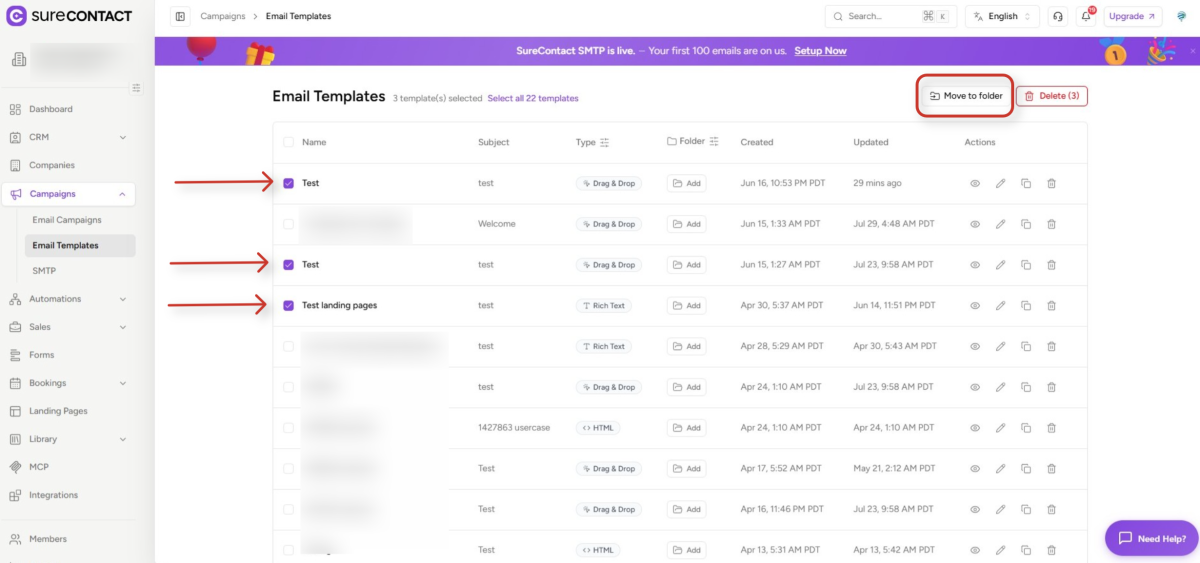
3. Choose a destination folder, or choose “no folder” to move everything back to the root.
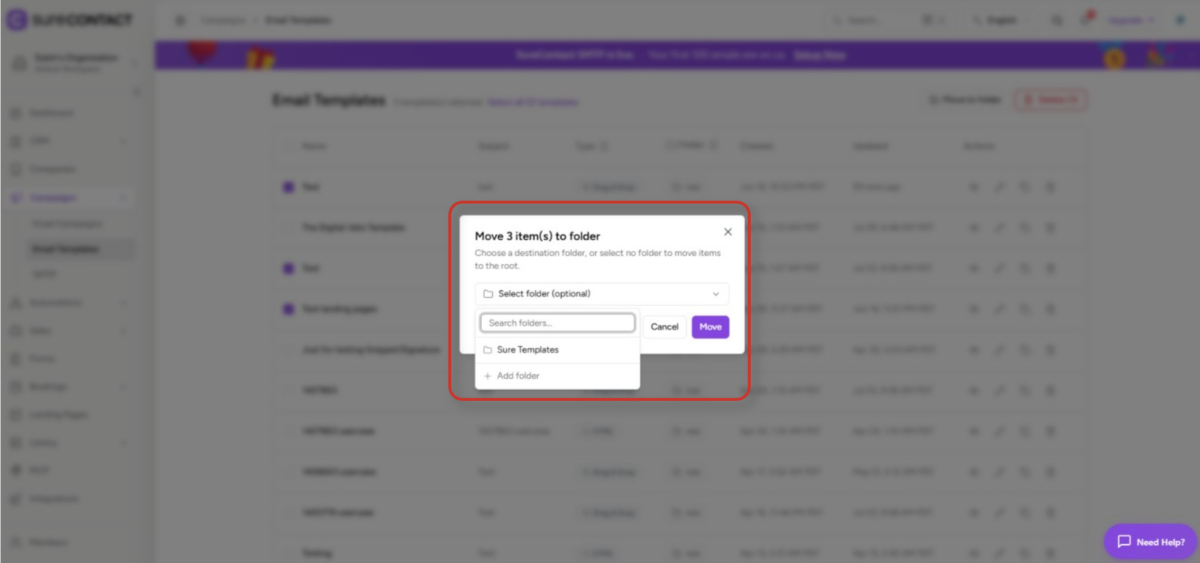
4. Confirm. All selected items move together.
Step-by-step: Rename or delete a folder
1. Go to Settings → Folders (or the folder filter dropdown).
2. Open the folder’s “⋮” menu.
3. Rename – edit the name/description and save.
4. Delete – confirm the prompt: “Are you sure you want to delete ‘[folder name]’? Items inside will not be deleted; they will become root-level items.”
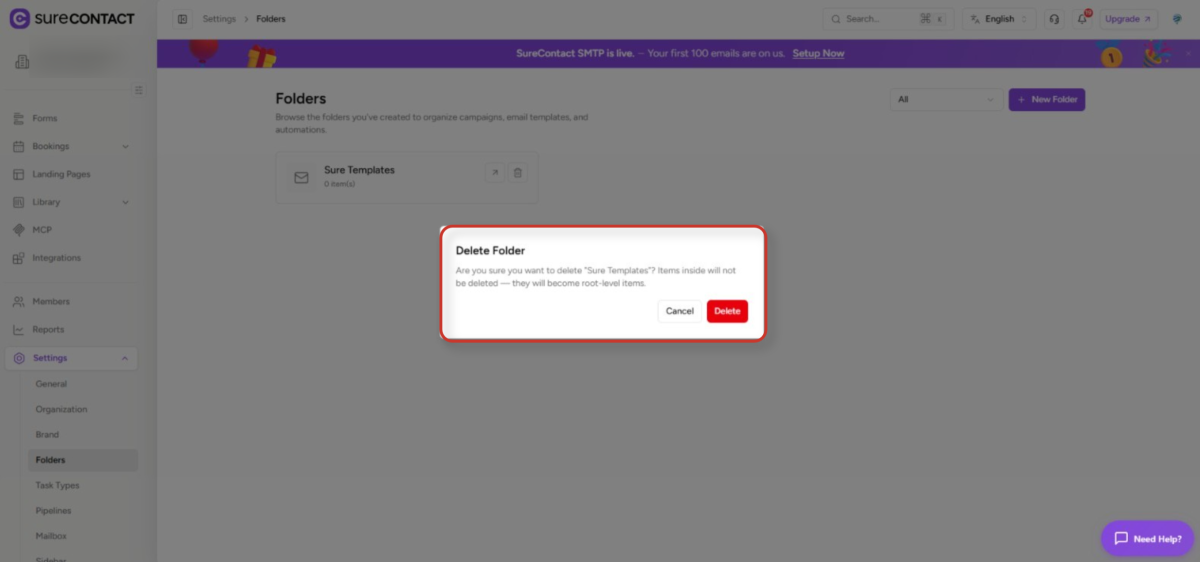
Some notes
- Folders are optional; items never require a folder.
- You can filter the Campaigns/Templates/Automations list by folder using the folder dropdown in the toolbar.
- Deleting a folder is safe; it only “un-files” the items; it does not delete campaigns, templates, or automations.
- There is currently no way to nest one folder inside another from the UI; folders are a single flat level per resource type.
Part 2 – Media Folders (Media Library)
Media Folders organize the images and assets a workspace has uploaded, used by the email/page editor’s image picker and the standalone Media Library panel.
Where to manage folders
Open the Media Library panel from the editor’s image insert dialog, or from the Assets tab of the page/email editor.
Step-by-step: Create a folder
1. Open the Media Library under Assets in email builder.
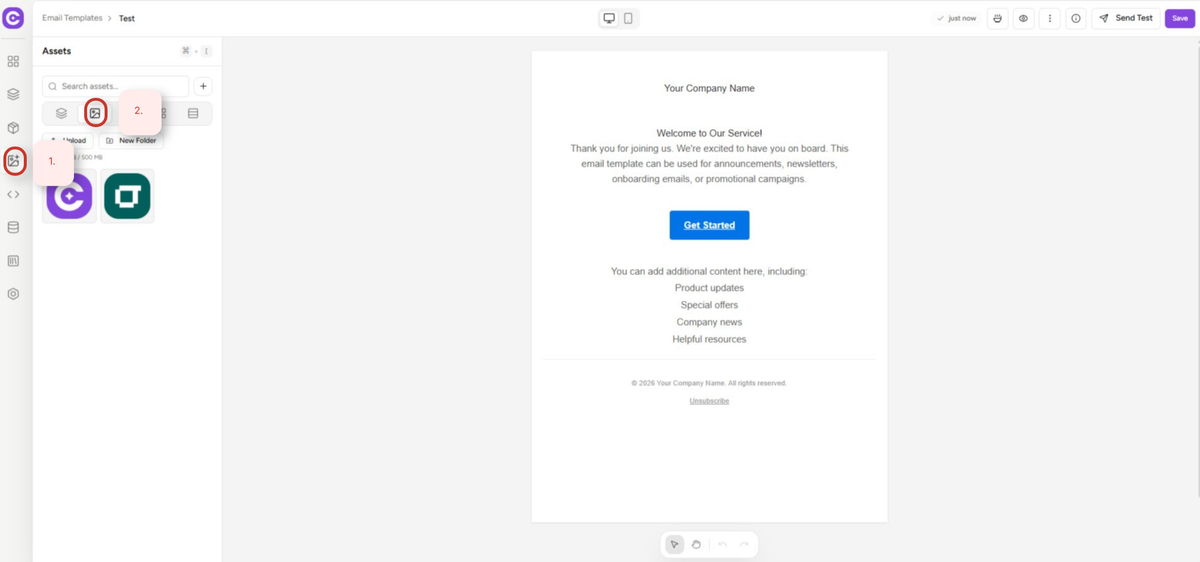
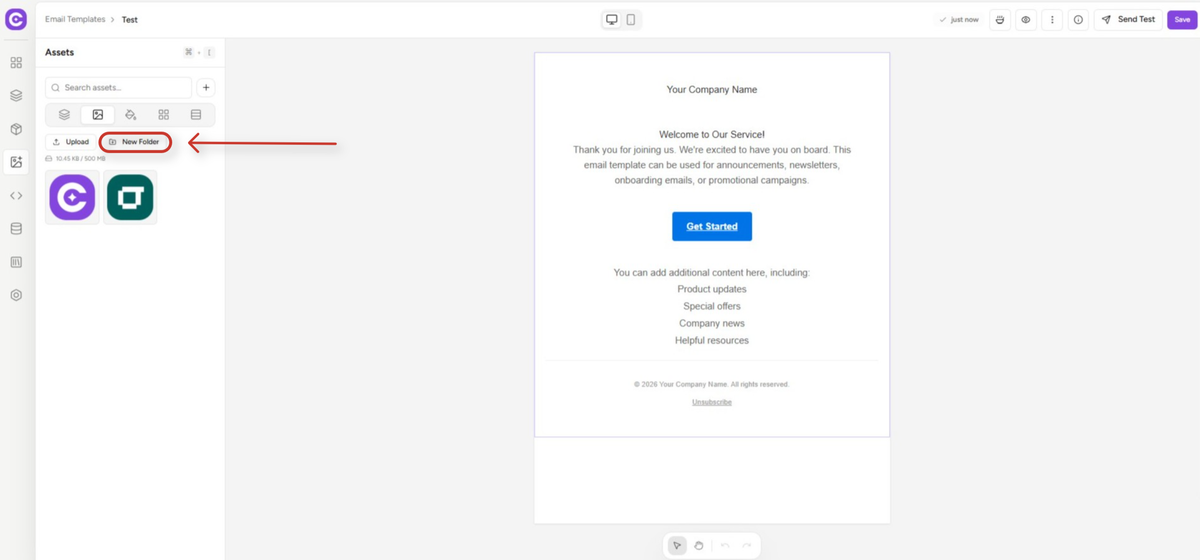
2. Navigate to the location where the folder should live; folders are created inside whatever folder you’re currently viewing, including nested inside another folder.
3. Click New Folder, enter a name, and save.
Step-by-step: Navigate and move items
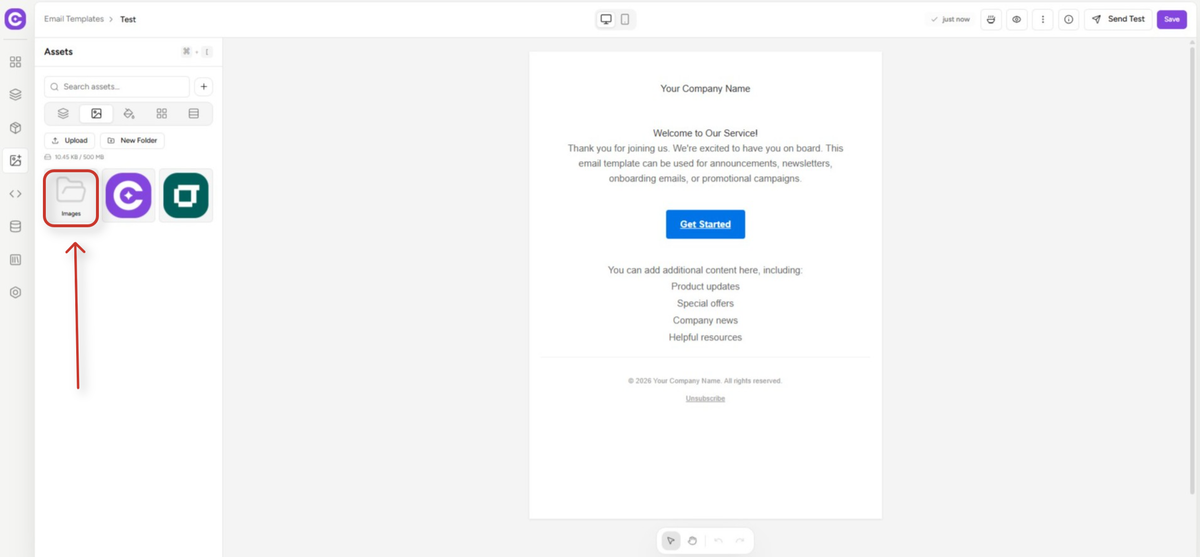
1. Click into a folder to view its contents; use the Back/breadcrumb navigation to go up a level.
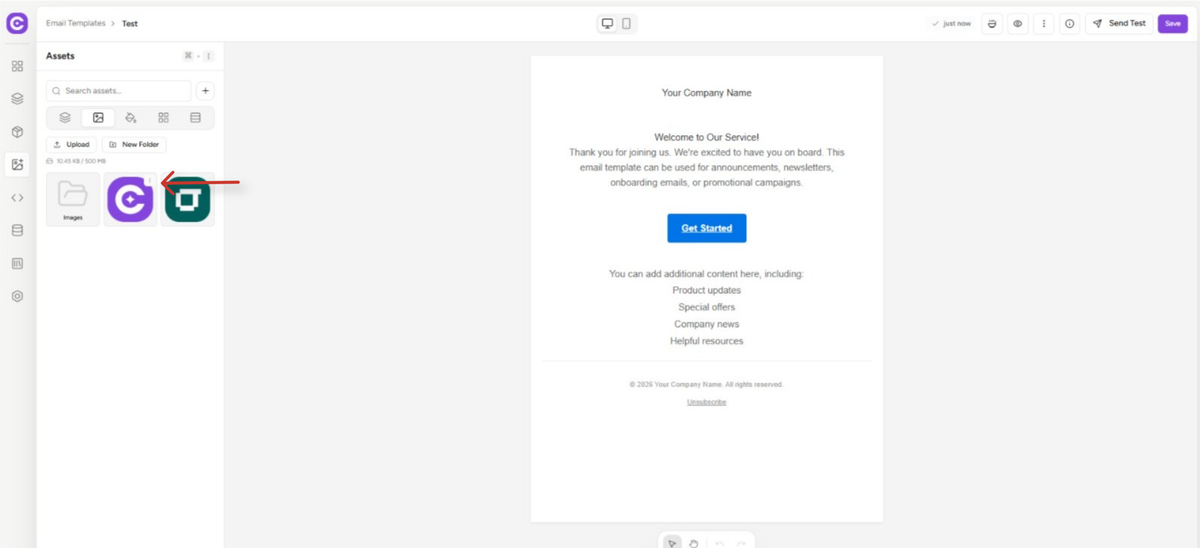
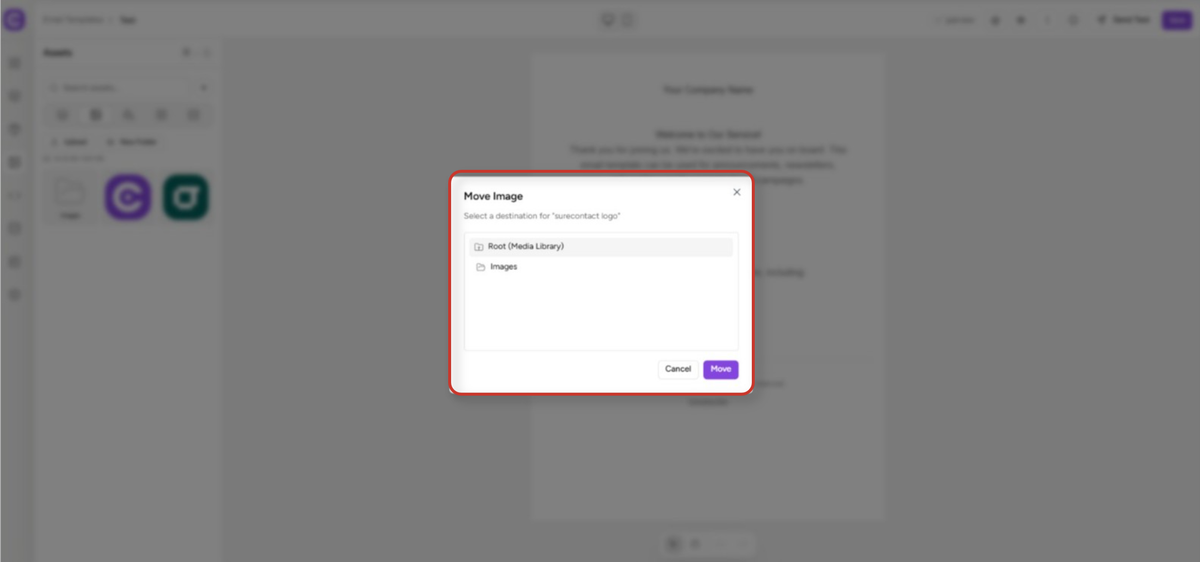
2. To move a file or folder, use its “⋮” menu → Move, which opens a folder-tree picker showing the full nested structure (indented by depth) so you can pick any destination, including nesting several levels deep.
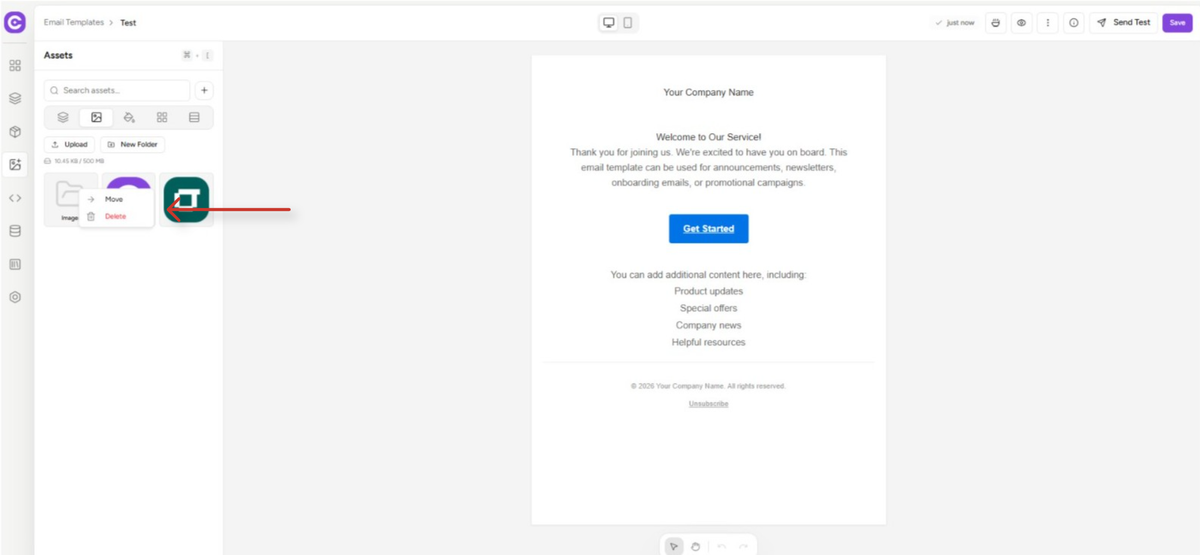
Step-by-step: Rename or delete a folder
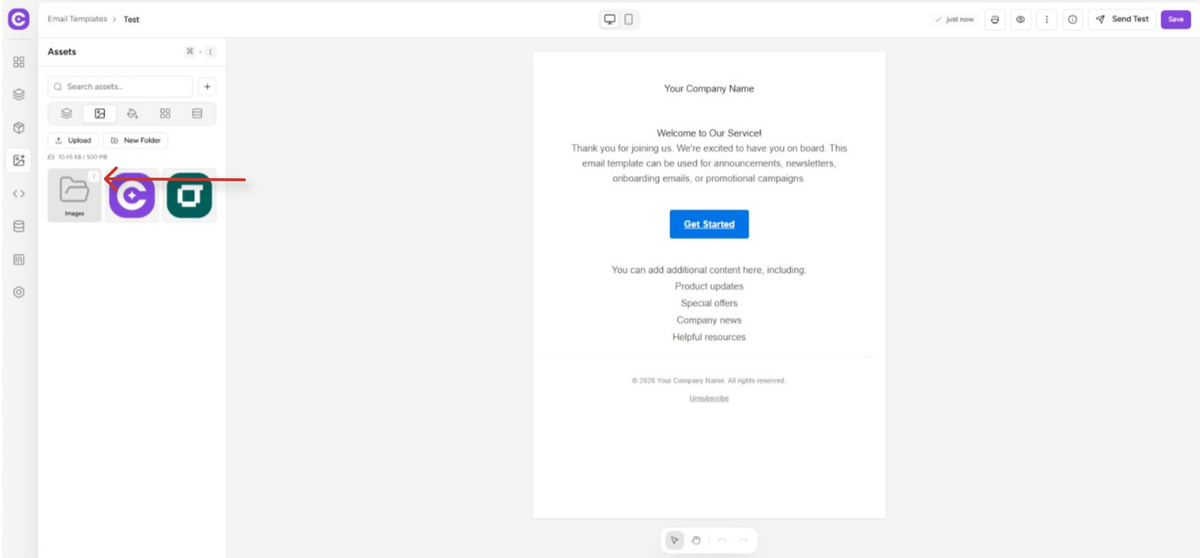
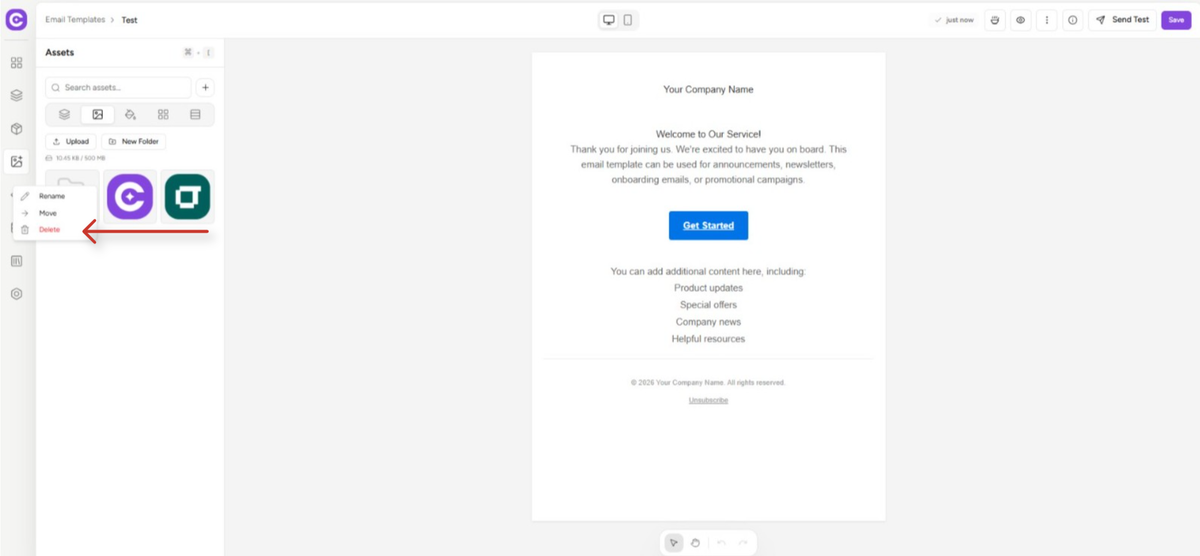
1. Use the folder’s “⋮” menu.
2. Rename, edit the name, and save.
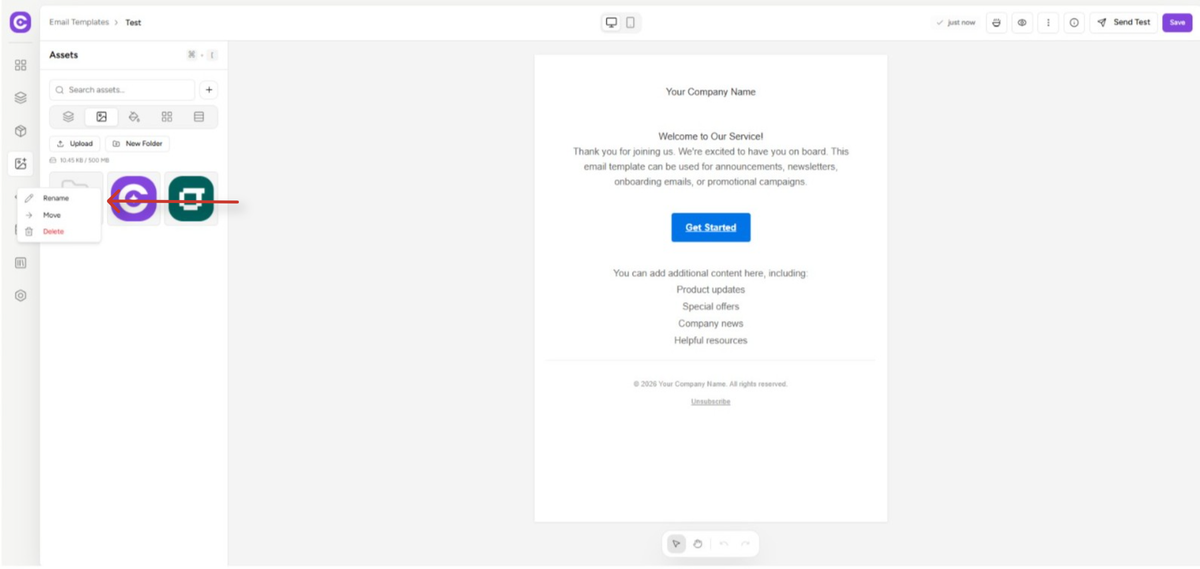
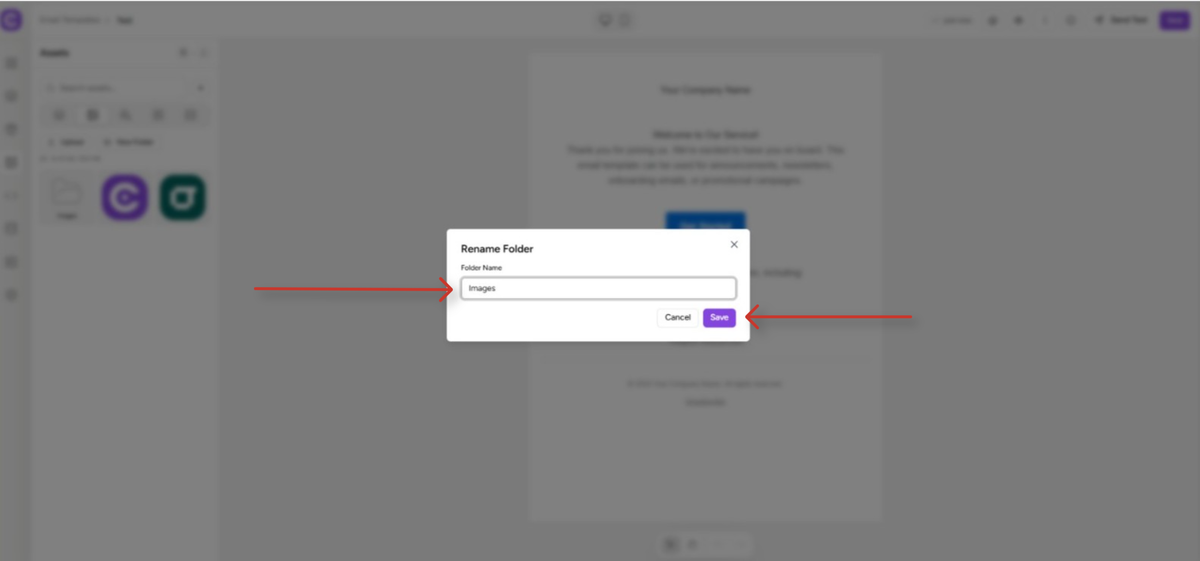
3. Delete; confirm the warning: “Are you sure you want to delete ‘[folder name]’? This will delete all contents including subfolders and media files. This action cannot be undone.”
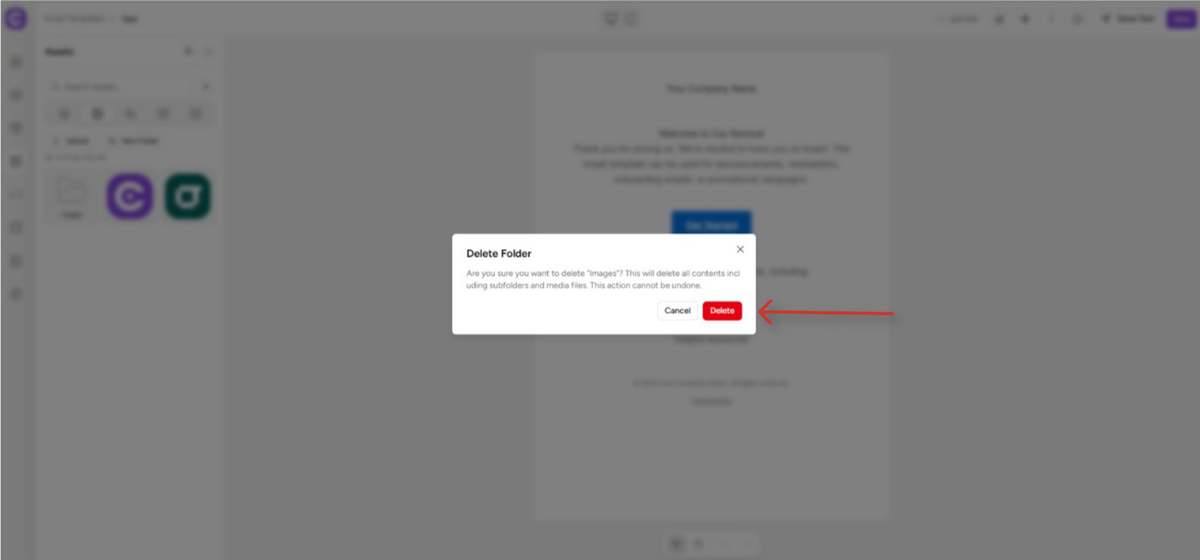
Important – this is the opposite of Resource Folders. Deleting a Media Folder permanently deletes every file and sub-folder inside it, with no way to recover them.
Some notes
- Media folders can be nested (unlike Campaign/Template/Automation folders).
- Storage usage (used/limit) is shown in the Media Library panel.
- Deleting a media folder is destructive and irreversible; encourage moving important files out first if unsure.
Need Help?
If you need any assistance, please email [email protected], and our support team will be happy to help you.
We don't respond to the article feedback, we use it to improve our support content.