
- Introduction to SureContact Dashboard
- How to Install and Connect the SureContact WordPress Plugin
- What Do Contact Fields Mean in the SureContact WordPress Plugin
- How to Invite Members to a Workspace in SureContact
- How to Switch Organizations in SureContact
- Workspace-Level Contact Allocation in SureContact
- Workspace-Level Timezone Settings in SureContact
- How to Add a Custom Tracking Domain in a Workspace in SureContact
- SureContact MCP Server
- Creating Forms in SureContact
- Create Forms & assign lists & tags
- Multi Language Support(WordPress)
- Page Visit Tracking Guide (WordPress)
- Forms Custom Fields Sync Guide
- Landing Pages User Flow Guide
- SureContact Organization Workspace Setup Guide
- Companies User Flow Guide
- FAQs
- Bulk Operations SureContact
- SureContact Double Opt-In Guide
- SureContact API Keys Guide
- SureContact 2FA User Guide
- SureContact Bookings User Flow Guide
- SureContact MultiStep Forms Guide
- Zoom Integration with SureContact
- Group Booking User Flow Documentation
- Global Search – User Flow Documentation
- Folders in SureContact
- SureContact Email Tracking Pixel Regulations
- Email Open Tracking Consent SureContact
- Forms Custom Success Message Redirect Guide
- Partial Form Submission Guide
- Shopify Integration with SureContact Guide
- Migrate to Unified Preference Page
- Setup SMTP in SureContact
- Email Campaigns in SureContact
- How to Add a Preferences URL in Your Emails
- How to Share Email Templates in SureContact
- Spintax Feature in SureContact
- Deleting Sent Campaigns in SureContact
- A/B Testing Integration Guide
- Unsubscription Guide
- SureContact SMTP Setup Guide
- SMTP Routing User Flow
- FluentCRM Integration with SureContact
- SureContact Third-Party Integration — Step-by-Step Guide
- Fluent Forms Integration with SureContact
- SureForms Integration with SureContact
- WPForms Integration with SureContact
- Bulk Sync WordPress Users to SureContact
- Contact Form 7 Integration with SureContact
- Sync WooCommerce Customers with SureContact
- FluentCart & FluentCommunity Integration With SureContact
SureContact API Keys Guide
SureContact API keys allow external apps, scripts, and integrations to securely access your workspace without requiring a login session. Each key carries specific permissions and can be revoked or regenerated at any time.
This guide walks through the complete workflow for creating, viewing, editing, revoking, regenerating, and deleting API keys in SureContact.
Prerequisites
Before managing API keys, please ensure the following:
1. You Have the Required Role
Only users with the Manager role or higher (Org Admin or Org Owner) can create, edit, revoke, or delete API keys. Members with a lower role will not see the API Keys section in Settings.
2. You Are in the Correct Workspace
API keys are scoped to a specific workspace. Make sure you are operating inside the correct workspace before creating keys.
1. Finding API Keys
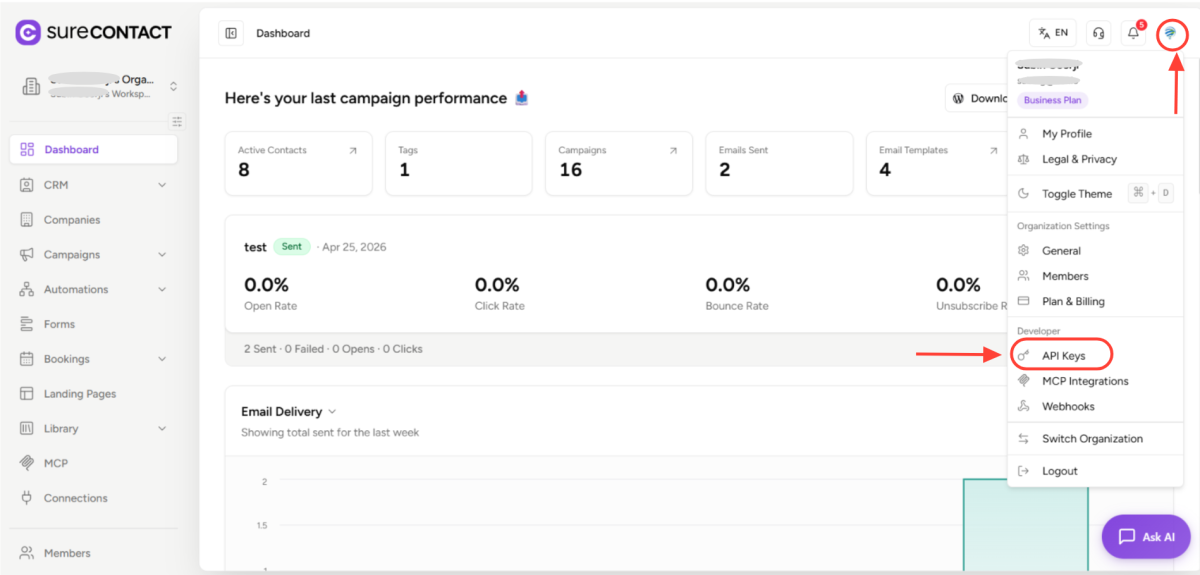
API keys are managed under Settings in the right top icon sidebar. Navigate to Developer → API Keys.
- Open your SureContact workspace.
- Scroll to the profile icon button of the right top sidebar and click it.
- In the Developer sub-navigation, click API Keys.
2. Viewing API Keys
The API Keys page displays a table listing all keys in the workspace. You can search by name or filter by status (Active or Revoked) using the toolbar at the top.
The table includes the following columns:
- Name – the label you assigned to the key.
- Key – a masked display showing only the first 4 and last 4 characters (e.g. xk7a…p9mz).
- Abilities – color-coded badges: Read (blue), Write (amber), Delete (red).
- Status – Active, Revoked, or Expired.
- Last Used – relative timestamp of the most recent API request using this key.
- Actions – Edit, Revoke/Activate, Regenerate, and Delete icons.
3. Creating an API Key
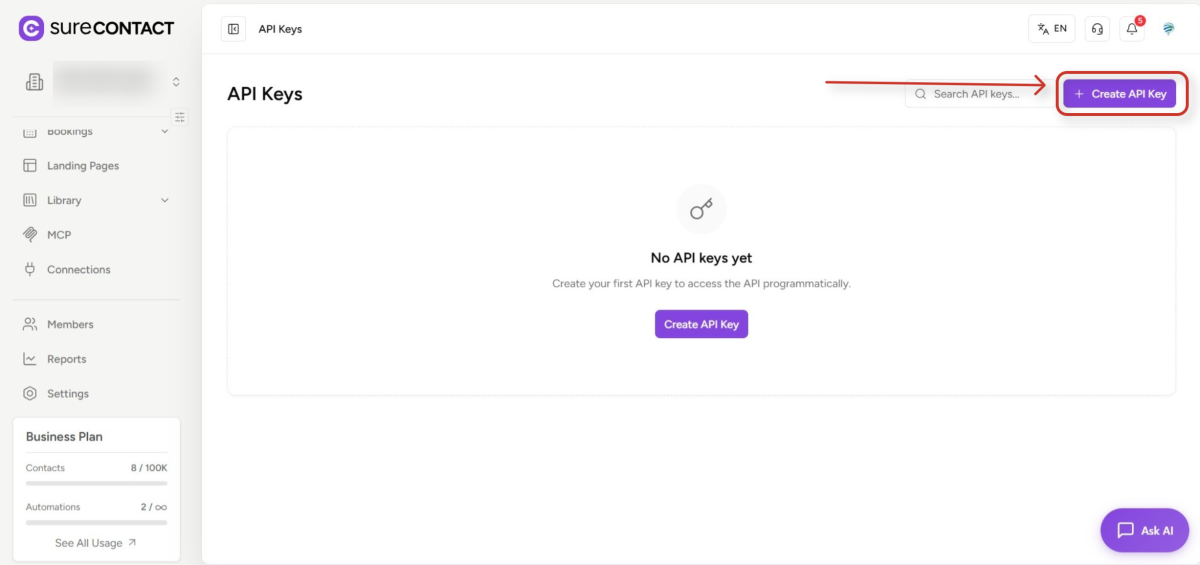
To create a new API key, click the Create API Key button in the top-right corner of the API Keys page. A side panel will slide open.
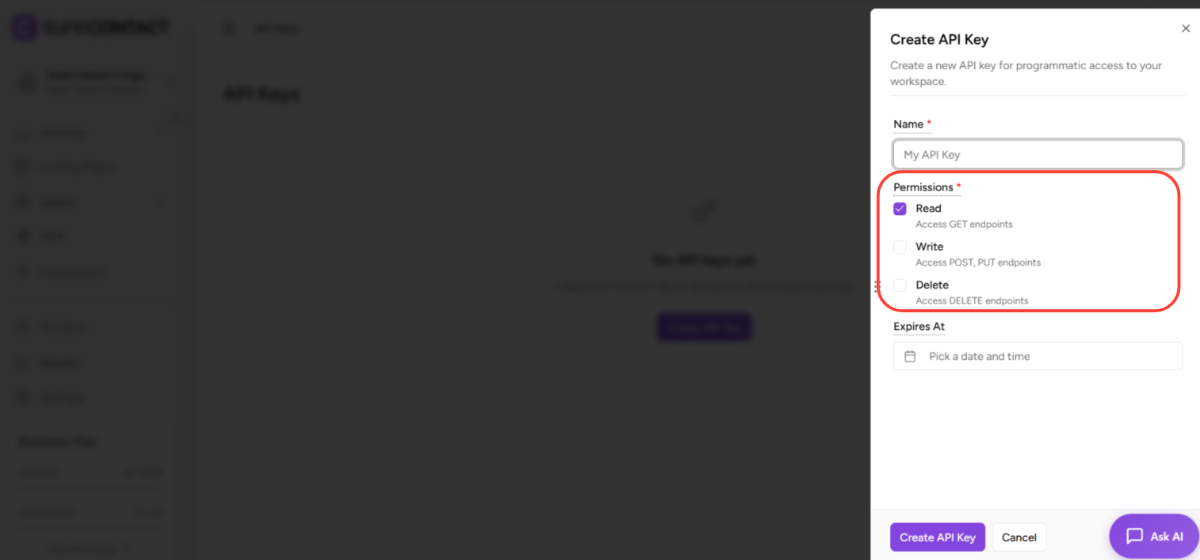
3.1 Name
- Enter a descriptive label for the key (e.g. “Zapier Integration” or “Reporting Script”).
- The name is required and must be 255 characters or fewer.
3.2 Abilities (Permissions)
- Select at least one permission: Read, Write, or Delete.
- Read – allows fetching contacts, lists, tags, campaigns, and reports.
- Write – allows creating and updating contacts, lists, tags, campaigns, and automations.
- Delete – allows deleting contacts, lists, tags, and other records.
- Always grant only the minimum permissions needed for the integration.
3.3 Expires At (Optional)
- Optionally set an expiry date and time. If set, the date must be in the future.
- Leave blank for a key with no expiration.
Click Create to generate the key.
4. Copying Your API Key After Creation
Immediately after clicking Create, a dialog appears displaying the full API key in plain text. This is the only time the key will be shown in full.
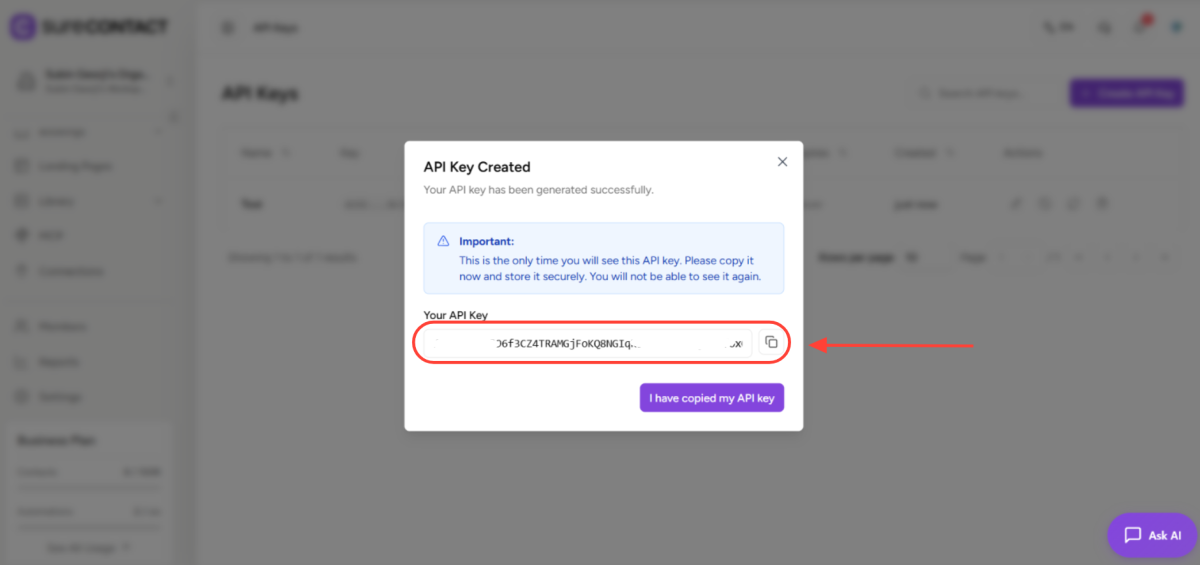
- Click the copy icon to copy the key to your clipboard.
- Store the key securely in a password manager or secrets vault.
- Click “I’ve saved my key – Close” to dismiss the dialog.
5. Editing an API Key
You can update a key’s name, abilities, expiry date, or active/inactive status without changing the key string itself.
- Click the pencil (Edit) icon on the key row.
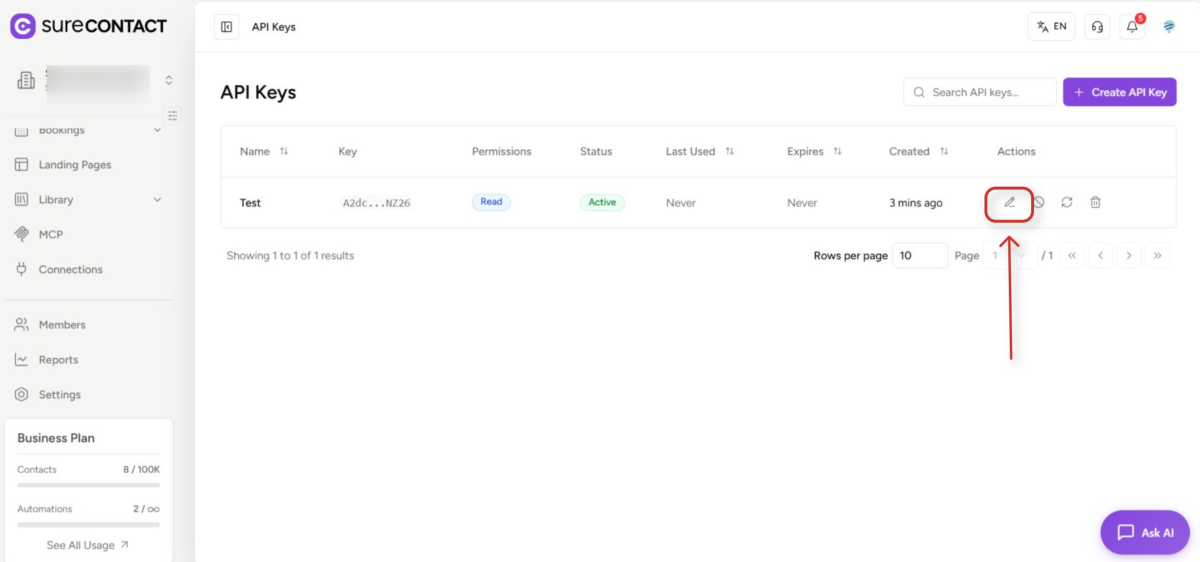
- A side panel opens with the current settings pre-filled.
- Update any of the fields: Name, Abilities, Expires At, or the Active toggle.
- Click Save Changes.
6. Key Actions – Revoke, Regenerate, and Delete
Each row in the API Keys table has four action icons on the right side.
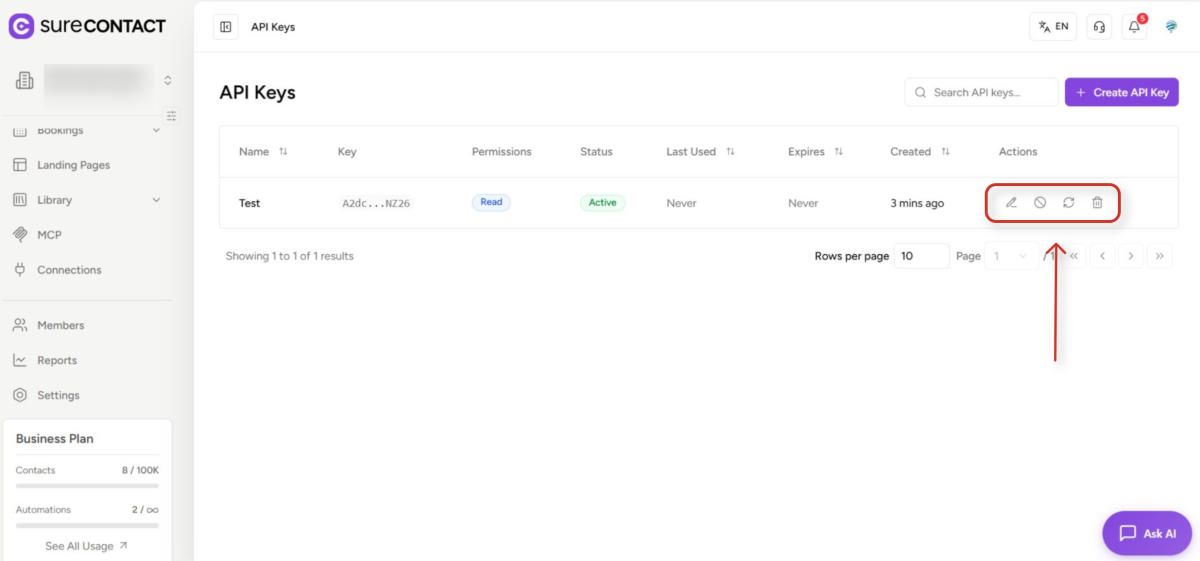
6.1 Revoking a Key
Revoking disables the key without deleting it. The key is preserved for audit purposes and can be re-activated later. Click the Revoke icon (circle with slash), confirm the dialog, and the key status changes to Revoked immediately. Any API requests using the revoked key will be rejected.
To re-activate a revoked key, click the same icon (which now acts as Activate).
6.2 Regenerating a Key
Regenerating creates a new key string with the same name, permissions, and expiry – the old string is permanently invalidated. Click the Regenerate icon (circular arrow), confirm the dialog, and a new full key is shown once. Copy it immediately.
6.3 Deleting a Key
Deleting permanently removes the key and all its audit logs. This cannot be undone. Click the trash icon, confirm the dialog, and the key is gone. Any API requests using the deleted key are immediately rejected.
7. Using Your API Key
Include your API key in the request headers when calling the SureContact public API. There are two supported methods:
Option A – Custom Header (Recommended)
- Add the header X-API-Key: your-api-key-here to every request.
Option B – Authorization Bearer
- Add the header Authorization: Bearer your-api-key-here to every request.
The key is checked against the required permission for each endpoint. A Read-only key will be rejected if you attempt a write or delete operation.
8. Security Rules and Limits
Key length: 60 random alphanumeric characters. Keys are stored as SHA-256 hashes – never in plain text. Only the first 4 and last 4 characters are shown after creation. Rate limiting is applied per key on all public API endpoints. Keys revoked for 30 or more days are automatically purged.
There are three key types: api (standard integrations), MCP (Claude/AI integrations), and SureMails (SureMails plugin). The SureContact MCP server uses api-type keys.
9. Common Scenarios
“I forgot to copy my key after creation”
You cannot retrieve the key string. Use Regenerate on the key row to create a new string with the same settings, then copy and store the new key immediately.
“I think my key was leaked”
Immediately click Regenerate (or Revoke if you no longer need the key). Update the key value in all your integrations and scripts.
“My integration stopped working”
Check the key’s Status column – it may be Revoked or Expired. Check Last Used to confirm whether recent requests are reaching SureContact. If the status is Active but requests fail, verify you are sending the key in the correct header.
“I need a read-only key for a reporting tool”
Create a key with only the Read ability. Optionally set an expiry date to limit its lifespan.
Need Help?
If you need any assistance, please email [email protected], and our support team will be happy to help you.
We don't respond to the article feedback, we use it to improve our support content.