
- Introduction to SureContact Dashboard
- How to Install and Connect the SureContact WordPress Plugin
- What Do Contact Fields Mean in the SureContact WordPress Plugin
- How to Invite Members to a Workspace in SureContact
- How to Switch Organizations in SureContact
- Workspace-Level Contact Allocation in SureContact
- Workspace-Level Timezone Settings in SureContact
- How to Add a Custom Tracking Domain in a Workspace in SureContact
- SureContact MCP Server
- Creating Forms in SureContact
- Setup SMTP in SureContact
- Email Campaigns in SureContact
- How to Add a Preferences URL in Your Emails
- How to Share Email Templates in SureContact
- Spintax Feature in SureContact
- Deleting Sent Campaigns in SureContact
- A/B Testing Integration Guide
- Unsubscription Guide
- SureContact SMTP Setup Guide
- SMTP Routing User Flow
- FluentCRM Integration with SureContact
- SureContact Third-Party Integration — Step-by-Step Guide
- Fluent Forms Integration with SureContact
- SureForms Integration with SureContact
- WPForms Integration with SureContact
- Bulk Sync WordPress Users to SureContact
- Contact Form 7 Integration with SureContact
- Sync WooCommerce Customers with SureContact
Contact Activity & Purchase History
SureContact provides a rich contact profile where you can view the full history of emails sent, activities logged, notes, and e-commerce purchase data for every contact in your workspace.
This guide walks you through how to access a contact’s profile, navigate the available tabs, review and filter activity timelines, log notes and manual activities, and explore purchase history.
How to Access a Contact’s Profile
1. Navigate to the Contacts section
- Click Contacts in the left sidebar to open the contacts list.
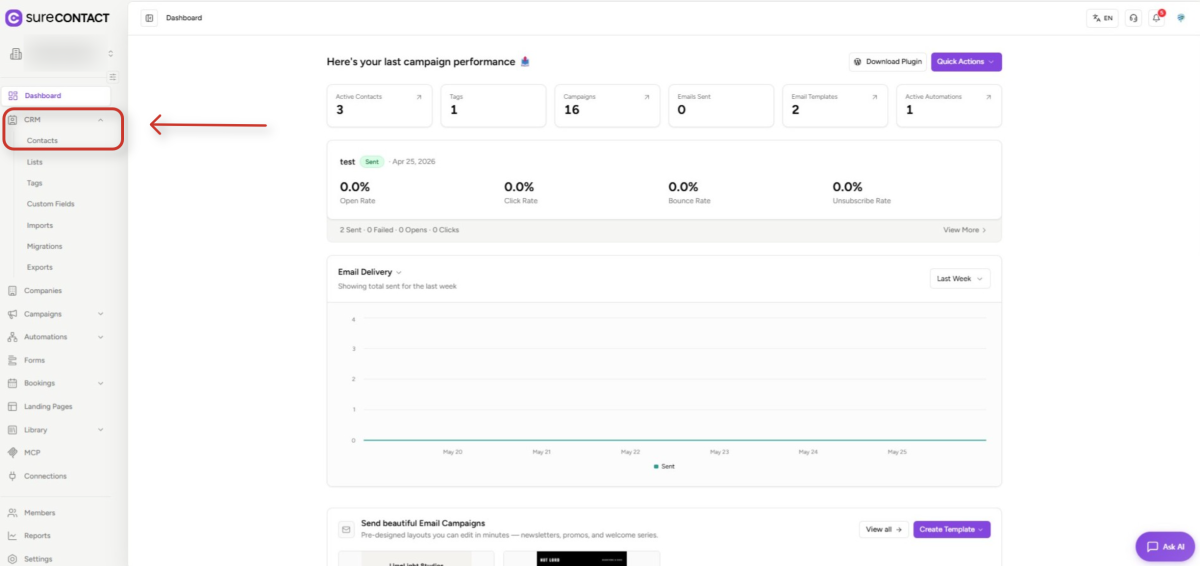
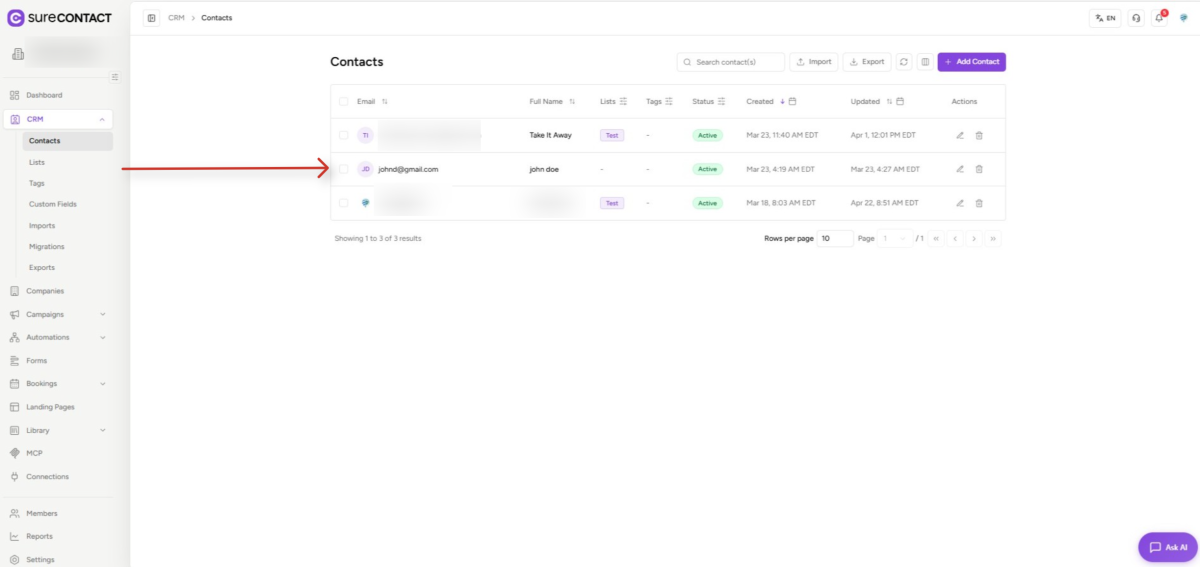
- You will see all contacts in your workspace listed in a searchable, paginated table.
2. Open a contact profile
- Click on any contact’s email address in the list to open their profile.
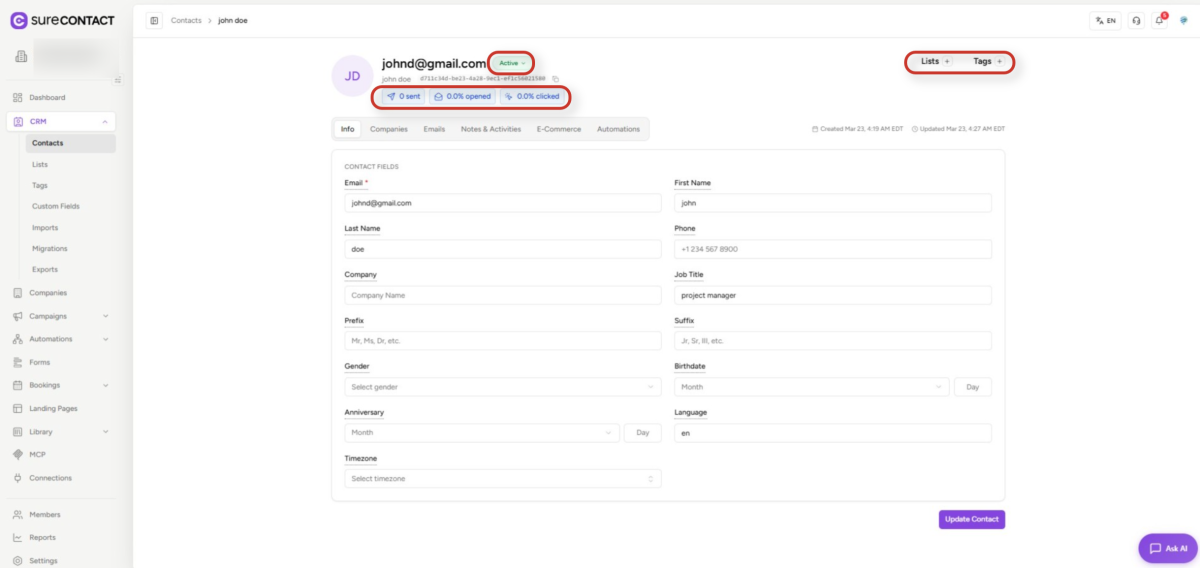
- The profile header displays a status badge (Active, Unsubscribed, Bounced, Invalid, Complained, or Pending), a “Do Not Email” badge if applicable, and key stats – Emails Sent, Open Rate, Click Rate, and Bounced count.
- Tags and Lists are shown below the stats and can be edited inline. Created and Updated timestamps are also shown.
Contact Profile Tabs
The contact profile has six tabs, each showing a different aspect of the contact’s data:
| Tab | What It Shows |
| Info | Name, email, phone, company, job title, custom fields |
| Companies | Companies this contact is linked to (requires Companies feature) |
| Emails | Email sending history and engagement stats |
| Notes & Activities | Manual notes + full activity timeline |
| E-Commerce | Purchase history and order stats |
| Automations | Active and completed automations for this contact |
Notes & Activities Tab
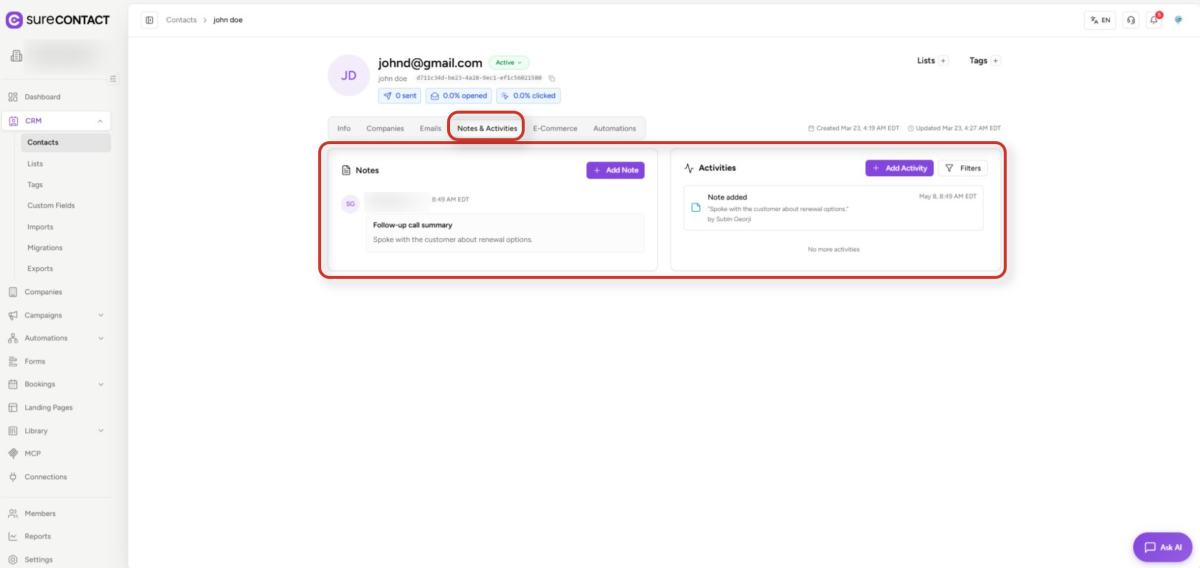
The Notes & Activities tab is split into two columns (stacked on mobile): Notes on the left and Activities on the right.
Notes (Left Column)
- Shows all notes logged for this contact – each note displays its title (optional), content, who created it, and when.
- Notes load 15 at a time; click “Load More” to see older notes.
Activities (Right Column)
- A full timeline of everything that has happened for this contact across all categories.
- Tracked activity types include: Email Sent / Opened / Clicked, Form Submitted, Tag Added/Removed, List Added/Removed, Contact Created/Updated, Note Added/Updated/Deleted, Purchase Completed/Cancelled/Refunded, Custom Field changes, and manually logged Custom Activities.
- Each activity shows a colored icon, an activity label, a short description (e.g. campaign name, tag name), who triggered it (if applicable), and a relative timestamp – hover over it to see the full date and time.
- Activities load 15 at a time; click “Load More” to see older entries.
Filtering Activities
You can filter the activity timeline to quickly find specific events.
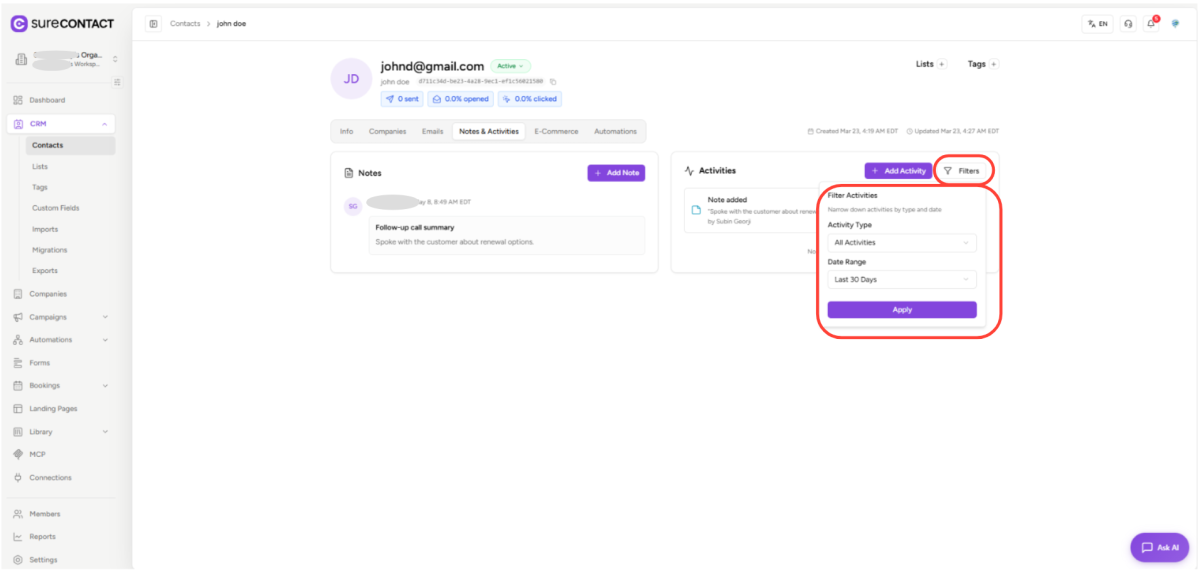
1. Open the Filters panel
- Click the “Filters” button in the top-right of the Activities section.
- A panel will appear with two filter options: Activity Type (filter by a specific event type or view All) and Date Range (Last 7 Days, Last 30 Days (default), Last 90 Days, All Time, or a Custom date range).
2. Apply or clear filters
- Click “Apply” to filter the activity list, or “Clear” to reset back to defaults.
- When an active filter is applied, a dot indicator appears on the Filters button so you always know filtering is active.
Adding a Note
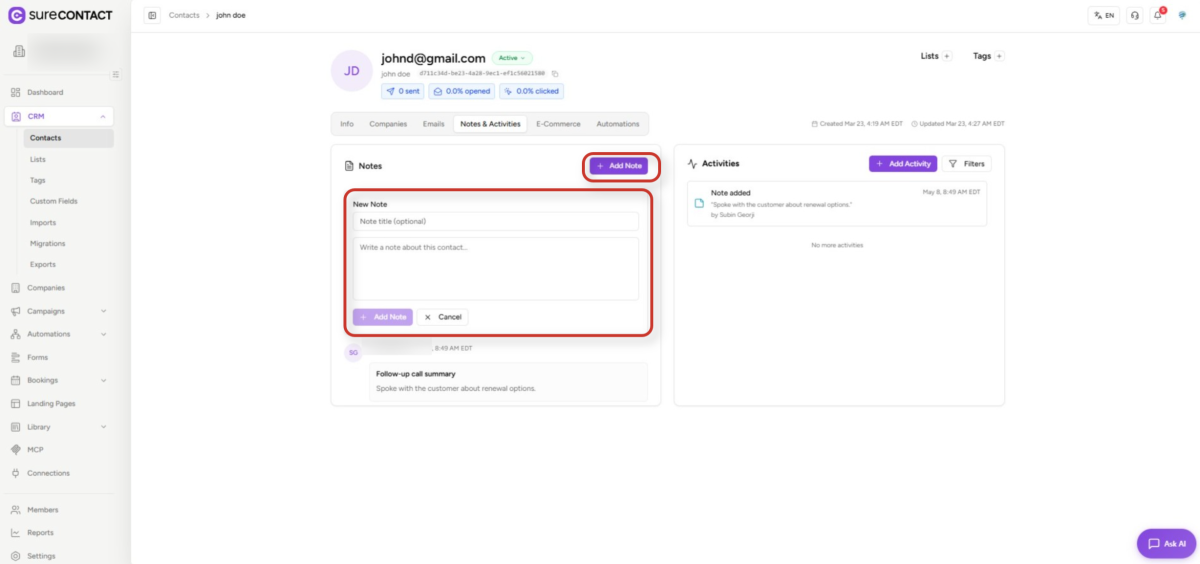
1. Click “Add Note”
- Click the “Add Note” button in the Notes section (left column).
- A form will appear with two fields: an optional Note Name and a required Description.
2. Save the note
- Enter the note details and click “Add Note” to save.
- The note will appear at the top of the list immediately.
Adding a Manual Activity
You can manually log custom activities such as calls, meetings, or follow-ups to keep a complete record of contact interactions.
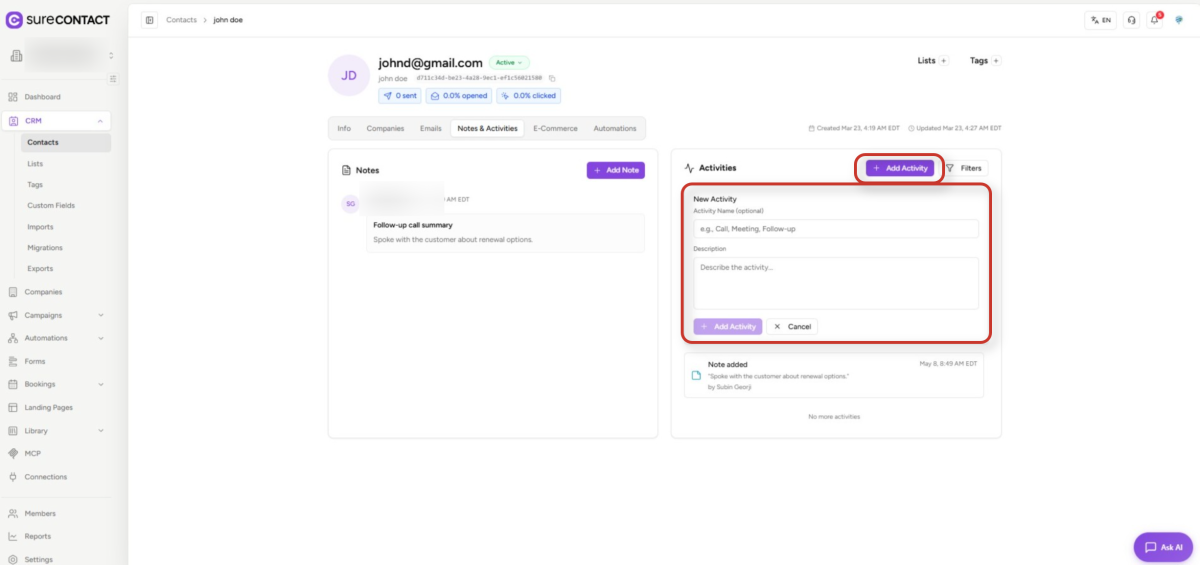
1. Click “Add Activity”
- Click the “Add Activity” button in the Activities section (right column).
- A form will appear with an optional Activity Name (e.g. “Call”, “Meeting”, “Follow-up”) and a required Description.
2. Save the activity
- Fill in the details and click “Add Activity”.
- A success notification confirms the entry, and the activity list refreshes automatically, showing your new entry at the top.
Emails Tab
The Emails tab shows the full email history for this contact, including both campaign emails and direct sends.
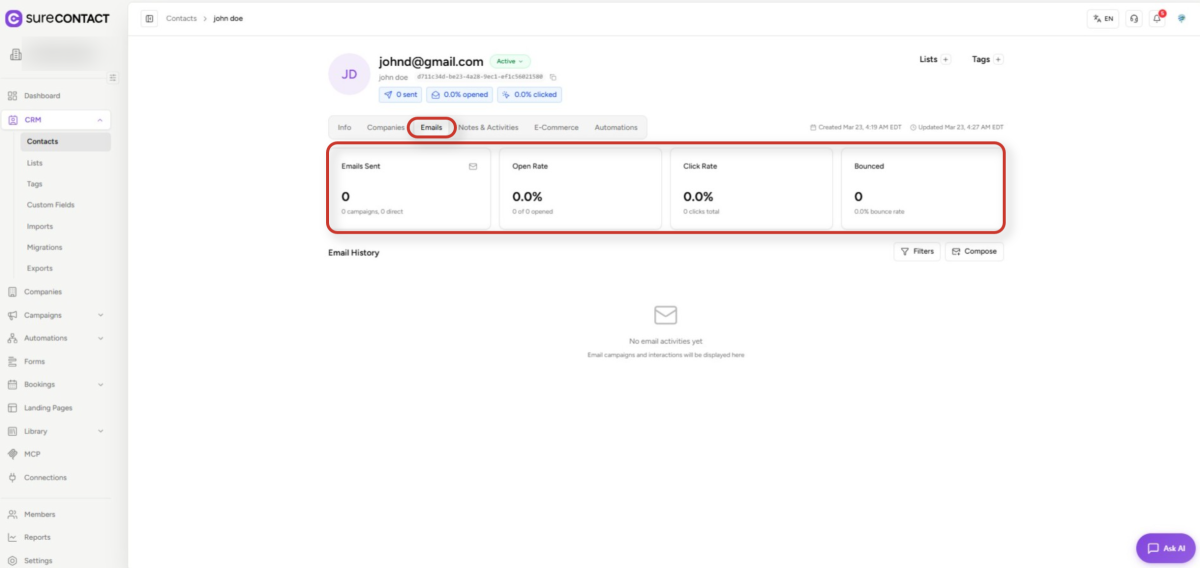
1. Review the stats cards
- At the top of the tab, four stat cards display: Emails Sent (total count, broken down by campaigns vs. direct emails), Open Rate (percentage + how many emails were opened), Click Rate (percentage + total clicks – click it to see which links were clicked and how many times), and Bounced (count and bounce rate).
2. Review the email history table
- The table lists every email sent to this contact with three columns: Status (Sent in blue, Opened in green, Clicked in purple), Subject (the email subject line), and Time (relative timestamp – hover for the full date and time).
3. Filter and compose
- Use the same Filters panel as Activities to filter by email event type and date range.
- Click “Compose” (top-right) to send a direct email to this contact without leaving the profile view.
E-Commerce Tab
The E-Commerce tab shows the contact’s complete purchase history, including order stats and line-item details.
1. Review the purchase stats
- Four stat cards appear at the top: Total Purchases (total number of orders), Total Spent (sum of all purchase amounts), Average Order Value (mean order value), and Last Purchase (date of the most recent purchase).
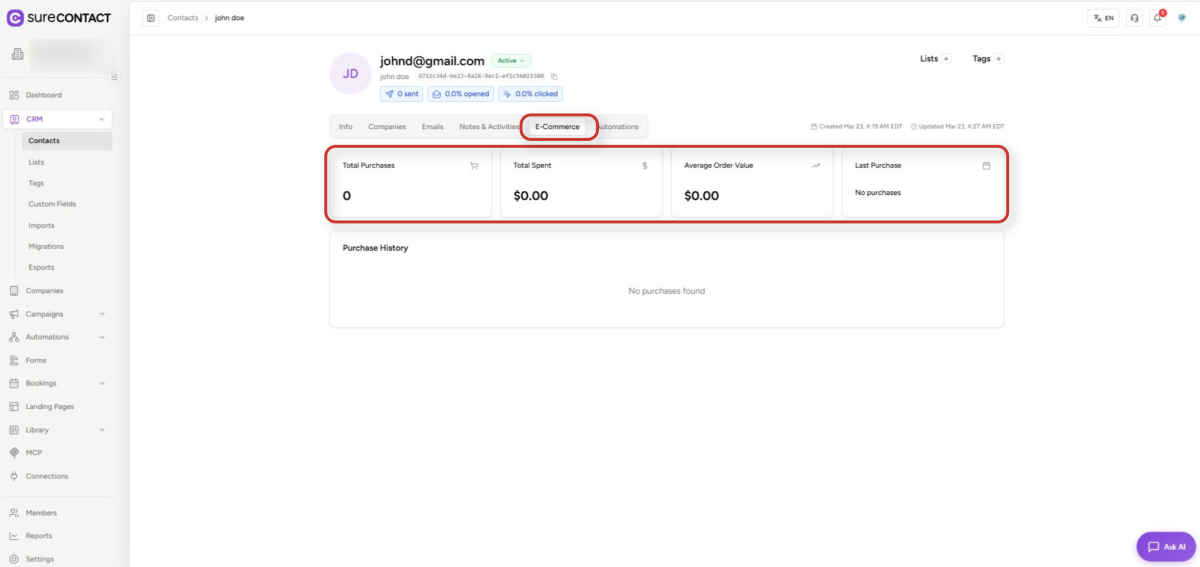
2. Review the purchase history table
- The table shows all orders with these columns: Order ID (source order ID), Date (purchase date; also shows cancellation or refund date if applicable), Total (order total with currency; shipping shown separately if applicable), Status (Completed in green, Pending in yellow, Cancelled in red, Refunded in gray), and Source (e.g. WordPress, Shopify, API, Manual).
3. Expand an order to see products
- Click the arrow on any order row to expand it and view the individual products in that order.
- Each product shows: product name, product ID, quantity, and unit price.
4. Pagination
- The table shows 25 purchases per page by default. You can switch to 10, 25, 50, or 100 per page and use Previous/Next to navigate.
Key Notes
A few things to keep in mind when working with contact profiles:
- There is no individual export option for activities or purchase history – contacts can be exported in bulk from the main Contacts list.
- All timestamps display as relative time (e.g., “3 days ago”) – hover over any timestamp to see the full date and time.
- On mobile, the profile tabs switch to a dropdown selector, and all columns stack vertically.
- Your browser’s back and forward buttons work to navigate between tabs within a contact profile.
Need Help?
If you need any assistance, please email [email protected], and our support team will be happy to help you.
We don't respond to the article feedback, we use it to improve our support content.