
- Introduction to SureContact Dashboard
- How to Install and Connect the SureContact WordPress Plugin
- What Do Contact Fields Mean in the SureContact WordPress Plugin
- How to Invite Members to a Workspace in SureContact
- How to Switch Organizations in SureContact
- Workspace-Level Contact Allocation in SureContact
- Workspace-Level Timezone Settings in SureContact
- How to Add a Custom Tracking Domain in a Workspace in SureContact
- SureContact MCP Server
- Creating Forms in SureContact
- Setup SMTP in SureContact
- Email Campaigns in SureContact
- How to Add a Preferences URL in Your Emails
- How to Share Email Templates in SureContact
- Spintax Feature in SureContact
- Deleting Sent Campaigns in SureContact
- A/B Testing Integration Guide
- Unsubscription Guide
- SureContact SMTP Setup Guide
- SMTP Routing User Flow
- Gradual Send Feature Guide
- Reusable Email Templates Guide
- Conditional Blocks Guide
- Scheduling vs. Sending Immediately Emails in SureContact
- Campaign Analytics Guide
- Email Tracking Opens Clicks SureContact
- SureContact Email Template Library Guide
- Sending Domains Subdomain vs Root Domain Guide
- DMARC Setup Guide
- Warming Up a New Sending Domain
- How to Add an Unsubscribe Link in Your Emails
- Analyzing a Campaign with AI (Spam & Ethics Check)
- FluentCRM Integration with SureContact
- SureContact Third-Party Integration — Step-by-Step Guide
- Fluent Forms Integration with SureContact
- SureForms Integration with SureContact
- WPForms Integration with SureContact
- Bulk Sync WordPress Users to SureContact
- Contact Form 7 Integration with SureContact
- Sync WooCommerce Customers with SureContact
Campaign Analytics Guide
SureContact tracks how recipients interact with every campaign you send. For each campaign, you can see how many contacts opened the email, clicked links, and unsubscribed, along with a breakdown of which specific links were clicked and who unsubscribed and why.
This guide walks through the campaign analytics features: where to find them, how to read the metrics cards, how to view click and unsubscribe details, how to filter contacts by engagement, and how to use workspace-wide reports.
How to View Campaign Analytics
Campaign analytics are available directly from any sent campaign’s detail page.
1. Open the Email Campaigns list
- In the left sidebar, click Campaigns, then select Email Campaigns.
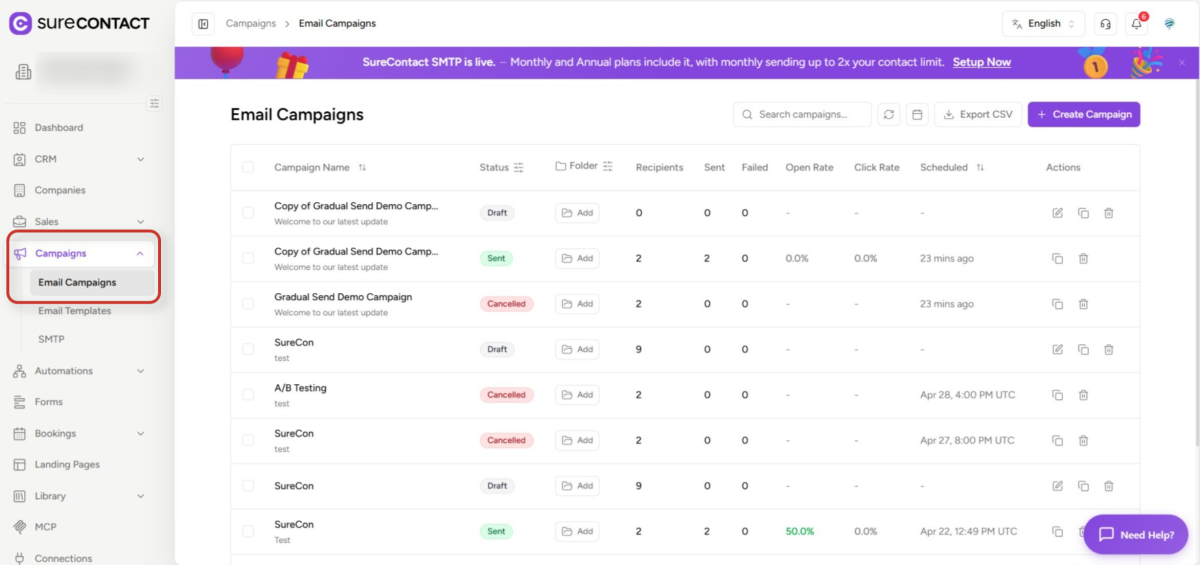
- The campaign list shows all campaigns with their status, recipients, open rate, and click rate.
2. Open a sent campaign
- Find the campaign you want to review – look for a Sent status badge.
- Click the campaign name to open its detail page.
3. View the metrics cards
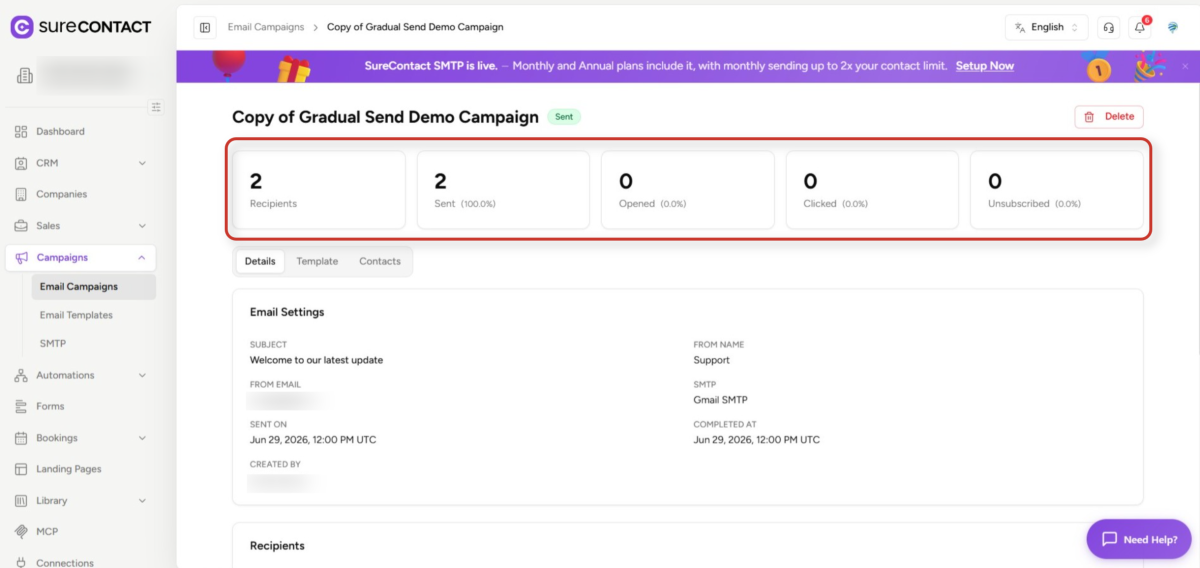
- The campaign detail page opens, showing the metrics cards at the top.
- Scroll down past the header if needed: the cards appear directly below the campaign name.
Understanding the Metrics Cards
The metrics cards provide a summary of campaign performance. Depending on which tracking options were enabled when the campaign was created, you will see some or all of the following:
Recipients
- Total number of contacts the campaign was sent to. Always shown.
Sent
- Number of emails successfully delivered, shown with a percentage of total recipients. Always shown.
Opened
- Number of contacts who opened the email, plus the open rate (%). Only shown if open tracking was enabled.
Clicked
- Number of contacts who clicked at least one link, plus the click rate (%). Only shown if click tracking was enabled.
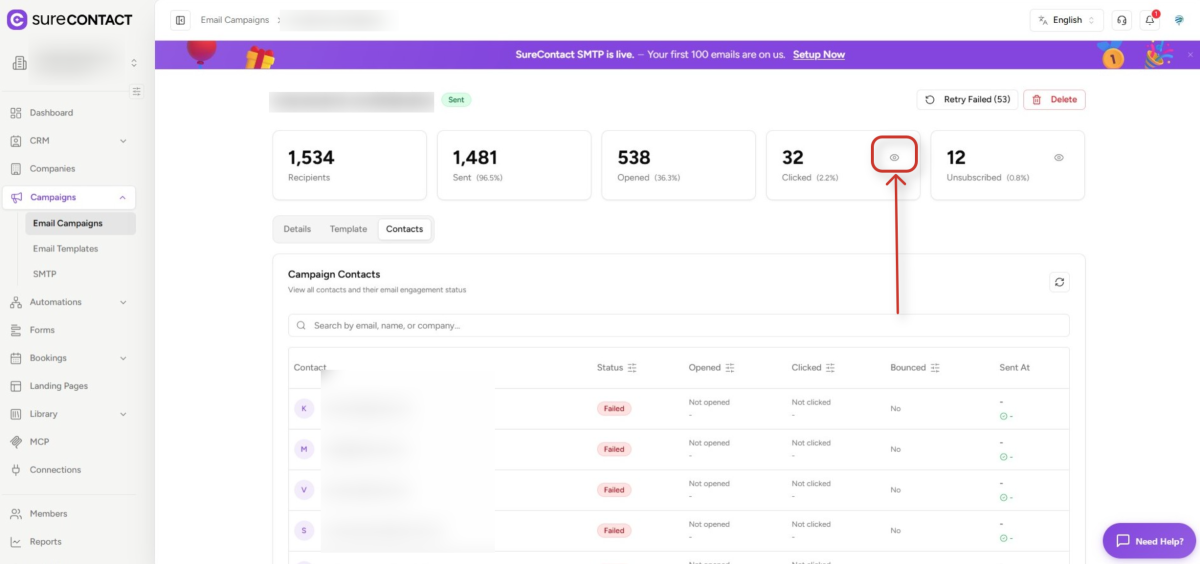
- An eye icon appears on this card: click it to see which specific links were clicked.
Unsubscribed
- Number of contacts who unsubscribed from this campaign, plus the unsubscribe rate (%). Always shown.
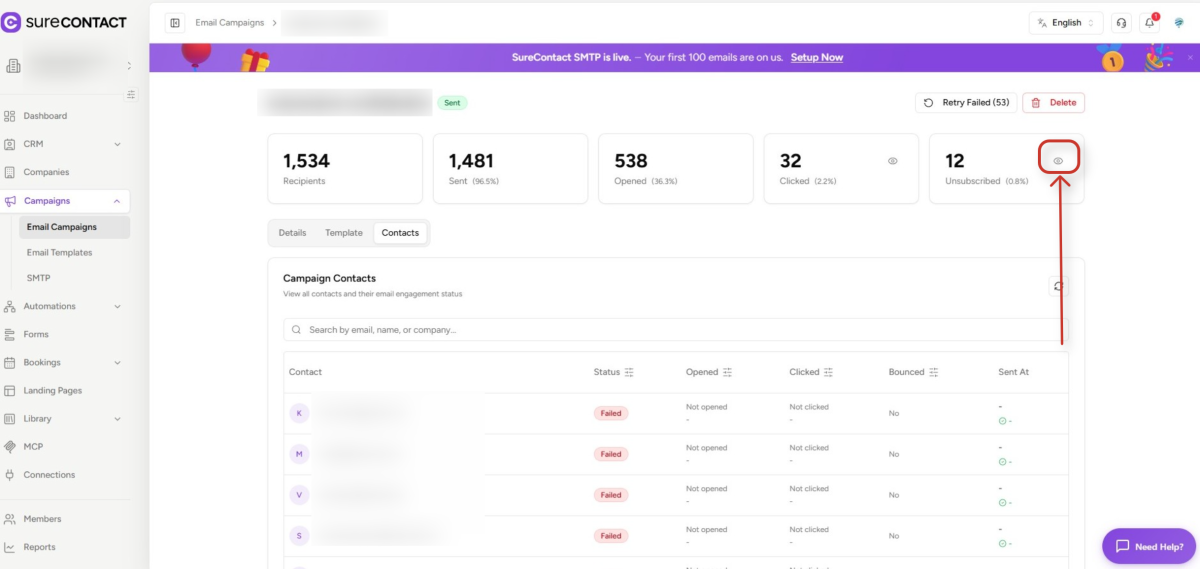
- An eye icon appears on this card: click it to see who unsubscribed and their reason.
Viewing Link Click Details
To see which specific links were clicked in your campaign:
1. Locate the Clicked metrics card
- On the campaign detail page, find the Clicked card in the metrics row.
2. Click the eye icon
- Click the eye icon (👁) in the top-right corner of the Clicked card.
- A dialog opens showing a table of all tracked links.
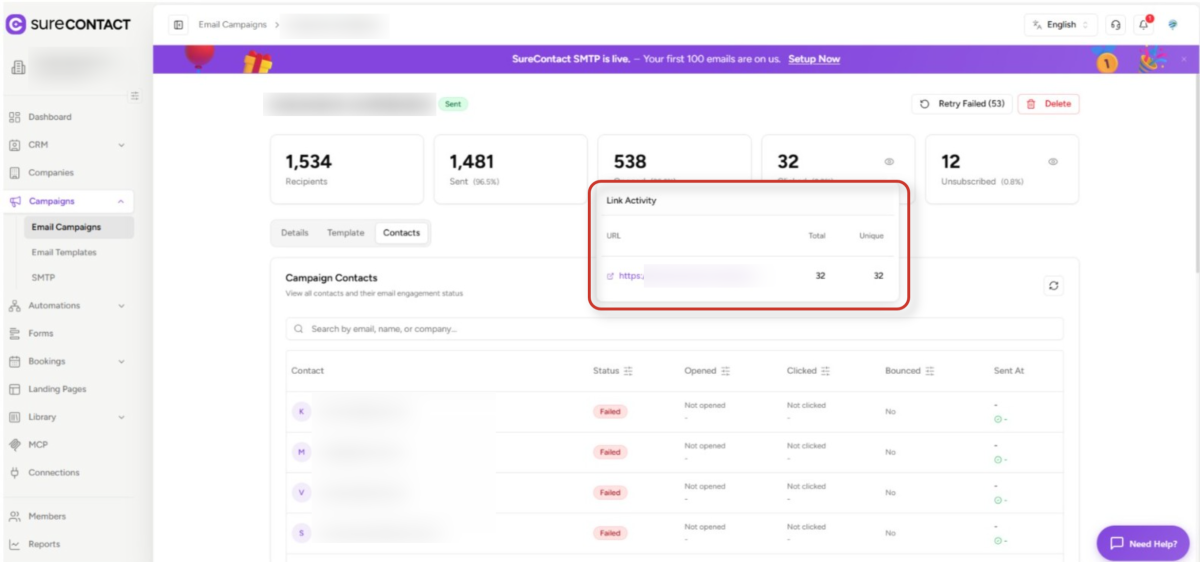
3. Read the link click table
- URL – the destination link that was clicked.
- Total Clicks – total number of times that link was clicked (includes multiple clicks by the same person).
- Unique – number of distinct contacts who clicked that link (counted once per person).
Viewing Unsubscribe Details
To see who unsubscribed from your campaign and why:
1. Locate the Unsubscribed metrics card
- On the campaign detail page, find the Unsubscribed card.
2. Click the eye icon
- Click the eye icon in the top-right corner of the Unsubscribed card.
- A dialog opens showing a table of contacts who unsubscribed.
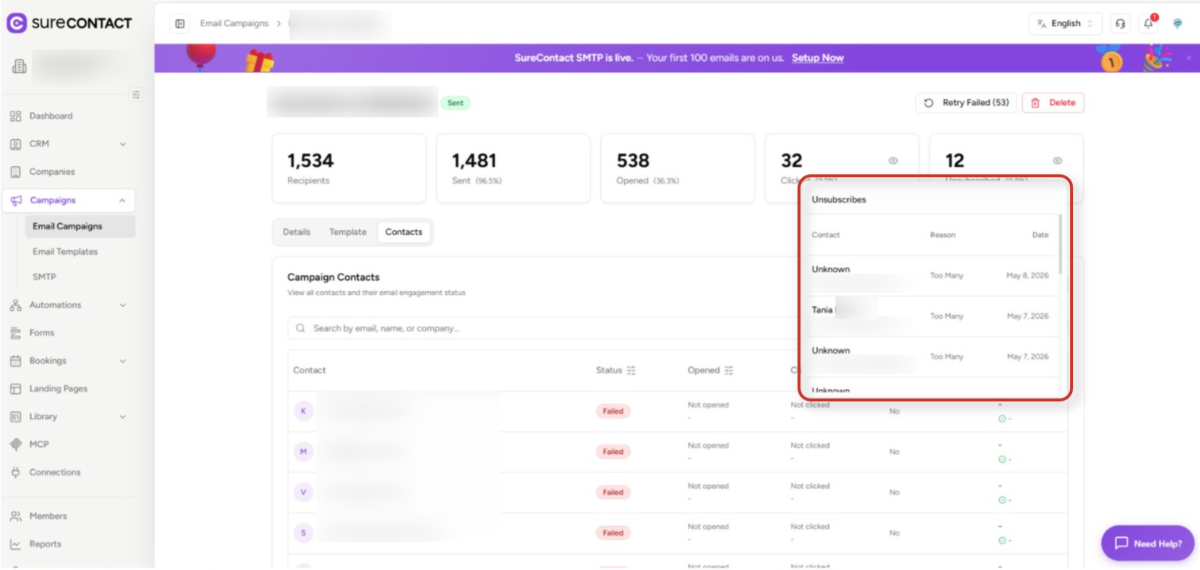
3. Read the unsubscribe table
- Contact – the contact’s name and email address.
- Reason – the reason they selected when unsubscribing (optional, selected by the contact).
- Date – the date and time they unsubscribed.
Filtering Campaign Contacts by Engagement
You can drill into exactly which contacts opened, clicked, bounced, or unsubscribed using the Contacts tab on the campaign detail page.
1. Open the Contacts tab
- On the campaign detail page, click the Contacts tab (next to Details and Template).
- The Campaign Contacts table loads, showing all contacts who received this campaign.
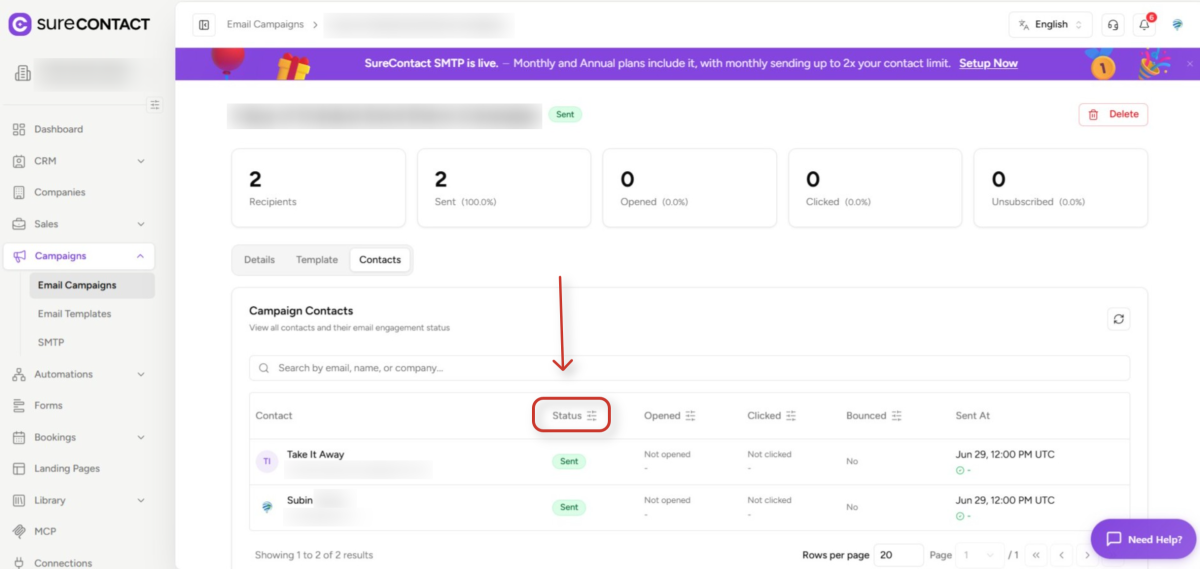
2. Filter the contact list
- Use the filter icon (≡) next to each column header to filter by that column’s values.
- Status – filter by: Sent, Pending, Bounced, Failed, Unsubscribed.
- Opened – filter by: Yes / No.
- Clicked – filter by: Yes / No.
- Bounced – filter by: Yes / No.
- For A/B test campaigns, a Variant column also appears – filter by variant A, B, C, D, or E.
3. Search contacts
- Use the search bar at the top to search by name, email, or company.
4. Browse results
- Use the pagination controls at the bottom to navigate through results.
- The default view shows 20 contacts per page.
Workspace-Wide Reports
For analytics across all campaigns over a time period, use the Reports section:
1. Open Reports
- In the left sidebar, click Reports.
2. Set the date range and grouping
- Use the Date Range dropdown to choose a preset (Today, Yesterday, Last 7 days, Last 30 days, Last 90 days, Last 12 months) or select a custom date range.
- Optionally set a comparison period using Compare With (Previous period, Previous month, Previous year, or Custom).
- Use the Group By dropdown to aggregate data by Day, Week, or Month.
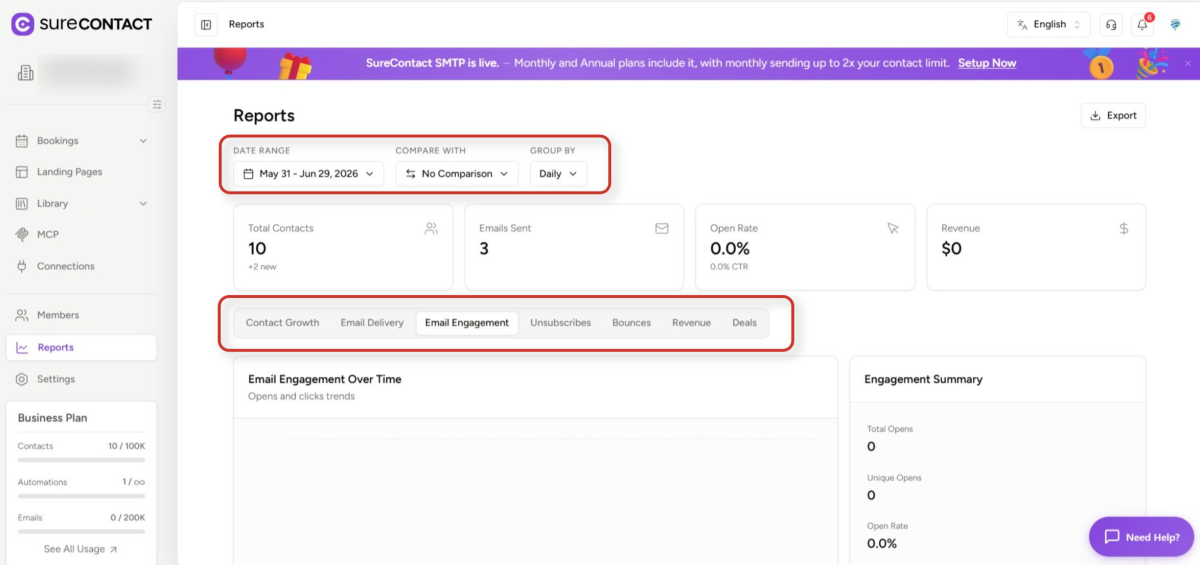
3. Select a report tab
- Contact Growth – new contacts added over time.
- Email Delivery – volume of emails sent over time.
- Email Engagement – opens and clicks over time across all campaigns.
- Unsubscribes – unsubscribe trends over time.
- Bounces – bounce rates over time.
- Revenue – revenue data (for e-commerce integrations).
4. Export report data
- Click the Export button in the top-right corner of the Reports page.
- Choose CSV or Excel (XLSX) format.
- The file downloads with data matching your current filters and date range.
UTM Parameters
If UTM parameters were configured when the campaign was created, they appear in the Campaign Settings section of the campaign detail page. Parameters (utm_source, utm_medium, utm_campaign, utm_term, utm_content) are appended to all tracked links, allowing you to attribute traffic from this campaign in external analytics tools like Google Analytics.
Common Issues
Open rate is 0% or very low
- Recipients’ email clients may be blocking the tracking pixel (image blocking). This is common with Apple Mail’s privacy protection feature.
Click tracking not recording
- Click tracking may have been disabled when the campaign was created, or the tracking domain is not configured correctly.
Unsubscribe link not working
- The tracking token associated with that email may have expired or been removed.
A contact unsubscribed but is still receiving emails
- Check the contact’s status on their profile page: it should show Unsubscribed. If it does not, contact support.
Cannot see the Opened or Clicked cards
- These cards only appear when the respective tracking options were enabled before the campaign was sent. Tracking cannot be added retroactively.
Need Help?
If you need any assistance, please email [email protected], and our support team will be happy to help you.
We don't respond to the article feedback, we use it to improve our support content.